SPLA/en: Unterschied zwischen den Versionen
Die Seite wurde neu angelegt: „=== Microsoft Project ===“ |
Keine Bearbeitungszusammenfassung |
||
| (46 dazwischenliegende Versionen von 2 Benutzern werden nicht angezeigt) | |||
| Zeile 1: | Zeile 1: | ||
<languages/> | |||
Note: The following information is for guidance only.<br> | |||
The current <b>Service Provider Use Rights (SPUR)</b> are authoritative and can be viewed here:<br> | |||
[https://www.microsoft.com/licensing/spur '''Service Provider Use Rights''']<br> | |||
<br> | |||
SPLA stands for Service Provider License Agreement. <br> | SPLA stands for Service Provider License Agreement. <br> | ||
It is a special | It is a special type of license that allows you to rent software licenses and legally sublicense them. <br> | ||
SPLA | SPLA enables you to bill Microsoft product licenses on a monthly basis – only for the services offered to the customer in the respective month.<br> | ||
<br> | <br> | ||
General | General Contact SPLA<br> | ||
Email: | Email: SPLA@Wortmann.de<br> | ||
Phone: +49 (0) 5744 944 - 254<br> | |||
<br /> | <br /> | ||
== Microsoft SPLA (Services Provider License Agreement) == | == Microsoft SPLA (Services Provider License Agreement) == | ||
| Zeile 35: | Zeile 40: | ||
== Become a SPLA contractual partner or obtain it conveniently via the TERRA CLOUD Center == | == Become a SPLA contractual partner or obtain it conveniently via the TERRA CLOUD Center == | ||
Wortmann AG offers you two | Wortmann AG offers you two ways to obtain SPLA licenses. You can decide which one you prefer.<br> | ||
<br> | |||
You can purchase SPLA licenses directly in the TERRA CLOUD Center, for example, when configuring a virtual machine.<br> | |||
For hosting and IaaS, we offer all SPLA licenses currently provided by Microsoft. In Germany, it is only possible to book licenses of this type without an SPLA agreement with Telekom AG and Wortmann AG.<br> | |||
Billing is done via the TERRA CLOUD invoice.<br> | |||
<br> | <br> | ||
If you would like to rent/lease SPLA licenses outside of TERRA CLOUD, directly with the end customer, and even more flexibly on a monthly basis, you can become an SPLA partner with Wortmann AG.<br> | |||
You will receive access to all currently available SPLA licenses from Microsoft via the Microsoft Admin Center (MAC). | |||
<br> | <br> | ||
With this option, you are responsible for reporting to Wortmann AG monthly which licenses you are using or leasing.<br> We will review the report for any obvious licensing errors and resolve them together before submitting the report to the manufacturer.<br> | |||
With this option, you | |||
<span id="SPLA_Lizenzierung"></span> | <span id="SPLA_Lizenzierung"></span> | ||
== SPLA licensing == | == SPLA licensing == | ||
| Zeile 51: | Zeile 56: | ||
=== User CAL's or SAL's === | === User CAL's or SAL's === | ||
User CALs as you know them do not exist in | The classic User CALs, as you might know them from local environments, do not exist in the SPLA program for Windows Server.<br> | ||
Instead, SPLA licensing uses '''Subscriber Access Licenses (SALs)'''. For example, with '''Exchange Servers''' or '''SQL Servers''', you only need to license the users who actually access the server or would have access.<br> | |||
If this VM is a | If this VM is a '''Terminal Server environment''', you only need to consider '''RDS SALs'''. These are still available.<br /> | ||
<br /> | |||
== Installation == | == Installation == | ||
Applies to all SPLA licenses (except RDS users): <br> | Applies to all SPLA licenses (except RDS users and Office): <br> | ||
The installation files are available in ISO format on our ''''FTP server (ftp44.terracloud.de)'''. Please note that you only have explicit access to this server within our data center. No login credentials are required to access the server. You can download the corresponding ISO file here and then run the setup EXE from the ISO.<br> | |||
<br> | |||
<b>Note:<br></b> | |||
Our FTP server requires a connection with a certificate and explicit TLS.<br> | |||
Therefore, connecting via File Explorer will not work. We can recommend the FileZilla tool instead.<br> | |||
<br> If you experience DNS problems when establishing a connection, you can also access the FTP44 server via its IP address: 185.35.12.116.<br> | |||
Please note, however, that the IP address can change at any time, so we recommend using the DNS name whenever possible.<br> | |||
<br> | |||
Installation instructions: <br> | Installation instructions: <br> | ||
• [https://docs.microsoft.com/de-de/Exchange/plan-and-deploy/deploy-new-installations/deploy-new-installations?view=exchserver-2016 Exchange Server] <br> | |||
• [https://docs.microsoft.com/de-de/sql/database-engine/install-windows/install-sql-server?view=sql-server-2017 SQL Server]<br> | |||
• [https://docs.microsoft.com/de-de/sharepoint/install/install Sharepoint Server] | |||
<br /> | <br /> | ||
=== Microsoft Office === | |||
Starting with Office 2019, Microsoft no longer offers installation ISOs; instead, installation must be performed using the Microsoft Deployment Tool.<br> | |||
In the following example, we assume you want to install Office 2021.<br> | |||
However, you can also select any other version that suits your needs. | |||
<span id="Deployment_Tool_herunterladen"></span> | |||
==== Download Deployment Tool==== | |||
1. Download the Microsoft Deployment Tool:<br> | |||
https://www.microsoft.com/en-us/download/details.aspx?id=49117<br> | |||
<br> | |||
2. Extract the data to any location (e.g., C:\Program Files\Office 2021). | |||
<span id="Konfigurationsdatei_erstellen"></span> | |||
==== Create configuration file ==== | |||
1. Navigate to https://config.office.com/.<br> | |||
<br> | |||
2. Click on '''Create'''.<br> | |||
<br> | |||
[[Datei:1-SPLA-Office-DE-Konfig erstellen.png|border]]<br> | |||
<br> | |||
3. Select your desired architecture and the product you have subscribed to.<br> | |||
<br> | |||
[[Datei:2-SPLA-Office-DE-Architektur und Produkt auswählen.png|border]]<br> | |||
<br> | |||
4. Select your desired language.<br> | |||
<br> | |||
[[Datei:3-SPLA-Office-DE-Sprache auswählen.png|border]]<br> | |||
<br> | |||
5. Check the licensing settings.<br> | |||
<br> | |||
It is important that '''KMS''' is selected as the licensing method. is.<br> | |||
<br> | |||
[[Datei:4-SPLA-Office-DE-Lizensierungeinstellungen.png|border]]<br> | |||
<br> | |||
'''Note:'''<br> | |||
If you are unable to select KMS, check the selected Office version; the SPLA variant must not be selected here.<br> | |||
<br> | |||
6. Click "Export" and keep the current settings.<br> | |||
Next, you must accept the license terms and assign a name to the configuration.<br> | |||
You can then download it.<br> | |||
<br> | |||
7. Please save this configuration file in the same folder where you extracted the Deployment Tool.<br> | |||
[[Datei:5-SPLA-Office-DE-Speicherort.png|border]]<br> | |||
<span id="Installation_und_Aktivierung"></span> | |||
==== Installation and Activation ==== | |||
1. Open PowerShell with administrator privileges and navigate to the specified directory.<br> | |||
Example: cd "C:\Program Files\Office 2021"<br> | |||
[[Datei:6-SPLA-Office-DE-CMD1.png|border]]<br> | |||
<br> | |||
2. Now run the following command in PowerShell.<br> | |||
.\setup.exe /download configuration.xml<br> | |||
[[Datei:7-SPLA-Office-DE-CMD2.png|border]]<br> | |||
<br> Wait until the cursor in PowerShell moves to the next line.<br> | |||
This may take some time (approx. 2GB download).<br> | |||
<br> | |||
You can then install Office 2021 with the following command:<br> | |||
.\setup.exe /configure Configuration.xml<br> | |||
[[Datei:8-SPLA-Office-DE-CMD3.png|border]] | |||
<br> | |||
'''Note:'''<br> | |||
Please check the Microsoft installation requirements beforehand.<br> | |||
<br> | |||
After a short time, a window will open here where you can check the installation progress.<br> | |||
After installation, Office must be manually activated.<br> | |||
[[Datei:9-SPLA-Office-DE-Installation starten.png|border]]<br> | |||
<br> | |||
It must be ensured that our KMS server 185.35.12.116 is reachable via port 1688.<br> | |||
This can be tested with the following KMS commands in PowerShell with administrator privileges:<br> | |||
<code>Test-NetConnection 185.35.12.116 -Port 1688<br></code> | |||
The option "TcpTestSucceeded" must always return "True"; otherwise, the port is blocked.<br> | |||
<br> | |||
'''Activation:'''<br> | |||
<code>slmgr.vbs /skms 185.35.12.116:1688</code><br> | |||
<code>cd “C:\Program Files\Microsoft Office\Office2021\”<br></code> | |||
<code>cscript ospp.vbs /act<br></code> | |||
<span id="Lizensierung"></span> | <span id="Lizensierung"></span> | ||
== Licensing == | == Licensing == | ||
=== Microsoft | <span id="Microsoft_Windows_Server_und_VDIs"></span> | ||
=== Microsoft Windows Server and VDIs === | |||
To activate Microsoft Office Standard / Professional Plus, | This activation procedure <b>only</b> works for Windows systems that are running in our cloud.<br> | ||
[https://learn.microsoft.com/de-de/ | <br> | ||
<br / | '''Check port'''<br> | ||
<span id="Office-Varianten | Please first check whether the necessary TCP network port for Windows activation is open:<br> | ||
=== Office variants | <br> | ||
<code>Test-NetConnection 185.35.12.116 -port 1688</code><br> | |||
<br> | |||
If the result is True, activation can be carried out.<br> | |||
<br> | |||
'''Activation'''<br> | |||
To activate, please use the following commands:<br> | |||
<br> | |||
<code>slmgr.vbs /skms 185.35.12.116:1688 </code> <br> | |||
<code>slmgr.vbs /ato </code><br> | |||
<br> | |||
If an error message occurs with the above commands, please use the following commands:<br> | |||
<br> | |||
<code> slmgr.vbs /upk </code><br> | |||
<code> slmgr.vbs /ipk WINDOWS_KEY </code><br> | |||
<code> slmgr.vbs /skms 185.35.12.116:1688 </code><br> | |||
<code> slmgr.vbs /ato </code> <br> | |||
<br> | |||
You can find the appropriate <code>WINDOWS_KEY</code> [https://learn.microsoft.com/de-de/windows-server/get-started/kms-client-activation-keys here].<br> | |||
<br> | |||
=== Microsoft Office Standard / Professional Plus (SPLA) === | |||
In the TERRA CLOUD Center, Office licenses from the Microsoft SPLA program can be purchased for installation and licensing in an IaaS virtual machine or a hosting scenario.<br> | |||
<br> | |||
Through the SPLA (Service Provider License Agreement) program, all Office versions still supported by Microsoft can be installed and licensed. The SPLA license is version-independent and therefore covers all Office versions (e.g., Office 2016, 2019, 2021, or LTSC 2024).<br> | |||
<br> | |||
'''Support Matrix for Office and Windows Configuration'''<br> | |||
[https://learn.microsoft.com/de-de/lifecycle/office-windows-configuration-matrix Full Configuration Support – End Dates]<br> | |||
<br> | |||
Older versions, such as... B. "Office 2016", can still be downloaded via our "FTP server", but is "no longer supported by Microsoft": [ftp://ftp44.terracloud.de/ '''ftp://ftp44.terracloud.de/''']<br> | |||
''Access from the cloud network via VPN or directly via a VM | |||
''<br><br> | |||
Microsoft Office Standard or Professional Plus is installed using the "Microsoft Office Deployment Tool" and a configuration file, which you create via [https://config.office.com/ '''config.office.com'''].<br> | |||
<br> | |||
'''Steps at a Glance''' | |||
# Download the Office Deployment Tool: [https://www.microsoft.com/en-us/download/details.aspx?id=49117 '''Office Deployment Tool'''] | |||
# Extract the files to any location (e.g., C:\Program Files\Office2024) | |||
# Configuration Create in the Office configuration portal: | |||
## Select architecture (x64 or x86) and the subscribed Office product | |||
## Select language | |||
## Select licensing method: KMS | |||
## Export the configuration file and save it in the same folder as the deployment tool | |||
# Start installation via PowerShell: | |||
## Open PowerShell with administrator privileges and navigate to the directory | |||
## Download the installation files: .\setup.exe /download configuration.xml | |||
## Start installation: .\setup.exe /configure configuration.xml | |||
# After installation, activate Office via the TERRA CLOUD KMS server. Please ensure that the server is accessible. | |||
<br> | |||
'''Further Information'''<br> | |||
For the latest information on deploying Microsoft Office LTSC 2024, please visit Microsoft directly: | |||
[https://learn.microsoft.com/de-de/office/ltsc/2024/deploy '''Deploy Office''']<br> | |||
<br> | |||
'''Summary''' | |||
* SPLA license = version-independent (all supported versions) | |||
* Installation via the Deployment Tool and [https://config.office.com/ '''config.office.com'''] | |||
* Activation is done via KMS through the TERRA CLOUD KMS server | |||
* Discontinued versions (e.g., Office 2016) are still available via FTP44 | |||
<span id="Office-Varianten"></span> | |||
=== Office variants === | |||
'''Standard''' <br> | '''Standard''' <br> | ||
The following programs and apps are included in an Office Standard license:<br> | |||
Word, Excel, PowerPoint, OneNote, Outlook, Publisher, Office Web Apps <br><br> | Word, Excel, PowerPoint, OneNote, Outlook, Publisher, Office Web Apps <br><br> | ||
'''Standard / Professional Plus''' <br> | '''Standard / Professional Plus''' <br> | ||
The following programs and apps are included in an Office Standard Plus license:<br> | |||
Word, Excel, PowerPoint, OneNote, Outlook, Publisher, Office Web Apps, <span style="Color:green">Access, InfoPath, Skype for Business</span> <br> | Word, Excel, PowerPoint, OneNote, Outlook, Publisher, Office Web Apps, <span style="Color:green">Access, InfoPath, Skype for Business / Teams</span> <br> | ||
<br /> | <br /> | ||
=== Microsoft Project === | === Microsoft Project === | ||
| Zeile 90: | Zeile 237: | ||
To activate Microsoft Visio, run the Powershell commands that you received from us in the deployment email. Activation takes place via our KMS server. | To activate Microsoft Visio, run the Powershell commands that you received from us in the deployment email. Activation takes place via our KMS server. | ||
<br /> | <br /> | ||
<span id="Microsoft_Exchange_Server"></span> | |||
=== Microsoft Exchange === | === Microsoft Exchange === | ||
To activate your Exchange server, a TeamViewer remote session is required.<br> | |||
<br | Therefore, please install the Exchange server and prepare TeamViewer on the server.<br> | ||
Then please contact Terra Cloud Support by phone: +49 (0) 5744 944 - 850.<br> | |||
They will then perform the Exchange server activation. | |||
=== Microsoft SQL Server === | === Microsoft SQL Server === | ||
| Zeile 101: | Zeile 251: | ||
To activate RDS licenses, a license server ID is required to create a license package ID. | To activate RDS licenses, a license server ID is required to create a license package ID. | ||
Further information on the subject of RDS licenses can be found [[SPLA# | Further information on the subject of RDS licenses can be found [[SPLA/en#Remote_Desktop_Server_Activation|here]]. | ||
<br /> | <br /> | ||
=== SharePoint === | <span id="SharePoint_Server"></span> | ||
=== SharePoint Server=== | |||
After completing the setup, you will be asked to enter a product key, which you will receive from Terra Cloud Support upon request. | After completing the setup, you will be asked to enter a product key, which you will receive from Terra Cloud Support upon request. | ||
| Zeile 113: | Zeile 264: | ||
== Requirement == | == Requirement == | ||
A Terminal Server Remote Desktop Service - Subscriber Access License (RDS-SAL) is required if RDS functions are used directly or indirectly.<br> | |||
This includes functions and services that are used with the Remote Desktop Services role activated:<br> | |||
• Remote Desktop Gateway<br> | |||
• Remote Desktop Gateway<br> | • RemoteApp Network Software<br> | ||
• RemoteApp Network Software<br> | • Remote Desktop Web Access<br> | ||
• Remote Desktop Web Access<br> | • Remote Web Access<br> | ||
• Remote Web Access<br> | • Remote Desktop Connection Broker<br> | ||
• Remote Desktop Connection Broker<br> | • Remote Desktop Session Host<br> | ||
• Remote Desktop Session Host<br> | • Remote Desktop Virtualization Host<br> | ||
• Remote Desktop Virtualization Host<br> | • RemoteFX<br> | ||
• RemoteFX<br> | In order to technically determine whether one of these functions is being used, you can check in Windows Server which features and roles are installed:<br> | ||
[[File:Serverrollen.png|border]]<br> | |||
[[ | |||
<br> | <br> | ||
[[ | [[File:Rollendienste.png|border]]<br> | ||
<br> | <br> | ||
Other products such as VMWare or Citrix also require an RDS CAL if they use these above-mentioned functions.<br> | |||
Sample hostnames have been used in the following document, this may differ from your deployed environment.<br> | |||
< | <span id="Aktivierung_RDS_für_SPLA_Vertrags-Partner"></span> | ||
== Activation RDS for SPLA contract partners== | |||
== | |||
< | <span id="Einleitung"></span> | ||
=== | ===Introduction=== | ||
Activating Terminal Server Remote Desktop Service - Subscriber Access Licenses (RDS-SALs) as an SPLA contract partner is a crucial step in offering Microsoft Terminal Server services in a hosting environment.<br> | |||
This wiki entry provides detailed instructions for SPLA contract partners on how to activate RDS-SALs and correctly record them in their monthly SPLA reporting.<br> | |||
<p style="color: red"> | |||
</ | <b>'''Important:'''</p> | ||
< | These instructions assume that you are a SPLA contract partner with Microsoft and have your own SPLA contract number.<br> | ||
=== | If you use the SPLA services via the Terra Cloud, please use the following instructions: [[https://wiki.terracloud.de/index.php/SPLA/en#Activation_of_RDS_for_non-SPLA_contract_partners_(when_booking_via_the_Terra_Cloud) Link]] | ||
.</b><br> | |||
<span id="Schritte_zur_Aktivierung_von_Terminal-Server_RDS-SALs"></span> | |||
===Steps for Activating Terminal Server RDS SALs=== | |||
;1. SPLA contract number: | |||
;1. SPLA | :As an SPLA contract partner, you have a unique SPLA contract number that is used for licensing and billing. Make sure you have this number handy. | ||
: | ;2. Activate terminal server role: | ||
;2. | :Log in to the Terminal Server host and open the Server Manager application. Navigate to "Roles" and "Capabilities" and select the Terminal Server role to activate. | ||
: | ;3. Entering the SPLA contract number: | ||
;3. | :In the Terminal Server role activation process, you will be asked to enter your SPLA contract number. Make sure this number is entered correctly and without errors as it is used to identify your contract and associated RDS SALs. | ||
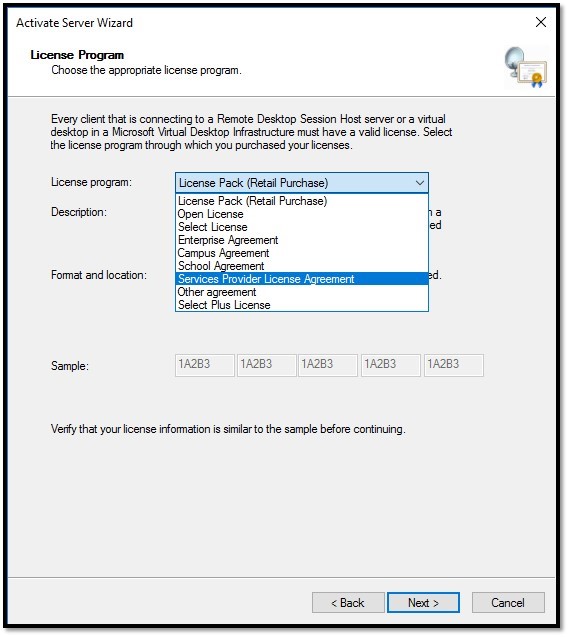
: | ;4. Select Services Provider License Agreement (SPLA): | ||
;4. Services Provider License Agreement (SPLA) | :Select the "Services Provider License Agreement" option during the activation process. This is required to activate the RDS SALs as SPLA contractors. | ||
: | ;5. Confirmation and completion: | ||
;5. | :After you have made your SPLA contract number and SPLA contract selection, click "Next" and follow the instructions to complete the activation process. | ||
: | ;6. License activation: | ||
;6. | :After successful activation of the terminal server role, the RDS SALs are activated on the corresponding terminal server and ready for use. | ||
: | ;7. Monthly SPLA reporting: | ||
;7. | :As a SPLA contractual partner, you are obliged to correctly record and report the number of terminal server access licenses (RDS SALs) used in your monthly SPLA reporting. This is important in order to bill the license fees correctly. | ||
: | [[File:RDS.jpg|border|Wizard]] | ||
[[ | |||
<br> | <br> | ||
< | <span id="Zusammenfassung"></span> | ||
===Summary=== | |||
=== | |||
Activating Terminal Server RDS SALs as a SPLA contract partner requires entering your SPLA contract number during the Terminal Server role activation process.<br> | |||
Once activated, you must ensure that you document the RDS SALs used in your monthly SPLA reporting to properly meet legal requirements and billing.<br> | |||
This process is critical to legally offering and managing Microsoft Hosted Services. | |||
<span id="Aktivierung_unter_Windows_Server_2022"></span> | |||
</ | === Activation in Windows Server 2022 === | ||
== | |||
< | We have found a very good and detailed guide for Windows Server 2022 on the Internet, which we do not want to withhold from you:<br> | ||
== | [[https://spheremedia.de/windows-server-2022-terminalserver-einrichten-anleitung-einfach/windows-server/ Link]]<br> | ||
<br> | |||
'''Note:''' This link and its content are without guarantee.<br> | |||
<span id="Aktivierung_RDS_für_nicht_SPLA_Vertrags-Partner_(bei_Buchung_über_die_Terra_Cloud)"></span> | |||
== Activation of RDS for non-SPLA contract partners (when booking via the Terra Cloud)== | |||
< | <span id="Aktivierung_des_RDS_Server_Host"></span> | ||
=== Activation of the RDS Server Host === | |||
1. | |||
[[ | To activate Remote Desktop Services on a Windows Server, the following steps must be carried out. <br> | ||
1. Please start Server Manager. <br> | |||
[[File:ServerManager.png|border|Server Manager]] <br> | |||
<br> | <br> | ||
2. | 2. Then select Remote Desktop Services. <br> | ||
[[ | [[File:Remotedienste.png|border|Remote Desktop Services]] <br> | ||
<br> | <br> | ||
3. | 3. Select the Server sub-item and the installed RDS server will be displayed. <br> | ||
[[ | [[File:Installierte RDS-Serve.png|border|Installed RDS Servers]] <br> | ||
<br> | <br> | ||
4. | 4. Start the Remote Desktop Licensing Manager on the RDS server by right-clicking. <br> | ||
[[ | [[File:Kontextmenue.png|border|Contextmenu]] <br> | ||
<br> | <br> | ||
5. | 5. The licensing manager should look like this. <br> | ||
[[ | [[File:Remotedesktoplizensierungsmanager.png|Remote Desktop Licensing Manager]] <br> | ||
<br> | <br> | ||
6. Server | 6. Select Activate Server. <br> | ||
[[ | [[File:Server aktivieren.png|border|Activate Server]] <br> | ||
<br> | <br> | ||
7. | 7. The server activation wizard will start and continue with “Next”. <br> | ||
[[ | [[File:Serveraktivierungs-Assistent.png|border|Activate Server]] <br> | ||
<br> | <br> | ||
8. | 8. Preselected connection method “Automatic connection” must be selected and proceed with “Next”. <br> | ||
[[ | [[File:Automatische Verbindung.png|border|Automatic Connection]] <br> | ||
<br> | <br> | ||
9. | 9. Fill in company information on page 1 with data and continue with “Next”. <br> | ||
[[ | [[File:Firmeninformation.png|border|Enter company information]] <br> | ||
<br> | <br> | ||
10. | 10. Fill in company information on page 2 with data and continue with “Next”. <br> | ||
[[ | [[File:Firmeninformationen1.png|border|More company information]] <br> | ||
<br> | <br> | ||
11. | 11. Activation is carried out and ends with “Close” <br> | ||
[[ | [[File:Serveraktivierungsassistent.png|border|Finish]] <br> | ||
<br> | <br> | ||
[[ | [[File:Aktivierungsstatus.png|border|Overview]] <br> | ||
<br /> | <br /> | ||
< | <span id="Aktivierung_der_RDS_Server_CALs"></span> | ||
=== Activation of the RDS server CALs === | |||
=== | |||
To activate the User Access Licenses (User CALs), the connection method for server activation must be adjusted. The following steps are required: <br> | |||
<br> | |||
1. | <b>Note:</b><br> | ||
If the connection method is not changed here, the license key package ID you receive from us cannot be entered and activated.<br> | |||
<br> | |||
1. In the Licensing Manager, open the RDS Server properties and set the connection method to Web Browser, as shown below. <br> | |||
[[Datei:EigenschaftenRDSSRV.png|border|Eigenschaften]] <br> | [[Datei:EigenschaftenRDSSRV.png|border|Eigenschaften]] <br> | ||
<br> | <br> | ||
2. | 2. Now select Install Licenses. <br> | ||
[[Datei:Lizenzen installieren.png|border|Lizenzen installieren]] <br> | [[Datei:Lizenzen installieren.png|border|Lizenzen installieren]] <br> | ||
<br> | <br> | ||
3. | 3. The License Installation Wizard will now start. Continue by clicking "Next." <br> | ||
[[Datei:Lizenzinstallierungsassistent.png|border|Lizenzinstallierungsassistent]] <br> | [[Datei:Lizenzinstallierungsassistent.png|border|Lizenzinstallierungsassistent]] <br> | ||
<br> | <br> | ||
4. | 4. The license server ID will appear in the window shown below.<br> | ||
''''' | <br> | ||
Please send it to us in an informal email with the following subject to [mailto:support@terracloud.de support@terracloud.de]: <br> | |||
'''''"RDS Licenses Package Number/Order Number, Quantity X"''''' as well as the '''''License Server ID''''' and '''''RDS Server operating system used'''''.<br> | |||
<br> | |||
The team will create the necessary license key package ID. <br> | |||
<br> | |||
[[Datei:LizenzserverID.png|border|LizenzserverID]] <br> | [[Datei:LizenzserverID.png|border|LizenzserverID]] <br> | ||
<br> | <br> | ||
5. | 5. Enter the license key package ID received from the TERRACLOUD team in the fields and click "Next." <br> | ||
[[Datei:Lizenzschluesselpaket-ID.png|border|Lizenzschlüsselpaket-ID]] <br> | [[Datei:Lizenzschluesselpaket-ID.png|border|Lizenzschlüsselpaket-ID]] <br> | ||
<br> | <br> | ||
6. | 6. After successful license registration, the user access licenses are activated. <br> | ||
[[Datei:Zugriffslizenzen aktiviert.png|border|Zugriffslizenzen aktiviert]] <br> | [[Datei:Zugriffslizenzen aktiviert.png|border|Zugriffslizenzen aktiviert]] <br> | ||
<br> | <br> | ||
7. | 7. After successful activation, the activated user access licenses are displayed in the Licensing Manager. <br> | ||
[[Datei:Anzeige im Lizenzmanager.png|border|Anzeige im Lizenzmanager]] <br> | [[Datei:Anzeige im Lizenzmanager.png|border|Anzeige im Lizenzmanager]] <br> | ||
<br> | <br> | ||
If a "Per Device" RDS CAL is displayed here, please contact our support team. <br> | |||
<br> | <br> | ||
8. | 8. After the installation, two adjustments must be made, otherwise the license server will stop functioning after the 120-day grace period.<br> | ||
[[Datei:Lizenzierungsmodus konfigurieren.png|border|120 Tage Karenzzeit - Fehlende Konfiguration]]<br> | [[Datei:Lizenzierungsmodus konfigurieren.png|border|120 Tage Karenzzeit - Fehlende Konfiguration]]<br> | ||
<br> | <br> | ||
To do this, open the deployment properties:<br> | |||
[[Datei:Server Manager RDS.png|border|Bereitstellungseigenschaften im Server-Manager]]<br> | [[Datei:Server Manager RDS.png|border|Bereitstellungseigenschaften im Server-Manager]]<br> | ||
<br> | <br> | ||
There, enter the IP address of the license server and set the Remote Desktop licensing mode to "Per User".<br> | |||
In | In our example, the license server was installed on a separate server, so its IP address is entered accordingly.<br> | ||
[[Datei:Bereitstellung konfigurieren.png|border|Bereitstellung konfigurieren]]<br> | [[Datei:Bereitstellung konfigurieren.png|border|Bereitstellung konfigurieren]]<br> | ||
<br /> | <br /> | ||
</ | <span id="Aktivierung_unter_Windows_Server_2022"></span> | ||
=== Activation in Windows Server 2022 === | |||
We have found a very good and detailed guide for Windows Server 2022 on the Internet, which we do not want to withhold from you:<br> | |||
[[https://spheremedia.de/windows-server-2022-terminalserver-einrichten-anleitung-einfach/windows-server/ Link]]<br> | |||
<br> | |||
'''Note:''' This link and its content are without guarantee.<br> | |||
Aktuelle Version vom 3. Dezember 2025, 12:04 Uhr
Note: The following information is for guidance only.
The current Service Provider Use Rights (SPUR) are authoritative and can be viewed here:
Service Provider Use Rights
SPLA stands for Service Provider License Agreement.
It is a special type of license that allows you to rent software licenses and legally sublicense them.
SPLA enables you to bill Microsoft product licenses on a monthly basis – only for the services offered to the customer in the respective month.
General Contact SPLA
Email: SPLA@Wortmann.de
Phone: +49 (0) 5744 944 - 254
Microsoft SPLA (Services Provider License Agreement)
is a program for service providers and ISVs (Independent Software Vendors).
This program lets you license Microsoft products on a monthly basis - under a three-year contract - to host software services and applications for your customers.
SPLA offers a variety of hosting scenarios with which you can offer your customers highly individual and robust solutions.
Volume Licensing Customers can license their server applications on-premise and in the cloud.
The latter usually happens within the framework of a qualified shared hardware environment for the service provider's specific applications.
What is the difference between SPLA and the other Microsoft Volume Licensing programs?
Microsoft Volume Licensing Programs offer various licensing options for purchasing Microsoft software licenses for internal use.
Hosting providers who want to offer software services to their customers and who offer software licenses as part of their service offering should use SPLA.
Microsoft SPLA is the only Microsoft Volume Licensing program that allows you to use Microsoft products for commercial hosting.
SPLA offers you these advantages
- Customized Service: Get the flexibility to offer your customers customized IT services through a dedicated or shared hosting environment.
- "Pay as you go" without upfront payment: Only pay for the licenses you need each month for your software services. There are no upfront costs or long-term commitments.
- Access to the latest product versions: Provide your customers with the most current and powerful platform. Easily download your products for free from the Microsoft Volume Licensing Service Center (VLSC) instead of ordering physical media.
- Try before you buy: Test and evaluate products internally before offering them as a service to your customers.
- Install directly at the customer's site: Install Microsoft products on servers located at your end customer's - under your management and control.
- Offer demonstrations and evaluations: You have up to 50 user product demos for Microsoft software. Offer your customers a 60-day trial free of charge.
- All your locations under a single contract
- Expand your audience: Expand your business with special offers for academic end customers.
Become a SPLA contractual partner or obtain it conveniently via the TERRA CLOUD Center
Wortmann AG offers you two ways to obtain SPLA licenses. You can decide which one you prefer.
You can purchase SPLA licenses directly in the TERRA CLOUD Center, for example, when configuring a virtual machine.
For hosting and IaaS, we offer all SPLA licenses currently provided by Microsoft. In Germany, it is only possible to book licenses of this type without an SPLA agreement with Telekom AG and Wortmann AG.
Billing is done via the TERRA CLOUD invoice.
If you would like to rent/lease SPLA licenses outside of TERRA CLOUD, directly with the end customer, and even more flexibly on a monthly basis, you can become an SPLA partner with Wortmann AG.
You will receive access to all currently available SPLA licenses from Microsoft via the Microsoft Admin Center (MAC).
With this option, you are responsible for reporting to Wortmann AG monthly which licenses you are using or leasing.
We will review the report for any obvious licensing errors and resolve them together before submitting the report to the manufacturer.
SPLA licensing
User CAL's or SAL's
The classic User CALs, as you might know them from local environments, do not exist in the SPLA program for Windows Server.
Instead, SPLA licensing uses Subscriber Access Licenses (SALs). For example, with Exchange Servers or SQL Servers, you only need to license the users who actually access the server or would have access.
If this VM is a Terminal Server environment, you only need to consider RDS SALs. These are still available.
Installation
Applies to all SPLA licenses (except RDS users and Office):
The installation files are available in ISO format on our 'FTP server (ftp44.terracloud.de). Please note that you only have explicit access to this server within our data center. No login credentials are required to access the server. You can download the corresponding ISO file here and then run the setup EXE from the ISO.
Note:
Our FTP server requires a connection with a certificate and explicit TLS.
Therefore, connecting via File Explorer will not work. We can recommend the FileZilla tool instead.
If you experience DNS problems when establishing a connection, you can also access the FTP44 server via its IP address: 185.35.12.116.
Please note, however, that the IP address can change at any time, so we recommend using the DNS name whenever possible.
Installation instructions:
• Exchange Server
• SQL Server
• Sharepoint Server
Microsoft Office
Starting with Office 2019, Microsoft no longer offers installation ISOs; instead, installation must be performed using the Microsoft Deployment Tool.
In the following example, we assume you want to install Office 2021.
However, you can also select any other version that suits your needs.
Download Deployment Tool
1. Download the Microsoft Deployment Tool:
https://www.microsoft.com/en-us/download/details.aspx?id=49117
2. Extract the data to any location (e.g., C:\Program Files\Office 2021).
Create configuration file
1. Navigate to https://config.office.com/.
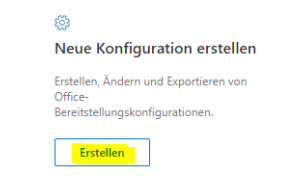
2. Click on Create.
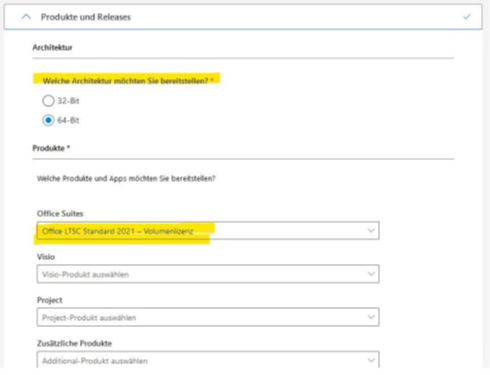
3. Select your desired architecture and the product you have subscribed to.
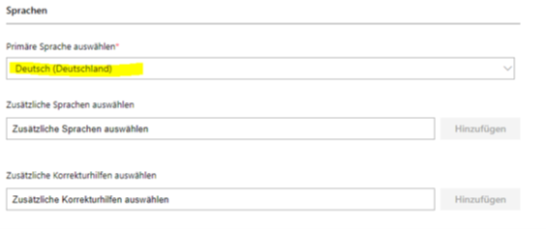
4. Select your desired language.
5. Check the licensing settings.
It is important that KMS is selected as the licensing method. is.
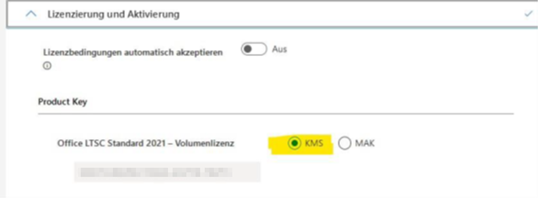
Note:
If you are unable to select KMS, check the selected Office version; the SPLA variant must not be selected here.
6. Click "Export" and keep the current settings.
Next, you must accept the license terms and assign a name to the configuration.
You can then download it.
7. Please save this configuration file in the same folder where you extracted the Deployment Tool.

Installation and Activation
1. Open PowerShell with administrator privileges and navigate to the specified directory.
Example: cd "C:\Program Files\Office 2021"

2. Now run the following command in PowerShell.
.\setup.exe /download configuration.xml

Wait until the cursor in PowerShell moves to the next line.
This may take some time (approx. 2GB download).
You can then install Office 2021 with the following command:
.\setup.exe /configure Configuration.xml

Note:
Please check the Microsoft installation requirements beforehand.
After a short time, a window will open here where you can check the installation progress.
After installation, Office must be manually activated.
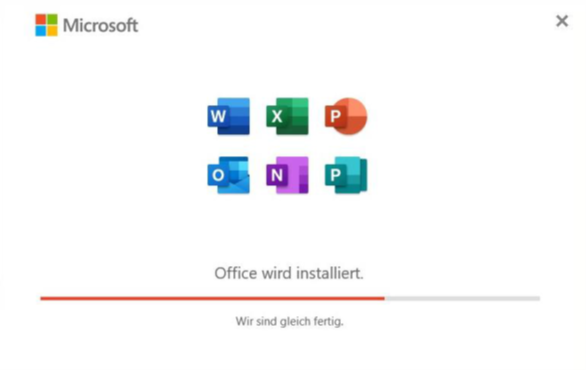
It must be ensured that our KMS server 185.35.12.116 is reachable via port 1688.
This can be tested with the following KMS commands in PowerShell with administrator privileges:
Test-NetConnection 185.35.12.116 -Port 1688
The option "TcpTestSucceeded" must always return "True"; otherwise, the port is blocked.
Activation:
slmgr.vbs /skms 185.35.12.116:1688
cd “C:\Program Files\Microsoft Office\Office2021\”
cscript ospp.vbs /act
Licensing
Microsoft Windows Server and VDIs
This activation procedure only works for Windows systems that are running in our cloud.
Check port
Please first check whether the necessary TCP network port for Windows activation is open:
Test-NetConnection 185.35.12.116 -port 1688
If the result is True, activation can be carried out.
Activation
To activate, please use the following commands:
slmgr.vbs /skms 185.35.12.116:1688
slmgr.vbs /ato
If an error message occurs with the above commands, please use the following commands:
slmgr.vbs /upk
slmgr.vbs /ipk WINDOWS_KEY
slmgr.vbs /skms 185.35.12.116:1688
slmgr.vbs /ato
You can find the appropriate WINDOWS_KEY here.
Microsoft Office Standard / Professional Plus (SPLA)
In the TERRA CLOUD Center, Office licenses from the Microsoft SPLA program can be purchased for installation and licensing in an IaaS virtual machine or a hosting scenario.
Through the SPLA (Service Provider License Agreement) program, all Office versions still supported by Microsoft can be installed and licensed. The SPLA license is version-independent and therefore covers all Office versions (e.g., Office 2016, 2019, 2021, or LTSC 2024).
Support Matrix for Office and Windows Configuration
Full Configuration Support – End Dates
Older versions, such as... B. "Office 2016", can still be downloaded via our "FTP server", but is "no longer supported by Microsoft": ftp://ftp44.terracloud.de/
Access from the cloud network via VPN or directly via a VM
Microsoft Office Standard or Professional Plus is installed using the "Microsoft Office Deployment Tool" and a configuration file, which you create via config.office.com.
Steps at a Glance
- Download the Office Deployment Tool: Office Deployment Tool
- Extract the files to any location (e.g., C:\Program Files\Office2024)
- Configuration Create in the Office configuration portal:
- Select architecture (x64 or x86) and the subscribed Office product
- Select language
- Select licensing method: KMS
- Export the configuration file and save it in the same folder as the deployment tool
- Start installation via PowerShell:
- Open PowerShell with administrator privileges and navigate to the directory
- Download the installation files: .\setup.exe /download configuration.xml
- Start installation: .\setup.exe /configure configuration.xml
- After installation, activate Office via the TERRA CLOUD KMS server. Please ensure that the server is accessible.
Further Information
For the latest information on deploying Microsoft Office LTSC 2024, please visit Microsoft directly:
Deploy Office
Summary
- SPLA license = version-independent (all supported versions)
- Installation via the Deployment Tool and config.office.com
- Activation is done via KMS through the TERRA CLOUD KMS server
- Discontinued versions (e.g., Office 2016) are still available via FTP44
Office variants
Standard
The following programs and apps are included in an Office Standard license:
Word, Excel, PowerPoint, OneNote, Outlook, Publisher, Office Web Apps
Standard / Professional Plus
The following programs and apps are included in an Office Standard Plus license:
Word, Excel, PowerPoint, OneNote, Outlook, Publisher, Office Web Apps, Access, InfoPath, Skype for Business / Teams
Microsoft Project
To activate Microsoft Project, run the Powershell commands that you received from us in the deployment email. Activation takes place via our KMS server.
Microsoft Visio
To activate Microsoft Visio, run the Powershell commands that you received from us in the deployment email. Activation takes place via our KMS server.
Microsoft Exchange
To activate your Exchange server, a TeamViewer remote session is required.
Therefore, please install the Exchange server and prepare TeamViewer on the server.
Then please contact Terra Cloud Support by phone: +49 (0) 5744 944 - 850.
They will then perform the Exchange server activation.
Microsoft SQL Server
Since the license is included in the ISO, SQL does not need to be activated separately.
Windows RDS
To activate RDS licenses, a license server ID is required to create a license package ID.
Further information on the subject of RDS licenses can be found here.
SharePoint Server
After completing the setup, you will be asked to enter a product key, which you will receive from Terra Cloud Support upon request.
Remote Desktop Server Activation
Requirement
A Terminal Server Remote Desktop Service - Subscriber Access License (RDS-SAL) is required if RDS functions are used directly or indirectly.
This includes functions and services that are used with the Remote Desktop Services role activated:
• Remote Desktop Gateway
• RemoteApp Network Software
• Remote Desktop Web Access
• Remote Web Access
• Remote Desktop Connection Broker
• Remote Desktop Session Host
• Remote Desktop Virtualization Host
• RemoteFX
In order to technically determine whether one of these functions is being used, you can check in Windows Server which features and roles are installed:
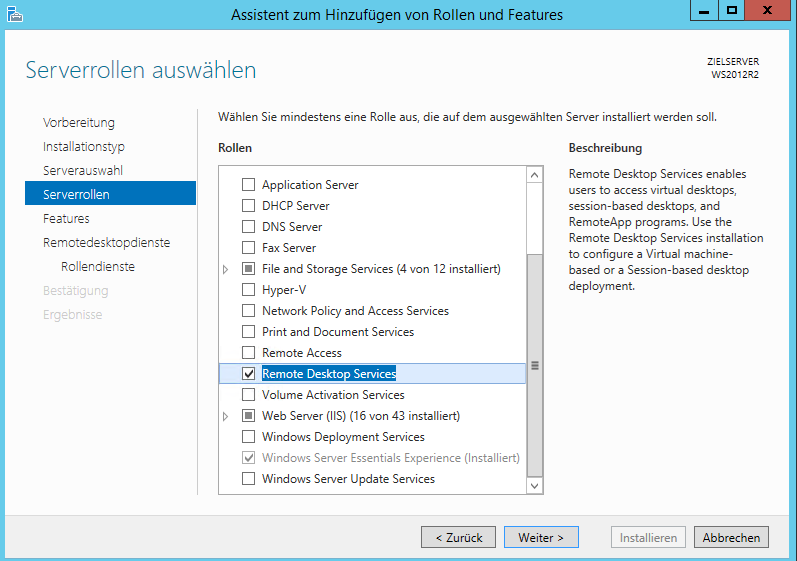
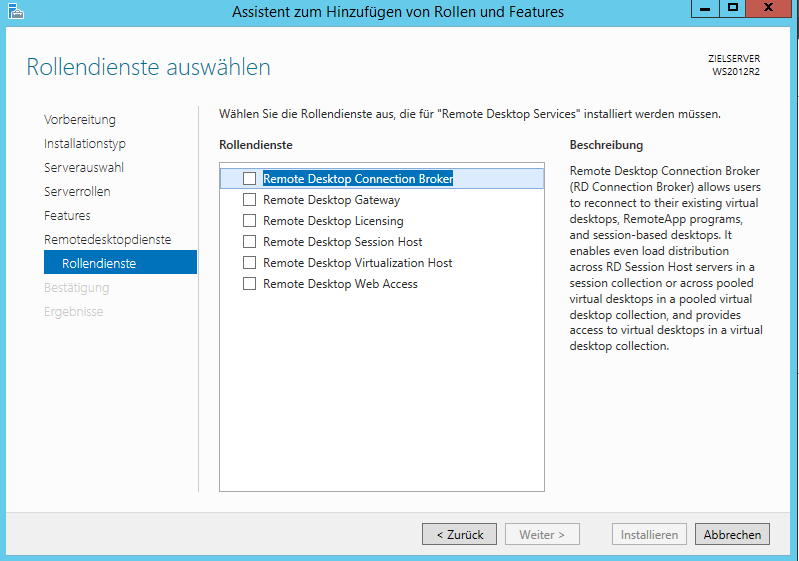
Other products such as VMWare or Citrix also require an RDS CAL if they use these above-mentioned functions.
Sample hostnames have been used in the following document, this may differ from your deployed environment.
Activation RDS for SPLA contract partners
Introduction
Activating Terminal Server Remote Desktop Service - Subscriber Access Licenses (RDS-SALs) as an SPLA contract partner is a crucial step in offering Microsoft Terminal Server services in a hosting environment.
This wiki entry provides detailed instructions for SPLA contract partners on how to activate RDS-SALs and correctly record them in their monthly SPLA reporting.
Important:
These instructions assume that you are a SPLA contract partner with Microsoft and have your own SPLA contract number.
If you use the SPLA services via the Terra Cloud, please use the following instructions: [Link]
.
Steps for Activating Terminal Server RDS SALs
- 1. SPLA contract number
- As an SPLA contract partner, you have a unique SPLA contract number that is used for licensing and billing. Make sure you have this number handy.
- 2. Activate terminal server role
- Log in to the Terminal Server host and open the Server Manager application. Navigate to "Roles" and "Capabilities" and select the Terminal Server role to activate.
- 3. Entering the SPLA contract number
- In the Terminal Server role activation process, you will be asked to enter your SPLA contract number. Make sure this number is entered correctly and without errors as it is used to identify your contract and associated RDS SALs.
- 4. Select Services Provider License Agreement (SPLA)
- Select the "Services Provider License Agreement" option during the activation process. This is required to activate the RDS SALs as SPLA contractors.
- 5. Confirmation and completion
- After you have made your SPLA contract number and SPLA contract selection, click "Next" and follow the instructions to complete the activation process.
- 6. License activation
- After successful activation of the terminal server role, the RDS SALs are activated on the corresponding terminal server and ready for use.
- 7. Monthly SPLA reporting
- As a SPLA contractual partner, you are obliged to correctly record and report the number of terminal server access licenses (RDS SALs) used in your monthly SPLA reporting. This is important in order to bill the license fees correctly.
Summary
Activating Terminal Server RDS SALs as a SPLA contract partner requires entering your SPLA contract number during the Terminal Server role activation process.
Once activated, you must ensure that you document the RDS SALs used in your monthly SPLA reporting to properly meet legal requirements and billing.
This process is critical to legally offering and managing Microsoft Hosted Services.
Activation in Windows Server 2022
We have found a very good and detailed guide for Windows Server 2022 on the Internet, which we do not want to withhold from you:
[Link]
Note: This link and its content are without guarantee.
Activation of RDS for non-SPLA contract partners (when booking via the Terra Cloud)
Activation of the RDS Server Host
To activate Remote Desktop Services on a Windows Server, the following steps must be carried out.
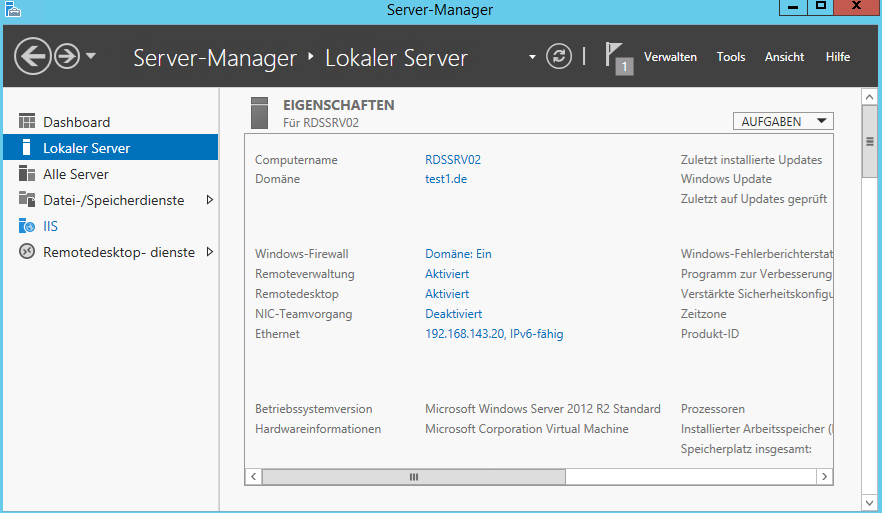
1. Please start Server Manager.
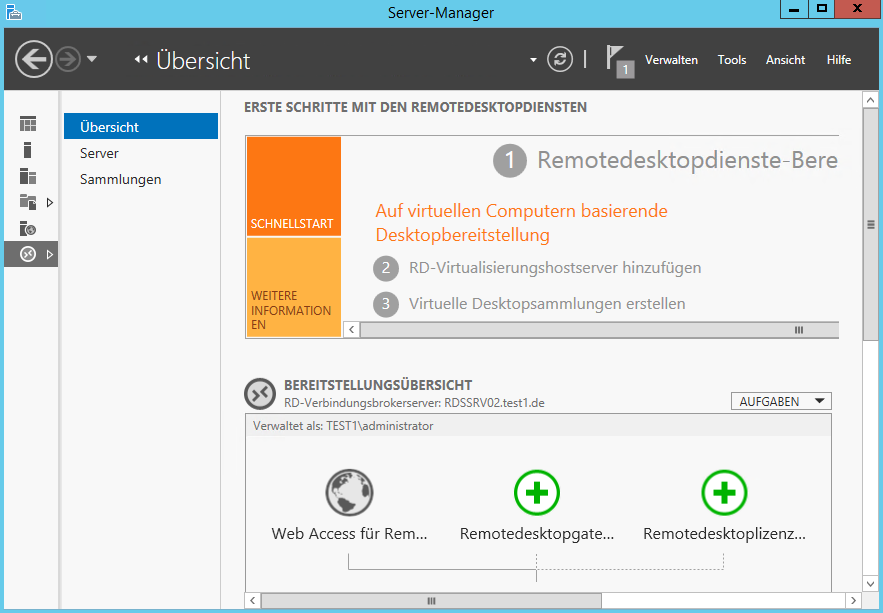
2. Then select Remote Desktop Services.
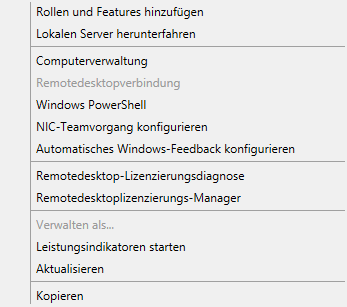
3. Select the Server sub-item and the installed RDS server will be displayed.
![]()
4. Start the Remote Desktop Licensing Manager on the RDS server by right-clicking.
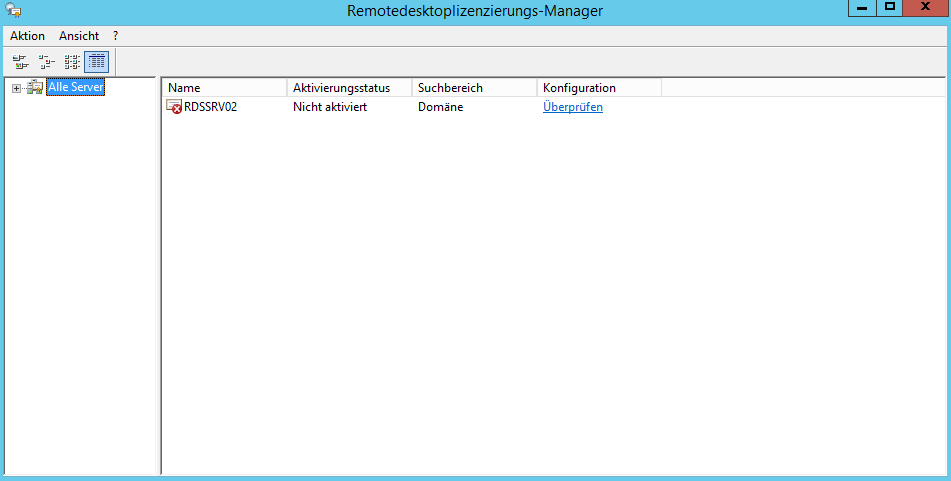
5. The licensing manager should look like this.
6. Select Activate Server.
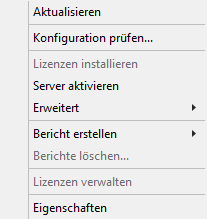
7. The server activation wizard will start and continue with “Next”.
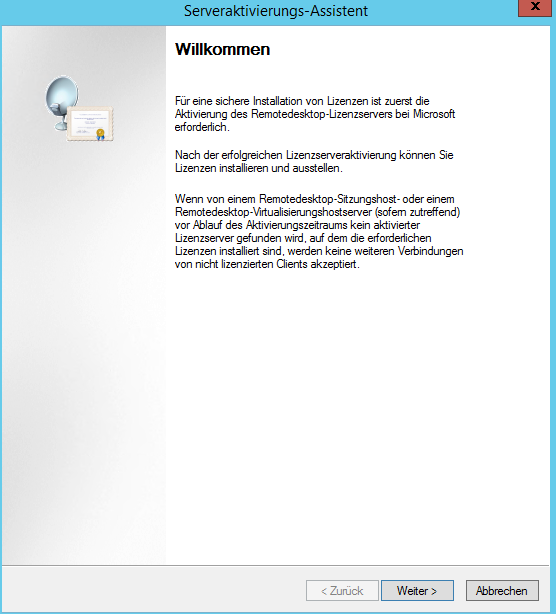
8. Preselected connection method “Automatic connection” must be selected and proceed with “Next”.
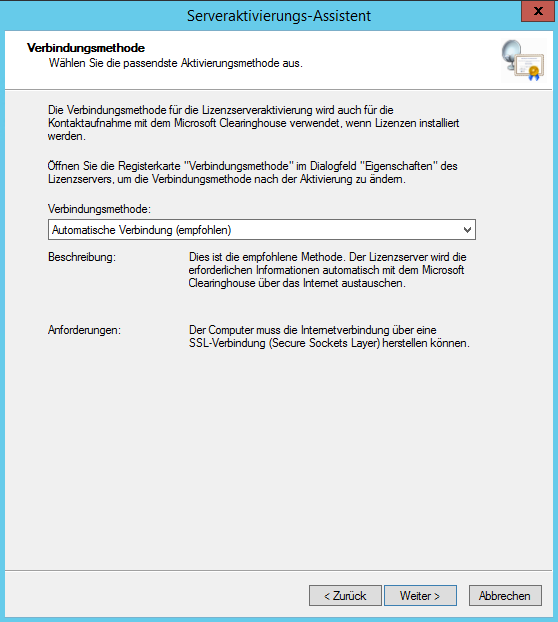
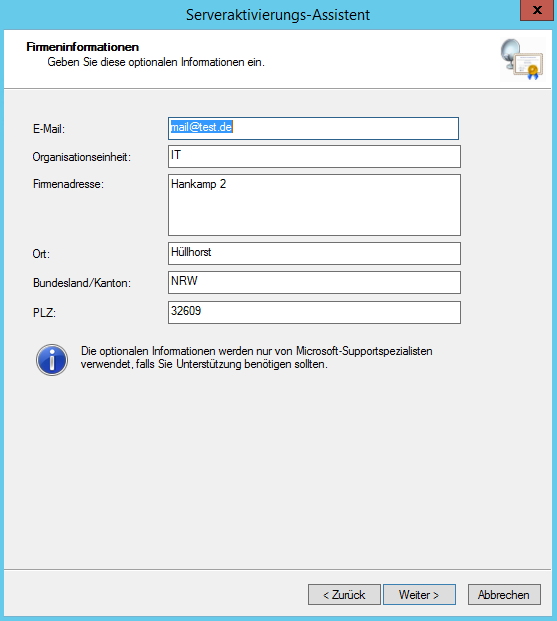
9. Fill in company information on page 1 with data and continue with “Next”.
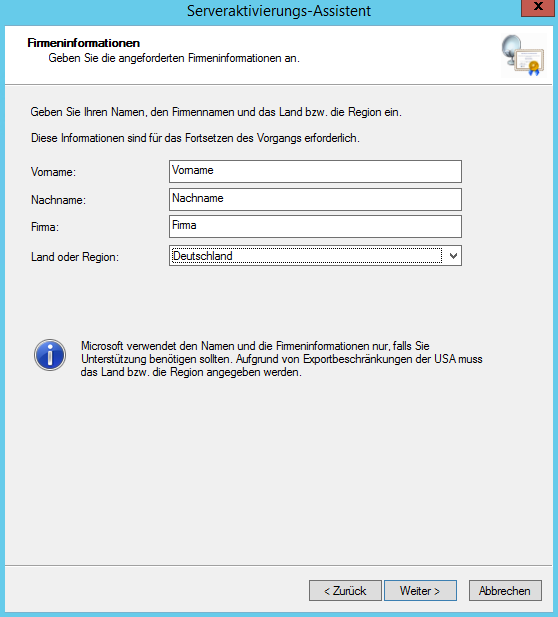
10. Fill in company information on page 2 with data and continue with “Next”.
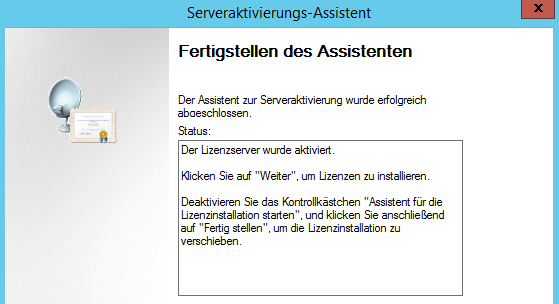
11. Activation is carried out and ends with “Close”
![]()
Activation of the RDS server CALs
To activate the User Access Licenses (User CALs), the connection method for server activation must be adjusted. The following steps are required:
Note:
If the connection method is not changed here, the license key package ID you receive from us cannot be entered and activated.
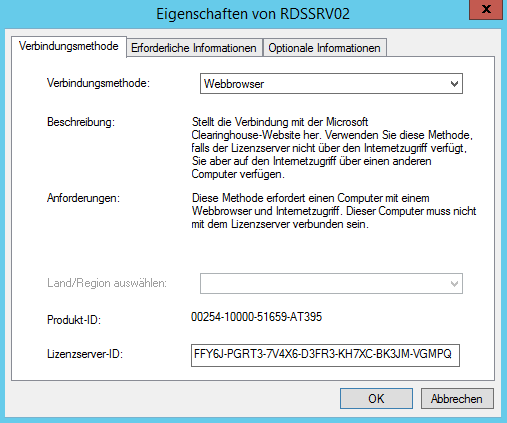
1. In the Licensing Manager, open the RDS Server properties and set the connection method to Web Browser, as shown below.
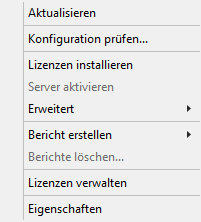
2. Now select Install Licenses.
3. The License Installation Wizard will now start. Continue by clicking "Next."
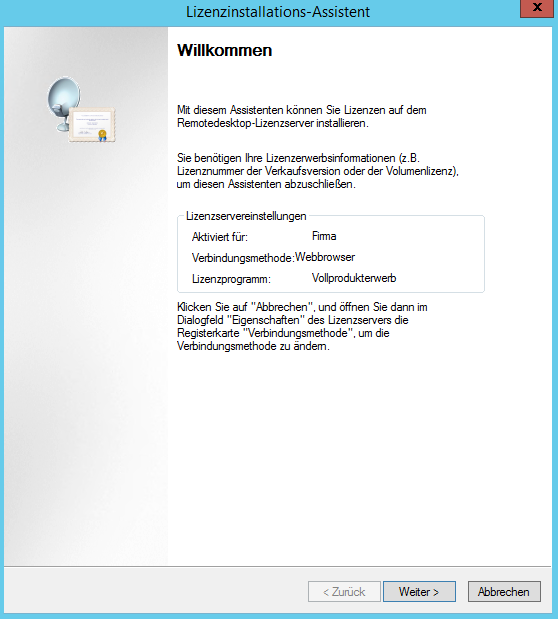
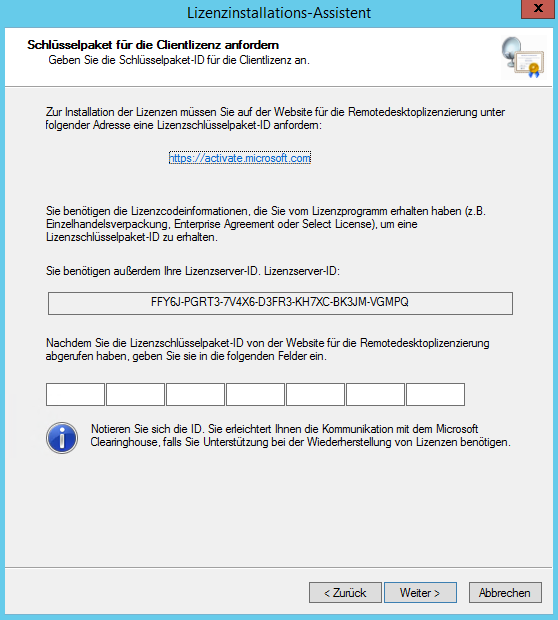
4. The license server ID will appear in the window shown below.
Please send it to us in an informal email with the following subject to support@terracloud.de:
"RDS Licenses Package Number/Order Number, Quantity X" as well as the License Server ID and RDS Server operating system used.
The team will create the necessary license key package ID.
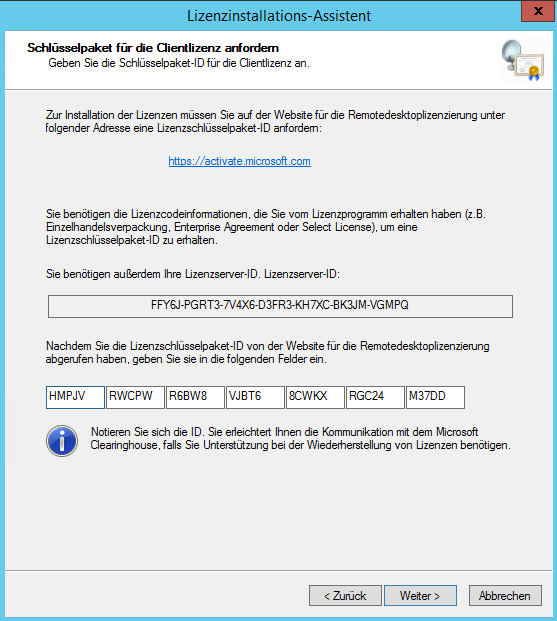
5. Enter the license key package ID received from the TERRACLOUD team in the fields and click "Next."
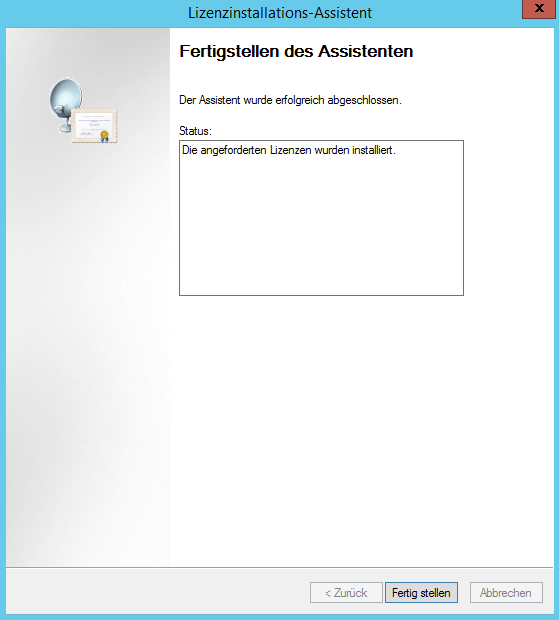
6. After successful license registration, the user access licenses are activated.
7. After successful activation, the activated user access licenses are displayed in the Licensing Manager.
![]()
If a "Per Device" RDS CAL is displayed here, please contact our support team.
8. After the installation, two adjustments must be made, otherwise the license server will stop functioning after the 120-day grace period.

To do this, open the deployment properties:
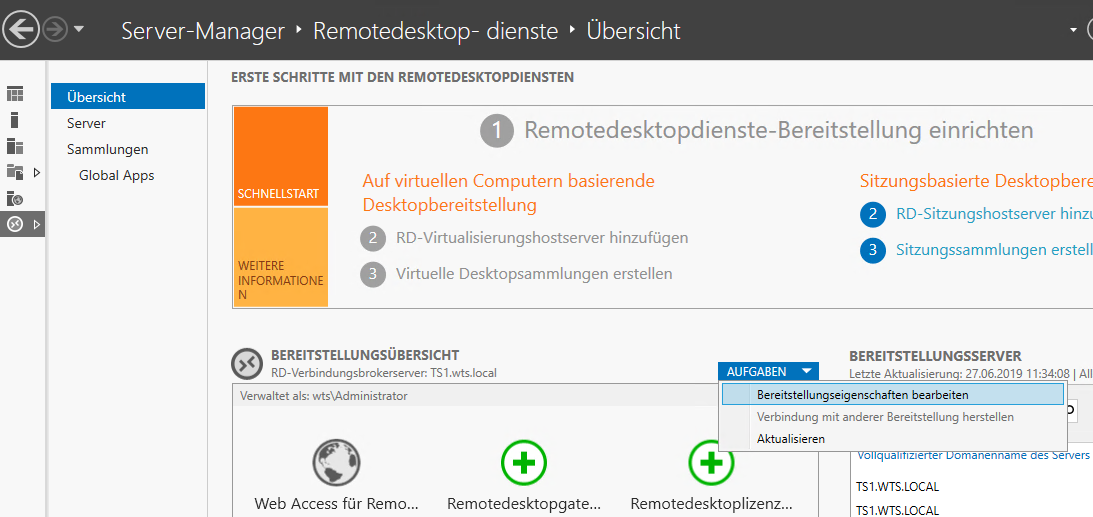
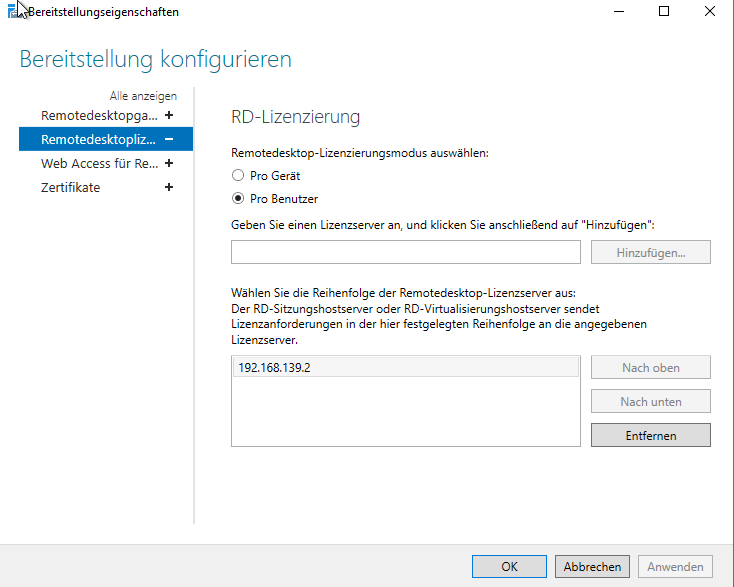
There, enter the IP address of the license server and set the Remote Desktop licensing mode to "Per User".
In our example, the license server was installed on a separate server, so its IP address is entered accordingly.
Activation in Windows Server 2022
We have found a very good and detailed guide for Windows Server 2022 on the Internet, which we do not want to withhold from you:
[Link]
Note: This link and its content are without guarantee.
