USB-Dongle/en: Unterschied zwischen den Versionen
Übernehme Bearbeitung einer neuen Version der Quellseite |
Keine Bearbeitungszusammenfassung |
||
| (20 dazwischenliegende Versionen von 2 Benutzern werden nicht angezeigt) | |||
| Zeile 1: | Zeile 1: | ||
<languages/> | <languages/> | ||
<span id="Zusendung"></span> | |||
== Sending == | == Sending == | ||
< | To send in a USB dongle, please use the submission form.<br> | ||
== Initial | You can find this [https://downloads.terracloud.de/files/EN_documentation/terra%20CLOUD_Submission%20form.pdf here].<br> | ||
Connect from the system within your TERRA CLOUD environment to our FTP server | <span id="Ersteinrichtung"></span> | ||
== Initial setup == | |||
<br> | Connect from the system within your TERRA CLOUD environment in which the USB dongle is to be integrated to our FTP server (<b>ftp44.terracloud.de</b>).<br> | ||
[[ | There you will find the appropriate client software.<br> | ||
<br> | [[Datei:DE-UTN-Download-1.PNG|border|ohne]]<br> | ||
First download the file '''"sehutnmanager-win- | [[Datei:1. ftp44 verzeichnis sehutnDongleManager.PNG|border|ohne]]<br> | ||
Then unzip this file into | First download the file '''"sehutnmanager-win-4.0.4.zip"''' or newer. Please pay attention to which operating system you are using.<br> | ||
<br> | Then unzip this file into the desired directory and run the file '''"sehutnmanager-win-4.0.4.exe"'''. <br> | ||
[[ | [[Datei:2. Datei öffnen.PNG|border|ohne]]<br> | ||
<br> | Install the software, please select the installation type <b>Complete</b>.<br> | ||
[[Datei:DE-UTN-Installation-5.PNG|border|ohne]]<br> | |||
<br> | When you start the software for the first time, you will be asked whether the UTN server and USB dongle should now be searched for and selected.<br> | ||
[[ | You can confirm this with <b>Yes</b>.<br> | ||
<br> | [[Datei:DE-UTN-Einrichtung-1.PNG|border|ohne]] <br> | ||
If the | If the UTN server and USB dongle are found, please add them using the <b>Add</b> button.<br> | ||
<br> | [[Datei:DE-UTN-Einrichtung-2.PNG|border|ohne]] <br> | ||
[[ | [[Datei:DE-UTN-Einrichtung-2-2.PNG|border|ohne]] <br> | ||
<br> | [[Datei:DE-UTN-Einrichtung-2-3.PNG|border|ohne]] <br> | ||
If you answered negatively to the first query, you can add the UTN server manually afterwards.<br> | |||
<br> | To do this, please go to <b>UTN server</b> --> <b>Add...</b><br> | ||
[[ | [[Datei:DE-UTN-Einrichtung-4.PNG|border|ohne]] <br> | ||
< | In the search field <b>Name or IP address</b>, enter the IP address of the USB dongles, which we sent you in advance by email.<br> | ||
[[Datei:DE-UTN-Einrichtung-5.PNG|border|ohne]] <br> | |||
The UTN server and the USB dongle we have plugged in will then be displayed.<br> | |||
<br> | You can mark the latter and connect it using the <b>Activate</b> button.<br> | ||
[[ | [[Datei:DE-UTN-Einrichtung-7.PNG|border|ohne]] <br> | ||
< | [[Datei:DE-UTN-Einrichtung-8.PNG|border|ohne]] <br> | ||
The status of the USB dongle will then change from <i>Available</i> to <i>Activated</i>.<br> | |||
<br> | [[Datei:DE-UTN-Einrichtung-9.PNG|border|ohne]] <br> | ||
[[ | From now on, the USB dongle should be displayed as a locally plugged-in USB stick.<br> | ||
<br> | |||
==FAQ== | == FAQ == | ||
<span id="USB-Dongle_nach_Neustart_automatisch_aktivieren"></span> | |||
=== Automatically activate USB dongle after restart === | === Automatically activate USB dongle after restart === | ||
< | Please right-click on the dongle server in the SEH UTN Manager. Then select <b>Auto-Connect...</b>.<br> | ||
[[Datei:Auto-Connect.png|border|ohne]]<br> | |||
In the following window, select the corresponding port of the USB dongle.<br> | |||
You can find this in the SEH UTN Manager in the properties of the UTN server.<br> | |||
Then confirm your selection with <b>OK</b>.<br> | |||
[[Datei:Portauswahl-AutoConnect.png|border|ohne]]<br> | |||
<span id="In_Supportfällen"></span> | |||
=== In support cases === | === In support cases === | ||
For support requests regarding your booked USB dongle, please send us a screenshot of the SEH UTN Manager from the affected client. <br> | For support requests regarding your booked USB dongle, please send us a screenshot of the SEH UTN Manager from the affected client. <br> | ||
[[Datei:8. Supportfällen.PNG|border|ohne]]<br> | |||
[[Datei:8. Supportfällen.PNG|border| | |||
Aktuelle Version vom 23. September 2025, 12:46 Uhr
Sending
To send in a USB dongle, please use the submission form.
You can find this here.
Initial setup
Connect from the system within your TERRA CLOUD environment in which the USB dongle is to be integrated to our FTP server (ftp44.terracloud.de).
There you will find the appropriate client software.


First download the file "sehutnmanager-win-4.0.4.zip" or newer. Please pay attention to which operating system you are using.
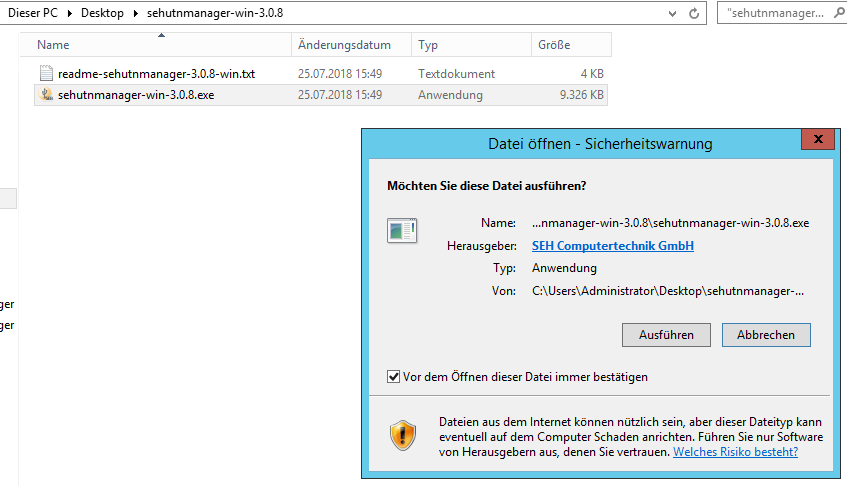
Then unzip this file into the desired directory and run the file "sehutnmanager-win-4.0.4.exe".

Install the software, please select the installation type Complete.

When you start the software for the first time, you will be asked whether the UTN server and USB dongle should now be searched for and selected.
You can confirm this with Yes.

If the UTN server and USB dongle are found, please add them using the Add button.


If you answered negatively to the first query, you can add the UTN server manually afterwards.
To do this, please go to UTN server --> Add...

In the search field Name or IP address, enter the IP address of the USB dongles, which we sent you in advance by email.

The UTN server and the USB dongle we have plugged in will then be displayed.
You can mark the latter and connect it using the Activate button.


The status of the USB dongle will then change from Available to Activated.

From now on, the USB dongle should be displayed as a locally plugged-in USB stick.
FAQ
Automatically activate USB dongle after restart
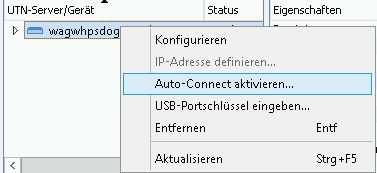
Please right-click on the dongle server in the SEH UTN Manager. Then select Auto-Connect....

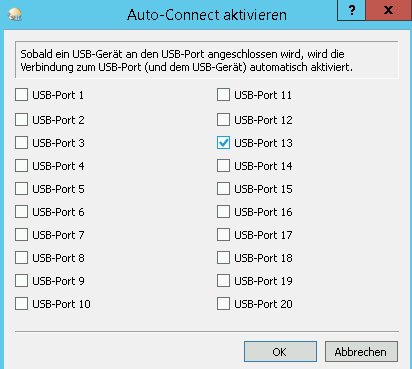
In the following window, select the corresponding port of the USB dongle.
You can find this in the SEH UTN Manager in the properties of the UTN server.
Then confirm your selection with OK.

In support cases
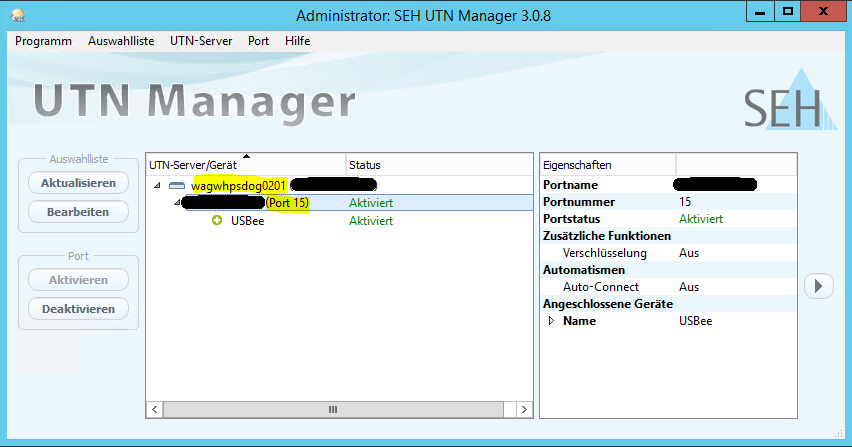
For support requests regarding your booked USB dongle, please send us a screenshot of the SEH UTN Manager from the affected client.

