TERRA CLOUD Veeam Data Protection Fehlerdiagnose/en: Unterschied zwischen den Versionen
Die Seite wurde neu angelegt: „= Problems adding the Restore Portal Application in Entra ID =“ |
Die Seite wurde neu angelegt: „'''Error:'''<br> You receive the following error message when adding a Microsoft 365 organization in the Microsoft 365 plug-in: 400px|ohne <br> '''Cause:''' <br> A Microsoft Entra ID Conditional Access policy [https://learn.microsoft.com/de-de/entra/identity/conditional-access/] is blocking the code login (Device Code Flow) of Veeam Backup for Microsoft 365. <br> <br> '''Solution:'''<br> Adjust the Conditional Access policy so t…“ |
||
| (7 dazwischenliegende Versionen von 2 Benutzern werden nicht angezeigt) | |||
| Zeile 1: | Zeile 1: | ||
<languages/> | <languages/> | ||
=Veeam Backup for Microsoft 365 Plug-in= | |||
<span id="Fehler_bei_dem_Hinzufügen_einer_Organisation:_„Hierauf_haben_Sie_keinen_Zugriff""></span> | |||
== Error adding an organization: "You do not have access to this" == | |||
'''Error:'''<br> | |||
You receive the following error message when adding a Microsoft 365 organization in the Microsoft 365 plug-in: | |||
[[Datei:Block access.png|400px|ohne]] | |||
<br> | |||
'''Cause:''' <br> | |||
A Microsoft Entra ID Conditional Access policy [https://learn.microsoft.com/de-de/entra/identity/conditional-access/] is blocking the code login (Device Code Flow) of Veeam Backup for Microsoft 365. <br> | |||
<br> | |||
'''Solution:'''<br> | |||
Adjust the Conditional Access policy so that the user used to register the Microsoft 365 organization is allowed to use the ''Device Code Flow''. <br> | |||
For more information about the device code flow, see this [https://learn.microsoft.com/de-de/entra/identity/conditional-access/concept-authentication-flows article] in the Microsoft documentation. <br> | |||
<span id="Sicherung"></span> | |||
= Backup = | |||
== Failed to access public folders.. There are no public folder server available. == | |||
''Error pattern''': <br> | |||
You receive the following error message for your Microsoft 365 backup job: <br> | |||
[[Datei:No-public-servers-available.png|600px]] <br> | |||
<br> | |||
'''Cause:''' <br> | |||
The user stored in the Entra ID application for Microsoft 365 data backup cannot be used for impersonation in Exchange Online Web Services.<br> | |||
Therefore, a backup of public folders is not possible. | |||
For [https://learn.microsoft.com/en-us/exchange/client-developer/exchange-web-services/impersonation-and-ews-in-exchange impersonation], the user requires an Exchange Online license and the required permissions.<br> | |||
<br> | |||
'''Solution:''' <br> | |||
Please check the configured user in the Entra ID application in the Veeam Backup for Microsoft 365 plug-in in the Protection Portal. <br> | |||
When linking the organization, the user specified during setup is initially stored here. <br> | |||
You can either change the stored user using the following instructions or assign a license and, if necessary, authorize the existing user in the Microsoft 365 Admin Center. <br> | |||
<br> | |||
'''Configuring the user for impersonation:''' | |||
# In the Protection Portal, click the gear in the upper right corner to access the configuration. | |||
# Select the Veeam Backup for Microsoft 365 plug-in. | |||
# In the "Organizations" section, edit the desired tenant using "Edit." | |||
# Click the ID in the "Application settings" section. | |||
# Enter the desired user in the "Exchange Online Web Services configuration" section and confirm the change using "Apply." | |||
[[Datei:Change-Impersonation-User.png|1200px]] | |||
== Processing mailbox <Name> completed with warning: Cannot protect a group mailbox because the group doesn't have an owner == | |||
'''Error:'''<br> | |||
You receive the following warning message for your Microsoft 365 backup job: <br> | |||
[[Datei:No owner.png|ohne|600px]] | |||
'''Cause:'''<br> | |||
Backing up Microsoft group mailboxes via Veeam Backup for Microsoft 365 is only possible if an owner is assigned to this group. Without this assignment, [https://learn.microsoft.com/en-us/exchange/client-developer/exchange-web-services/impersonation-and-ews-in-exchange] impersonation is not possible. <br> | |||
This is a known issue with Microsoft and Veeam. <br> | |||
<br> | |||
'''Solution:'''<br> | |||
Please assign an owner to the groups listed in the warning message. For instructions, see this [https://support.microsoft.com/en-us/topic/assign-a-new-owner-to-an-orphaned-group-86bb3db6-8857-45d1-95c8-f6d540e45732 Microsoft article]. | |||
<span id="Wiederherstellung"></span> | |||
= Recovery = | |||
<span id="Probleme_bei_dem_Hinzufügen_der_Restore_Portal_Application_in_Entra_ID"></span> | <span id="Probleme_bei_dem_Hinzufügen_der_Restore_Portal_Application_in_Entra_ID"></span> | ||
= Problems adding the Restore Portal Application in Entra ID = | == Problems adding the Restore Portal Application in Entra ID == | ||
'''Error:'''<br> | |||
''' | When running the application ''[https://wiki.terracloud.de/index.php/TERRA_CLOUD_Veeam_Data_Protection/en#Add_Restore_Portal_Application_in_the_tenant Connect-VB365RestorePortal]'', you receive an error message when adding the Restore Portal Application or assigning permissions for it. <br> | ||
The Entra ID Enterprise Application of the TERRA CLOUD Veeam Data Protection Restore Portal must be added and authorized once before a restore can be performed. <br> | |||
<br> | |||
''' | '''Instructions for manually adding the Restore Portal Application:'''<br> | ||
1. | 1. Start PowerShell as an administrator. <br> | ||
2. | 2. Install the Microsoft Graph module. <br> | ||
::<pre>Install-Module Microsoft.Graph</pre> | ::<pre>Install-Module Microsoft.Graph</pre> | ||
3. | 3. Run the ''"Connect-AzureAD"'' cmdlet to launch a login dialog for Entra ID. | ||
::<pre>Connect-AzureAD</pre> | ::<pre>Connect-AzureAD</pre> | ||
4. | 4. Please log in to a user with the "Global Administrator" role in the Microsoft 365 tenant for which the application is to be added. <br> | ||
5. | 5. Add the Entra ID Enterprise Application using the "New-AzureADServicePrincipal" cmdlet. | ||
::<pre>New-AzureADServicePrincipal -AppID "c3a749b0-ec1f-4b2b-af40-316172f7d71a"</pre> | ::<pre>New-AzureADServicePrincipal -AppID "c3a749b0-ec1f-4b2b-af40-316172f7d71a"</pre> | ||
6. | 6. Open the Microsoft Entra ID Admin Center and search for a corporate application named "TERRA CLOUD Veeam Data Protection - Restore Portal" (remove the filter if necessary). <br> | ||
7. | 7. Grant administrator permission for the desired tenant in the "Security --> Permissions" section (see screenshot below). <br> | ||
8. | 8. Check whether logging in to the Restore Portal is now possible. <br> | ||
[[ | [[File:Entra-ID-Admincenter-permission-cut.png|1200px]] | ||
Aktuelle Version vom 19. September 2025, 13:02 Uhr
Veeam Backup for Microsoft 365 Plug-in
Error adding an organization: "You do not have access to this"
Error:
You receive the following error message when adding a Microsoft 365 organization in the Microsoft 365 plug-in:
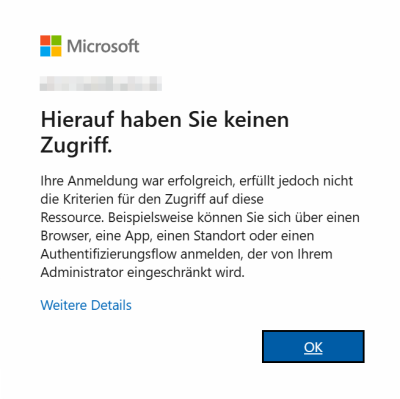
Cause:
A Microsoft Entra ID Conditional Access policy [1] is blocking the code login (Device Code Flow) of Veeam Backup for Microsoft 365.
Solution:
Adjust the Conditional Access policy so that the user used to register the Microsoft 365 organization is allowed to use the Device Code Flow.
For more information about the device code flow, see this article in the Microsoft documentation.
Backup
Failed to access public folders.. There are no public folder server available.
Error pattern':
You receive the following error message for your Microsoft 365 backup job:
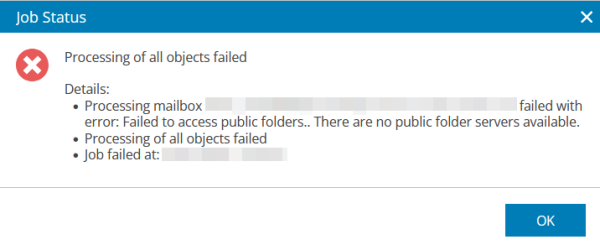
Cause:
The user stored in the Entra ID application for Microsoft 365 data backup cannot be used for impersonation in Exchange Online Web Services.
Therefore, a backup of public folders is not possible.
For impersonation, the user requires an Exchange Online license and the required permissions.
Solution:
Please check the configured user in the Entra ID application in the Veeam Backup for Microsoft 365 plug-in in the Protection Portal.
When linking the organization, the user specified during setup is initially stored here.
You can either change the stored user using the following instructions or assign a license and, if necessary, authorize the existing user in the Microsoft 365 Admin Center.
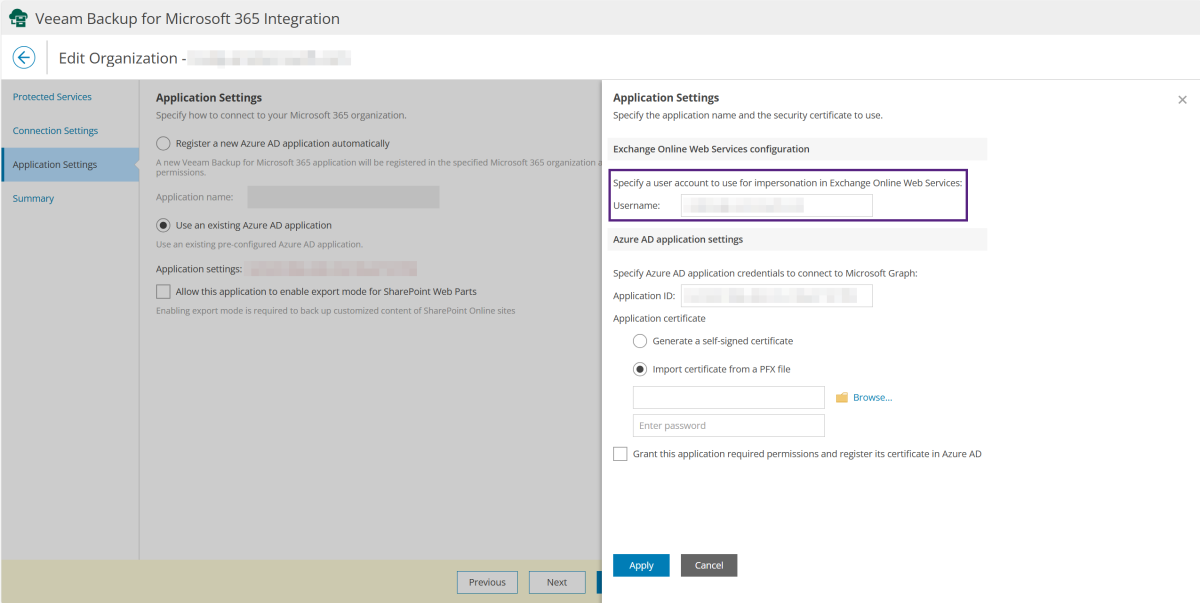
Configuring the user for impersonation:
- In the Protection Portal, click the gear in the upper right corner to access the configuration.
- Select the Veeam Backup for Microsoft 365 plug-in.
- In the "Organizations" section, edit the desired tenant using "Edit."
- Click the ID in the "Application settings" section.
- Enter the desired user in the "Exchange Online Web Services configuration" section and confirm the change using "Apply."
Processing mailbox <Name> completed with warning: Cannot protect a group mailbox because the group doesn't have an owner
Error:
You receive the following warning message for your Microsoft 365 backup job:
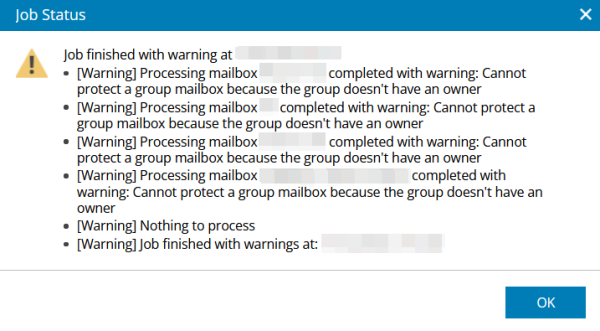
Cause:
Backing up Microsoft group mailboxes via Veeam Backup for Microsoft 365 is only possible if an owner is assigned to this group. Without this assignment, [2] impersonation is not possible.
This is a known issue with Microsoft and Veeam.
Solution:
Please assign an owner to the groups listed in the warning message. For instructions, see this Microsoft article.
Recovery
Problems adding the Restore Portal Application in Entra ID
Error:
When running the application Connect-VB365RestorePortal, you receive an error message when adding the Restore Portal Application or assigning permissions for it.
The Entra ID Enterprise Application of the TERRA CLOUD Veeam Data Protection Restore Portal must be added and authorized once before a restore can be performed.
Instructions for manually adding the Restore Portal Application:
1. Start PowerShell as an administrator.
2. Install the Microsoft Graph module.
Install-Module Microsoft.Graph
3. Run the "Connect-AzureAD" cmdlet to launch a login dialog for Entra ID.
Connect-AzureAD
4. Please log in to a user with the "Global Administrator" role in the Microsoft 365 tenant for which the application is to be added.
5. Add the Entra ID Enterprise Application using the "New-AzureADServicePrincipal" cmdlet.
New-AzureADServicePrincipal -AppID "c3a749b0-ec1f-4b2b-af40-316172f7d71a"
6. Open the Microsoft Entra ID Admin Center and search for a corporate application named "TERRA CLOUD Veeam Data Protection - Restore Portal" (remove the filter if necessary).
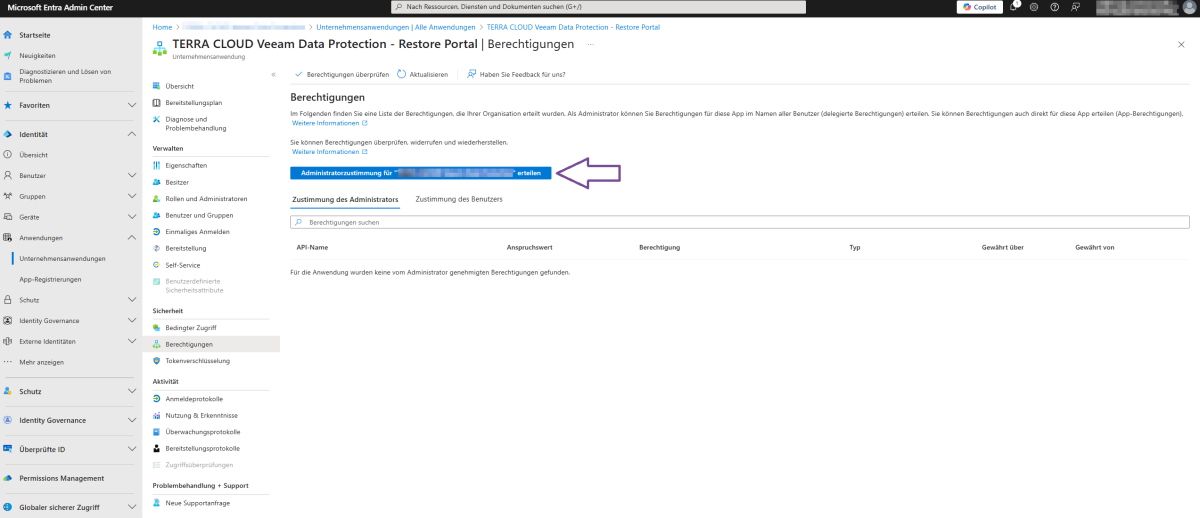
7. Grant administrator permission for the desired tenant in the "Security --> Permissions" section (see screenshot below).
8. Check whether logging in to the Restore Portal is now possible.
