Firewall/en: Unterschied zwischen den Versionen
Die Seite wurde neu angelegt: „An existing VPN tunnel is required for the connection to the firewall.<br> Before establishing the connection, please check whether the standard port 1194 is enabled for VPN connections on your local firewall.<br> If port 1194 is blocked, establishing the VPN tunnel will fail.<br> <br />“ |
Keine Bearbeitungszusammenfassung |
||
| (39 dazwischenliegende Versionen von 2 Benutzern werden nicht angezeigt) | |||
| Zeile 1: | Zeile 1: | ||
<languages/> | |||
<span id="Private_Cloud_Strategie"></span> | <span id="Private_Cloud_Strategie"></span> | ||
==Private Cloud Strategy== | ==Private Cloud Strategy== | ||
| Zeile 12: | Zeile 13: | ||
* OpenVPN Client for MacOS - [https://wiki.securepoint.de/UTM/VPN/SSL_VPN-Roadwarrior-MacOS click here] | * OpenVPN Client for MacOS - [https://wiki.securepoint.de/UTM/VPN/SSL_VPN-Roadwarrior-MacOS click here] | ||
'''VPN configuration file:'''<br> | '''VPN configuration file:'''<br> | ||
The VPN data for administrator access can be found in the Cloud Center below the respective order within the service information, see also ''[[Service-Informationen|Service-Information]]''.<br> | The VPN data for administrator access can be found in the Cloud Center below the respective order within the service information, see also ''[[Service-Informationen/en|Service-Information]]''.<br> | ||
<br> | |||
<span id="VLAN-Anforderungen"></span> | |||
==VLAN Requirements== | |||
Every virtual Securepoint UTM has 2x virtual network interfaces by default.<br> | |||
One of these communicates with the Internet, the other communicates with the systems in the package.<br> | |||
Since a Hyper-V VM can have a maximum of 8x network cards attached, we can provide a maximum of 6x additional VLANs.<br> | |||
<span id="Verbindung_zur_Firewall_herstellen"></span> | <span id="Verbindung_zur_Firewall_herstellen"></span> | ||
==Connect to the firewall== | ==Connect to the firewall== | ||
| Zeile 23: | Zeile 29: | ||
If port 1194 is blocked, establishing the VPN tunnel will fail.<br> | If port 1194 is blocked, establishing the VPN tunnel will fail.<br> | ||
<br /> | <br /> | ||
< | <span id="Ersteinrichtung_der_VPN_-_Verbindung_im_Securepoint_VPN_Client"></span> | ||
=== | ===Initial setup of the VPN connection in the Securepoint VPN Client=== | ||
* Install the respective VPN client, in this example we are assuming the Securepoint VPN client. | |||
* | * Open the VPN client and click the gear at the bottom right to open the settings menu..<br> | ||
* | [[File:vpnclient1.png|border|Open VPN client settings]]<br> | ||
[[ | * In the context menu under Source file, click on the three dots to select the source file that was previously downloaded from the Cloud Portal, see also ''[[https://wiki.terracloud.de/index.php/Service-Informationen/en Service Information]]''. | ||
* | [[File:vpnclient2.png|border|Importing the configuration]]<br> | ||
[[ | * Select the opvn file from the previously extracted zip file and click “Import”. | ||
* | * Optionally, the configuration can be assigned a name under “Import as:” under which the configuration will later be visible in the VPN client. | ||
* | * Use the arrow button to start establishing the VPN connection | ||
* | [[File:vpnclient3.png|border|Connect]]<br> | ||
[[ | The required initial access data is:<br> | ||
<u>User</u>: ssluser-admin<br> | |||
<u>Password</u>: ChanTroFar93!<br> | |||
<section begin=excludepaas/> | <section begin=excludepaas/> | ||
<br /> | <br /> | ||
< | <span id="Verbindung_zur_Firewall_Weboberfläche"></span> | ||
===Connection to the firewall web interface=== | |||
<u>https://<IP | |||
After the VPN connection has been successfully established, access the following address in any browser:<br> | |||
<u>https://<firewall IP address>:11115</u><br> | |||
<br> | <br> | ||
The IP address of the firewall was assigned by you when ordering the environment and can be accessed subsequently in the Cloud Center<br> | |||
can be viewed below the respective order within the service information, see also ''[[Service-Informationen/en|Service Information]]''.<br> | |||
<br> | <br> | ||
[[ | [[File:FW_Login.png|border|FW_Login]]<br> | ||
<br> | <br> | ||
The required initial access data is:<br> | |||
<u> | <u>User</u>: fwadmin<br> | ||
<u> | <u>Password</u>: Terra001<br> | ||
< | <span id="Erstzugriff_auf_die_Firewall_Weboberfläche"></span> | ||
== Initial access to the firewall web interface == | |||
== | |||
< | '''Note:'''<br> | ||
The WebGUI has changed visually since firmware version 12.6.2.<br> | |||
< | However, with a few exceptions, all points are still called the same, so you can continue to follow all the steps using the following instructions.<br> | ||
< | <br> | ||
=== | The first time you open the firewall web interface, a few things need to be done:<br> | ||
<span id="Firewallname_vergeben"></span> | |||
=== Assign firewall name === | |||
[[File:Firewallname_vergeben.png|border|Firewallname_given]]<br> | |||
[[ | Please enter a firewall name, which must correspond to an FQDN, e.g. myfirewall.local. <br> | ||
The firewall name must not contain any umlauts, special characters or capital letters.<br> | |||
<br> | <br> | ||
Then click on the Complete button.<br> | |||
<br> | <br> | ||
=== Firmware Update === | === Firmware Update === | ||
Depending on the preinstalled firmware version, you will receive a message that a newer firmware is available.<br> | |||
In this example we assume that version 11.8.9 is preinstalled.<br> | |||
In | |||
<br> | <br> | ||
[[ | [[File:Firmwareupdate_verfügbar.png|border|Firmwareupdate_available]]<br> | ||
<br> | <br> | ||
This query should be answered with Yes when the environment is commissioned for the first time.<br> | |||
You will then receive a view of the available new firmware, which will be imported using the “Start test run” button.<br> | |||
<br> | <br> | ||
[[ | [[File:Verfügbare_Firmwares.png|border|Available_Firmwares]]<br> | ||
<br> | <br> | ||
In order to use the new firmware, several license agreements must be checked and accepted.<br> | |||
[[ | [[File:Firewall-Lizenzvereinbarung.png|border|Firewall License Agreement]]<br> | ||
<br> | <br> | ||
Finally, a restart must be carried out. This can take up to 5 minutes.<br> | |||
You can follow the restart via the console connection via the Technical Center (https://manage.terracloud.de).<br> | |||
<br> | <br> | ||
[[ | [[File:Firmware_Neustart.png|border|Firmware_Reboot]]<br> | ||
<br> | <br> | ||
After the firewall has successfully restarted and you have logged in again, the new firmware must be confirmed as the new standard firmware.<br> | |||
<br> | <br> | ||
[[ | [[File:Firewall-Firmware-ReleaseNotes.png|border|Firewall-Firmware-ReleaseNotes]]<br> | ||
< | <span id="Meldung_zum_Virenscanner_bestätigen"></span> | ||
=== Confirm virus scanner message === | |||
=== | |||
If you have booked the firewall with only one vCore, you will receive a message that the number of virus scanners on the firewall has been reduced for stability and performance reasons.<br> | |||
This message is normal and needs to be confirmed.<br> | |||
[[File:Virenscanner-Meldung.png|border|Virus scanner message]]<br> | |||
[[ | <span id="Cloud-Backup_Passwort_setzen"></span> | ||
< | === Set cloud backup password === | ||
=== | |||
Please enter a password to back up your firewall configuration in the Securepoint cloud.<br> | |||
This gives you the opportunity to import the firewall configuration from the Securepoint Cloud after reinstalling the firewall.<br> | |||
[[File:Cloudbackup-Passwort.png|border|Cloudbackup-Password]]<br> | |||
[[ | |||
<br> | <br> | ||
Your firewall will then be completely set up.<br> | |||
<br> | <br> | ||
[[ | [[File:Firewall-WebGUI.png|border|Firewall-WebGUI|700px]]<br> | ||
< | <span id="Änderung_der_initialen_Kennwörter"></span> | ||
==Change of initial passwords== | |||
* | |||
We recommend changing the initial passwords after the handover. | |||
To do this, it is necessary to set up OTP for the respective user. | |||
* In the firewall interface, open the menu item Authentication --> User | |||
[[Datei:Firewall-Kennwort aendern-1.png|1200px|center|mini]] | |||
* Click on the configuration symbol (wrench) behind the respective user and enter the new password in the Password and Confirm password fields. | |||
* If the OTP has not yet been prepared for this user, this must be done here. To do this, scroll all the way down and make the appropriate OTP settings. An input format, hash algorithm and an interval must be entered. Then please click on the button with the arrow in the Code field. This will generate a new code that you can use for your OTP app. Alternatively, please use the generated QR code. At the very bottom you have the option of checking the currently generated OTP code from your OTP app. | |||
<b>Note:<br> | |||
The OTP only needs to be prepared for use at this point.<br> | |||
Without further configuration, the OTP is not required for changing the password or logging into the WebGUI.</b> | |||
<br> | <br> | ||
[[Datei:Firewall- | [[Datei:DE-Firewall-Benutzer-OTP.PNG|1200px|center|mini]] | ||
<br> | <br> | ||
* | * Finally, click on the save icon at the top right. | ||
[[Datei:Fwusermgmt.PNG|1200px|center|mini]] | |||
<br> | <br> | ||
[[Datei: | [[Datei:Firewall-Kennwort aendern-3.png|1200px|center|mini]] | ||
<br> | <br> | ||
You cannot change the user "admin".<br> | |||
This is an administrative account that is only used in the background for the firewall services.<br> | |||
'''Instructions and information on configuring the firewall can be found at:'''<br> | |||
''' | |||
http://wiki.securepoint.de/index.php/Howtos-V11 | http://wiki.securepoint.de/index.php/Howtos-V11 | ||
<br /> | <br /> | ||
< | <span id="E-Mail-Schutz:_Spam-Filter_mit_Anti-Viren-Paket_(optional)"></span> | ||
== Email protection: spam filter with anti-virus package (optional)== | |||
*https://wiki.securepoint.de/UTM/APP/Mailfilter | Protection is implemented directly on the firewall included in the cloud environment. <br> | ||
*https://wiki.securepoint.de/UTM/APP/Mailrelay-Best_Practice | The following options can be set: <br> | ||
*https://wiki.securepoint.de/UTM/APP/Mailfilter | |||
*https://wiki.securepoint.de/UTM/APP/Mailrelay-Best_Practice | |||
<br /> | <br /> | ||
< | <span id="Internet-Schutz:_Content-Filter_mit_Anti-Viren-Paket_(optional)"></span> | ||
== Internet protection: Content filter with anti-virus package (optional) == | |||
== Internet | |||
Internet protection is implemented on the cloud firewall in your cloud environment. The following options can be set: <br> | |||
*https://wiki.securepoint.de/UTM/APP/Webfilter | *https://wiki.securepoint.de/UTM/APP/Webfilter | ||
<section begin=excludeiaas/> | <section begin=excludeiaas/> | ||
<br /> | <br /> | ||
< | <span id="Änderung_der_internen_IP-Adresse"></span> | ||
== Change of internal IP address == | |||
== | |||
To change the internal IP address without losing access to the firewall,<br> | |||
first the new IP address must be added, the VPN settings adjusted and only then the old IP address deleted.<br> | |||
<br> | <br> | ||
* | * First the network object "Internal-Interface" is adjusted. To do this, open the packet filter under the "Firewall" tab. <br> | ||
[[ | * Under "Network objects" you will find the "internal-interface" object. Open the settings of the network object by clicking on the "wrench". | ||
[[File:Netzobjekte bearbeiten.png|1200px|center|mini]] | |||
<br> | <br> | ||
* | * Regardless of the initial state, select “eth1” here under “Interface” <br> | ||
[[ | [[File:Firewall-IP-aendern-1-1.png|1200px|center|mini]] | ||
<br> | <br> | ||
'''Note: In the newer firewall version, the interface field was renamed target and eth1 was renamed lan2.''' | |||
<br> | <br> | ||
* | * The new IP network is then assigned. Open the network configuration in the firewall web interface under the “Network” tab. <br> | ||
[[ | * On the right side, click on the “wrench” of eth1 for the configuration.<br> | ||
[[File:Netzwerk Konfiguration.png|1200px|center|mini]] | |||
<br> | <br> | ||
* | * Add the new IP address under the “IP addresses” tab. | ||
[[ | [[File:Schnittstelle bearbeiten1.png|1200px|center|mini]] | ||
<br> | <br> | ||
[[File:Firewall-IP-aendern-3-2.png|1200px|center|mini]] | |||
[[ | |||
<br> | <br> | ||
* | * If you only want to change the host address, it is sufficient to enter the new address here, delete the old address using the small x and complete this by clicking on the "Save" button. | ||
[[ | [[File:Firewall-IP-aendern-4.png|1200px|center|mini]] | ||
<br> | <br> | ||
* | * However, if you want to change the subnet, you must make further settings for the VPN tunnel <b>before deleting the old IP address</b>.<br> | ||
: | [[File:Firewall-IP-aendern-5.png|1200px|center|mini]] | ||
<br> | <br> | ||
* Open the SSL-VPN configuration in the firewall web interface under the "VPN" tab.<br> | |||
[[ | * Click on the wrench on the right to edit the SSL-VPN connection. <br> | ||
[[File:SSL VPN2.png|1200px|center|mini]] | |||
<br> | <br> | ||
[[ | * You can then release the address range of the server networks. After adding, click on Save and then on "Restart". <br> | ||
:'''Please note that this will interrupt all tunnels and require a new tunnel to be set up!'''<br> | |||
[[File:SSL VPN3.png|1200px|center|mini]] | |||
<br> | <br> | ||
[[File:Firewall-IP-aendern-8.png|1200px|center|mini]] | |||
[[ | |||
<br> | <br> | ||
[[File:Firewall-IP-aendern-9.png|1200px|center|mini]] | |||
[[ | |||
<br> | <br> | ||
* We then remove the old, no longer required network from the eth1 interface <br> | |||
[[ | [[File:Schnittstelle bearbeiten.png|1200px|center|mini]] | ||
<br> | <br> | ||
[[File:Firewall-IP-aendern-11.png|1200px|center|mini]] | |||
[[ | |||
Aktuelle Version vom 20. November 2025, 10:18 Uhr
Private Cloud Strategy
Basically, every private cloud package from the TERRA CLOUD is delivered with a virtual Securepoint UTM appliance.
This starter guide serves as the basis for setting up a VPN tunnel and accessing the firewall's web interface.
Requirements for access
OpenVPN Client:
- Securepoint VPN Client - Download Link
- other OpenVPN client
- OpenVPN Client for MacOS - click here
VPN configuration file:
The VPN data for administrator access can be found in the Cloud Center below the respective order within the service information, see also Service-Information.
VLAN Requirements
Every virtual Securepoint UTM has 2x virtual network interfaces by default.
One of these communicates with the Internet, the other communicates with the systems in the package.
Since a Hyper-V VM can have a maximum of 8x network cards attached, we can provide a maximum of 6x additional VLANs.
Connect to the firewall
An existing VPN tunnel is required for the connection to the firewall.
Before establishing the connection, please check whether the standard port 1194 is enabled for VPN connections on your local firewall.
If port 1194 is blocked, establishing the VPN tunnel will fail.
Initial setup of the VPN connection in the Securepoint VPN Client
- Install the respective VPN client, in this example we are assuming the Securepoint VPN client.
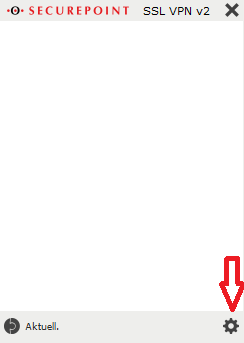
- Open the VPN client and click the gear at the bottom right to open the settings menu..
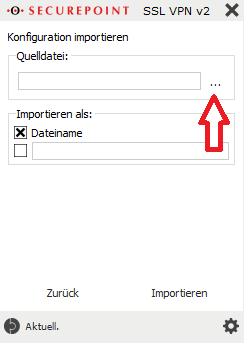
- In the context menu under Source file, click on the three dots to select the source file that was previously downloaded from the Cloud Portal, see also [Service Information].
- Select the opvn file from the previously extracted zip file and click “Import”.
- Optionally, the configuration can be assigned a name under “Import as:” under which the configuration will later be visible in the VPN client.
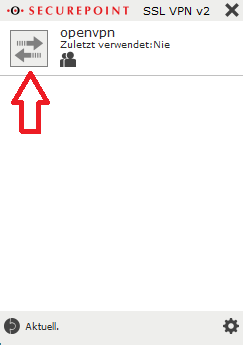
- Use the arrow button to start establishing the VPN connection
The required initial access data is:
User: ssluser-admin
Password: ChanTroFar93!
Connection to the firewall web interface
After the VPN connection has been successfully established, access the following address in any browser:
https://<firewall IP address>:11115
The IP address of the firewall was assigned by you when ordering the environment and can be accessed subsequently in the Cloud Center
can be viewed below the respective order within the service information, see also Service Information.
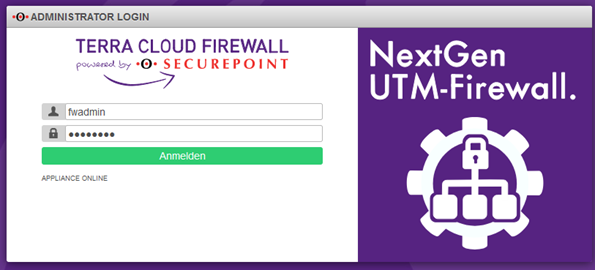
The required initial access data is:
User: fwadmin
Password: Terra001
Initial access to the firewall web interface
Note:
The WebGUI has changed visually since firmware version 12.6.2.
However, with a few exceptions, all points are still called the same, so you can continue to follow all the steps using the following instructions.
The first time you open the firewall web interface, a few things need to be done:
Assign firewall name
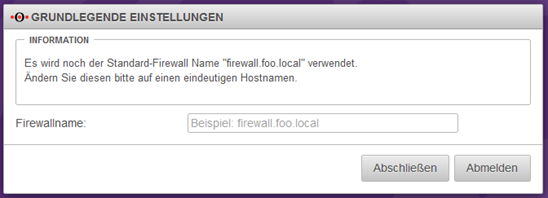
Please enter a firewall name, which must correspond to an FQDN, e.g. myfirewall.local.
The firewall name must not contain any umlauts, special characters or capital letters.
Then click on the Complete button.
Firmware Update
Depending on the preinstalled firmware version, you will receive a message that a newer firmware is available.
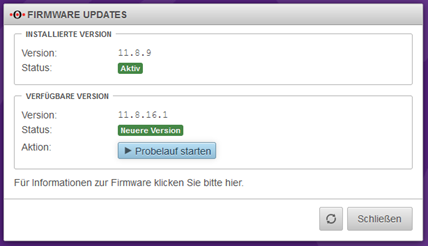
In this example we assume that version 11.8.9 is preinstalled.
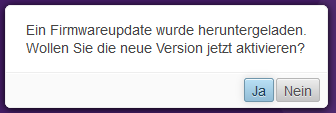
This query should be answered with Yes when the environment is commissioned for the first time.
You will then receive a view of the available new firmware, which will be imported using the “Start test run” button.
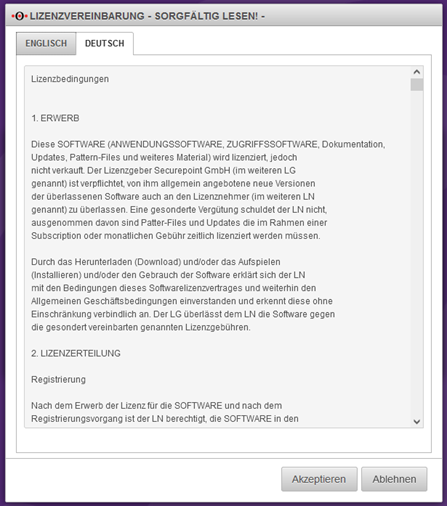
In order to use the new firmware, several license agreements must be checked and accepted.
Finally, a restart must be carried out. This can take up to 5 minutes.
You can follow the restart via the console connection via the Technical Center (https://manage.terracloud.de).
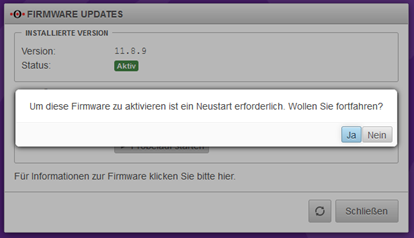
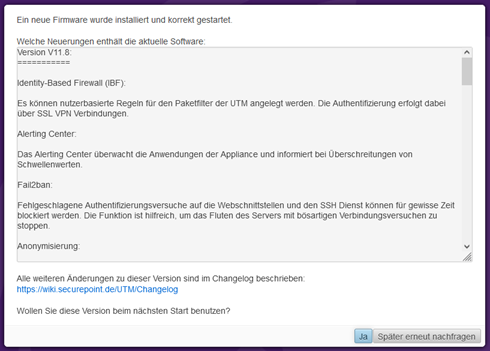
After the firewall has successfully restarted and you have logged in again, the new firmware must be confirmed as the new standard firmware.
Confirm virus scanner message
If you have booked the firewall with only one vCore, you will receive a message that the number of virus scanners on the firewall has been reduced for stability and performance reasons.
This message is normal and needs to be confirmed.

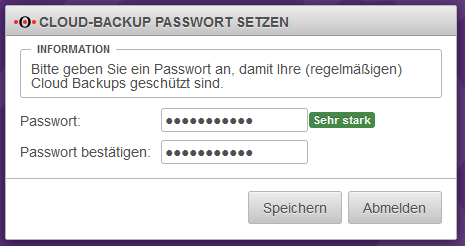
Set cloud backup password
Please enter a password to back up your firewall configuration in the Securepoint cloud.
This gives you the opportunity to import the firewall configuration from the Securepoint Cloud after reinstalling the firewall.
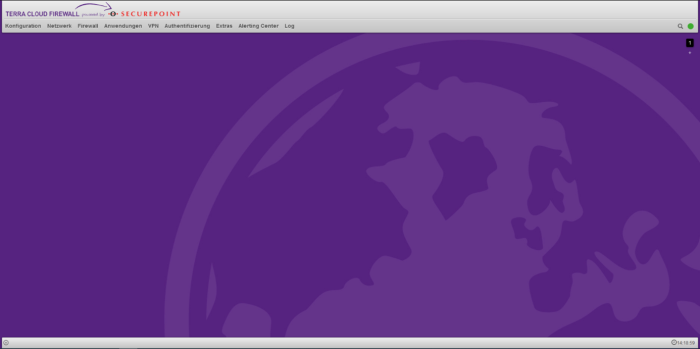
Your firewall will then be completely set up.
Change of initial passwords
We recommend changing the initial passwords after the handover. To do this, it is necessary to set up OTP for the respective user.
- In the firewall interface, open the menu item Authentication --> User
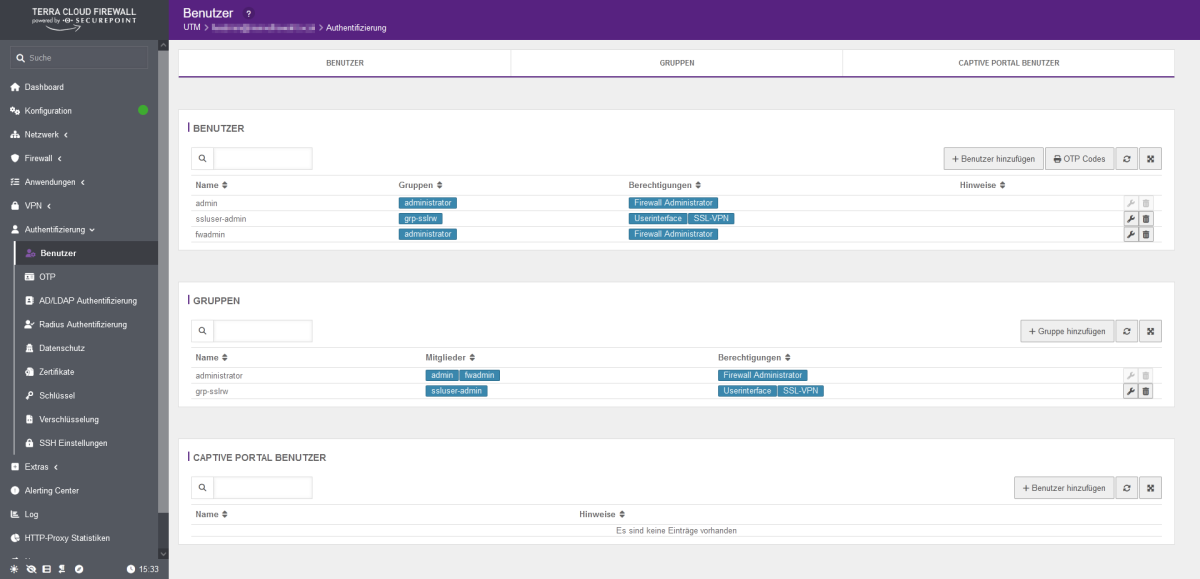
- Click on the configuration symbol (wrench) behind the respective user and enter the new password in the Password and Confirm password fields.
- If the OTP has not yet been prepared for this user, this must be done here. To do this, scroll all the way down and make the appropriate OTP settings. An input format, hash algorithm and an interval must be entered. Then please click on the button with the arrow in the Code field. This will generate a new code that you can use for your OTP app. Alternatively, please use the generated QR code. At the very bottom you have the option of checking the currently generated OTP code from your OTP app.
Note:
The OTP only needs to be prepared for use at this point.
Without further configuration, the OTP is not required for changing the password or logging into the WebGUI.
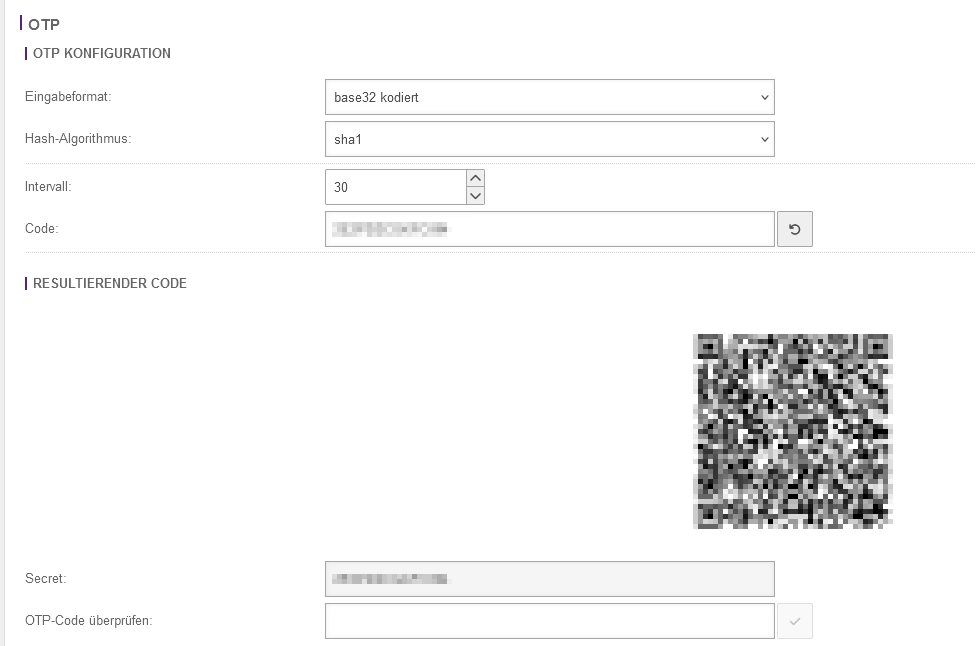
- Finally, click on the save icon at the top right.


You cannot change the user "admin".
This is an administrative account that is only used in the background for the firewall services.
Instructions and information on configuring the firewall can be found at:
http://wiki.securepoint.de/index.php/Howtos-V11
Email protection: spam filter with anti-virus package (optional)
Protection is implemented directly on the firewall included in the cloud environment.
The following options can be set:
- https://wiki.securepoint.de/UTM/APP/Mailfilter
- https://wiki.securepoint.de/UTM/APP/Mailrelay-Best_Practice
Internet protection: Content filter with anti-virus package (optional)
Internet protection is implemented on the cloud firewall in your cloud environment. The following options can be set:
Change of internal IP address
To change the internal IP address without losing access to the firewall,
first the new IP address must be added, the VPN settings adjusted and only then the old IP address deleted.
- First the network object "Internal-Interface" is adjusted. To do this, open the packet filter under the "Firewall" tab.
- Under "Network objects" you will find the "internal-interface" object. Open the settings of the network object by clicking on the "wrench".
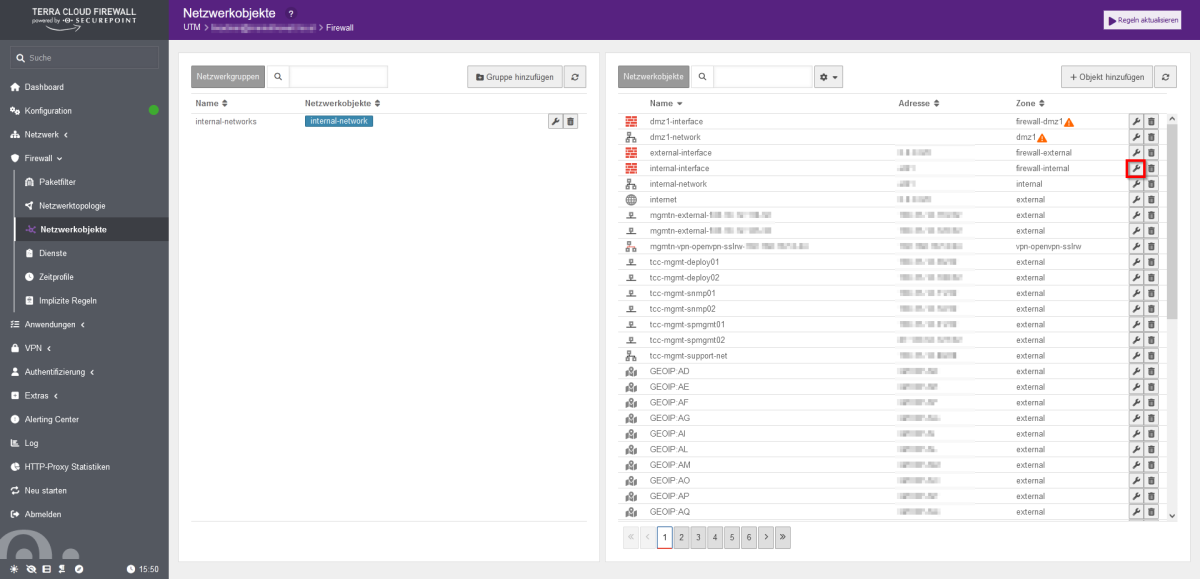
- Regardless of the initial state, select “eth1” here under “Interface”

Note: In the newer firewall version, the interface field was renamed target and eth1 was renamed lan2.
- The new IP network is then assigned. Open the network configuration in the firewall web interface under the “Network” tab.
- On the right side, click on the “wrench” of eth1 for the configuration.
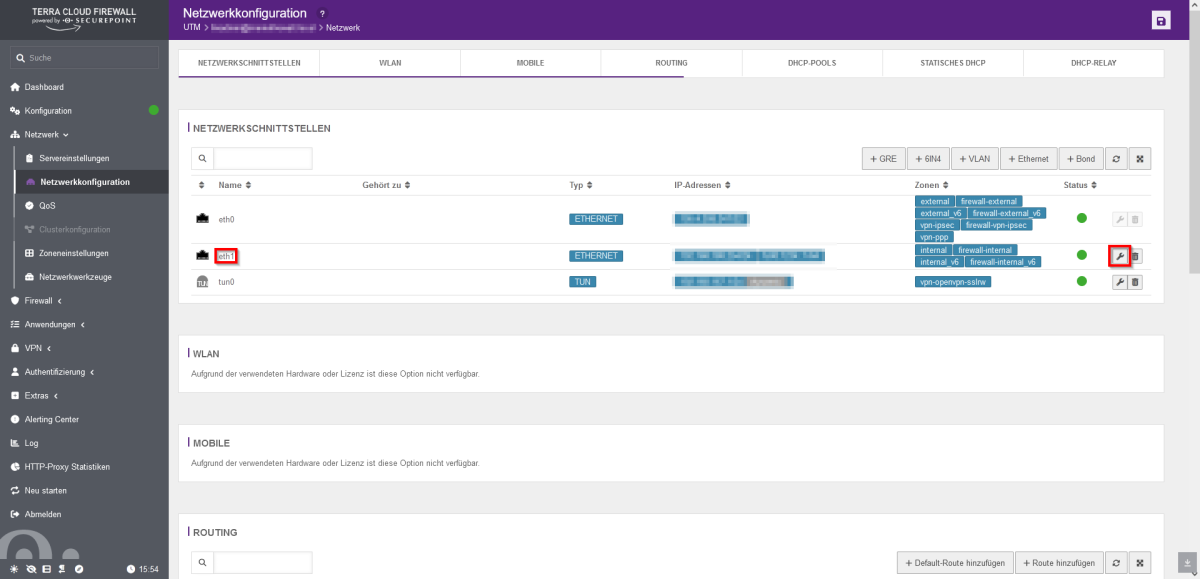
- Add the new IP address under the “IP addresses” tab.


- If you only want to change the host address, it is sufficient to enter the new address here, delete the old address using the small x and complete this by clicking on the "Save" button.

- However, if you want to change the subnet, you must make further settings for the VPN tunnel before deleting the old IP address.

- Open the SSL-VPN configuration in the firewall web interface under the "VPN" tab.
- Click on the wrench on the right to edit the SSL-VPN connection.
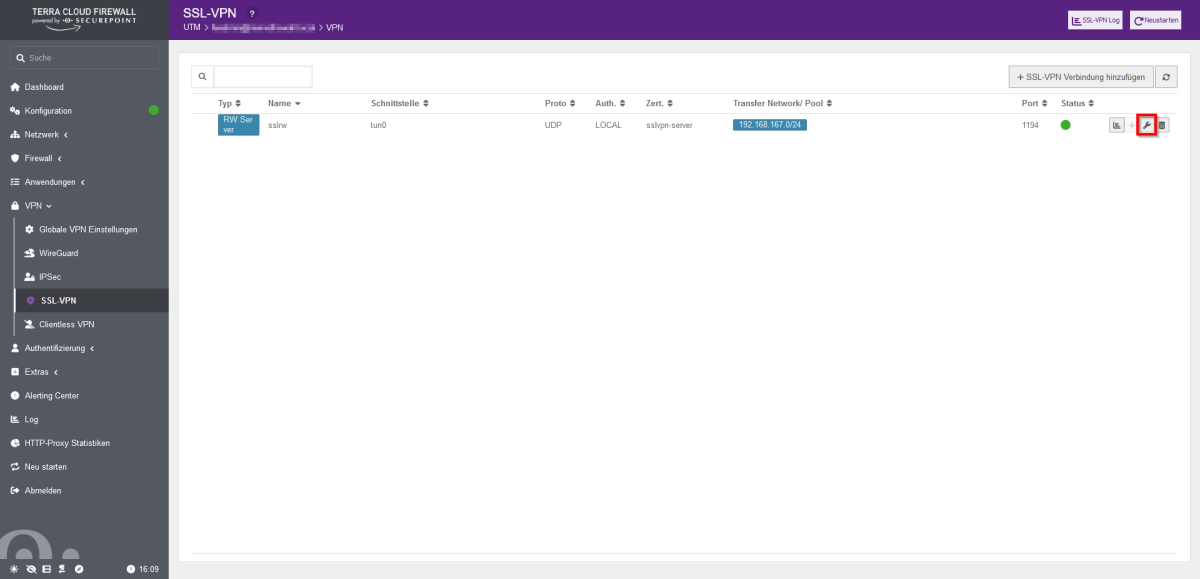
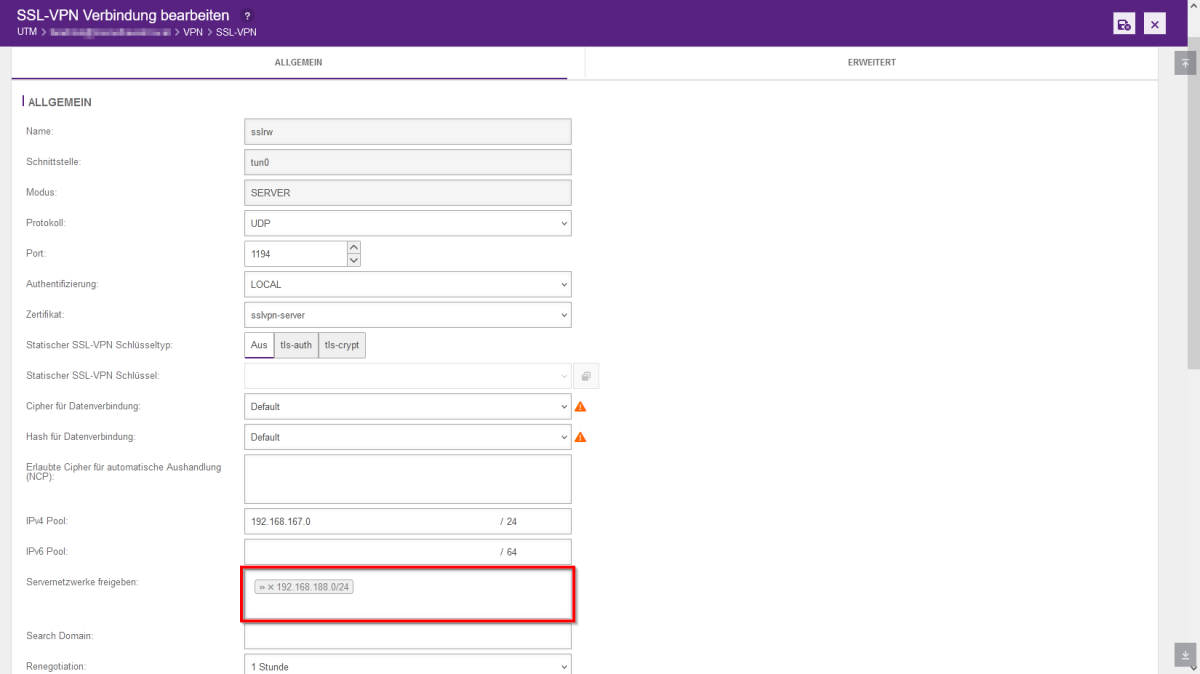
- You can then release the address range of the server networks. After adding, click on Save and then on "Restart".
- Please note that this will interrupt all tunnels and require a new tunnel to be set up!
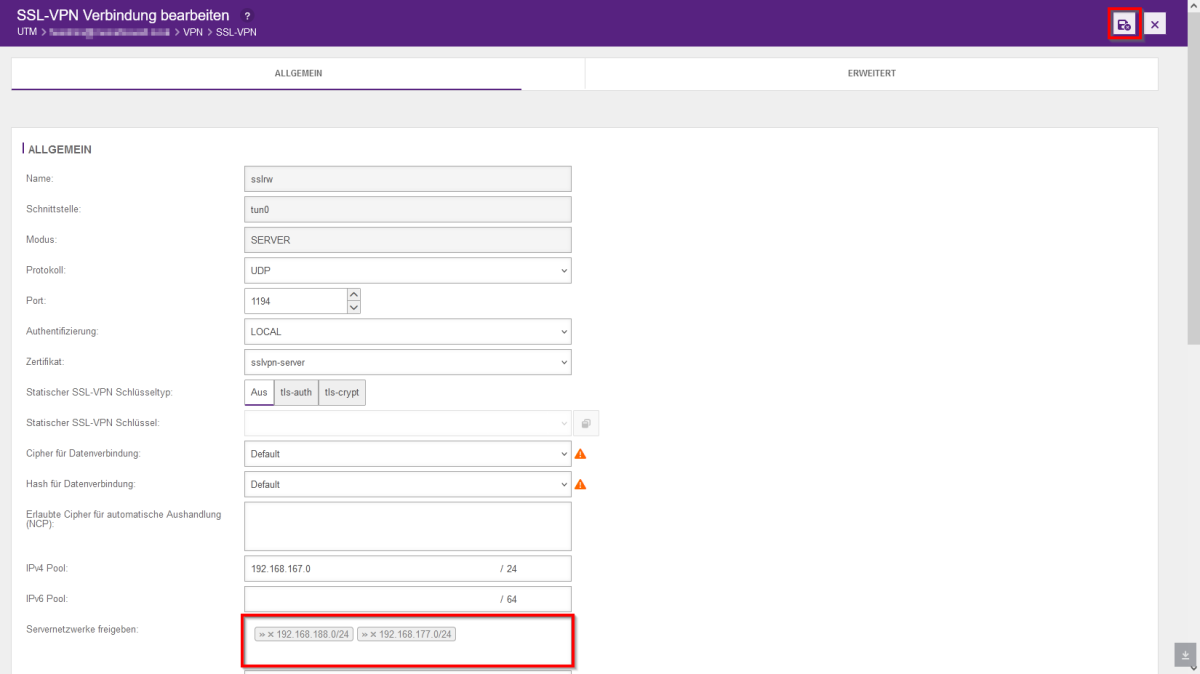

- We then remove the old, no longer required network from the eth1 interface


