TERRA CLOUD Veeam Data Protection/en: Unterschied zwischen den Versionen
Die Seite wurde neu angelegt: „== '''Introduction''' ==“ |
Die Seite wurde neu angelegt: „===== Download =====“ |
||
| Zeile 102: | Zeile 102: | ||
If the alarm has not yet been deactivated, the following message will be displayed in the Protection Portal and/or sent to you via email. <br> | If the alarm has not yet been deactivated, the following message will be displayed in the Protection Portal and/or sent to you via email. <br> | ||
[[File:Managed-companies-quota.png|750px|without]] | [[File:Managed-companies-quota.png|750px|without]] | ||
< | <span id="Endkunden_erstellen_und_verknüpfen"></span> | ||
=== | === Create and link end customers === | ||
'''General:'''<br> | |||
''' | In the Protection Portal, end-customer organizations are represented by a "Company." Your "Reseller" organization can manage any number of companies and thus end customers.<br> | ||
Companies can only be created automatically via the [https://manage.terracloud.de/login TERRA CLOUD Technical Center] and not manually in the Protection Portal.<br> | |||
Companies | This enables the clear assignment of TERRA CLOUD Veeam Data Protection usage data to an end customer from the TERRA CLOUD Center/Technical Center. <br> | ||
<br> | <br> | ||
'''TERRA CLOUD Veeam Data Protection | '''Deploy TERRA CLOUD Veeam Data Protection for an end customer'''<br> | ||
# | # Please navigate to the "Customer Management" section in the [https://manage.terracloud.de TERRA CLOUD Technical Center] | ||
# | # Select the desired end customer and go to the "SERVICE SETTINGS" tab | ||
# | # Start the deployment by clicking "CREATE AND LINK END CUSTOMER" (see screenshot below) | ||
<br> | <br> | ||
[[ | [[File:TC-create-company-open2.png|1250px|without]] | ||
The automated deployment performs the following steps in the background:<br> | |||
# | # Create a company based on the end customer information from the Technical Center | ||
# | # Assign your resources for data backup (Veeam Backup for M365 Server and Repository) | ||
# | # Create a user account for the company | ||
<br> | <br> | ||
After successful completion, the created user account and a green check mark will be displayed.<br> | |||
The The displayed user access is a default of the Veeam Service Provider Console and is not required for setting up and managing data backups.<br> | |||
This provides insight into the data backup configuration within the company.<br> | |||
[[ | [[File:TC-create-company-ready.png|1250px|without]] | ||
<!-- | <!-- | ||
If you would like to create a new end customer in the protection.terracloud.de portal, please first select the "Companies" tab in the left menu bar.<br> | |||
After selecting the "green plus symbol" in the top left, you can start configuring the user account.<br> | |||
[[ | [[File:New_Company_New.png|framed|without|1000 px]] | ||
In the first step, under "Company Info," you can enter the contact details of your new customer.<br> | |||
The only required field here is "Company name." All other fields can be filled in optionally.<br> | |||
[[ | [[File:New_Company_Company_Info.png|framed|without]] | ||
Please select the "Native" option in the second step "Company Type."<br> | |||
[[ | [[File:New_Company_Company_Type.png|framed|without]] | ||
In | In the "User Info" menu, define a portal user for the respective customer. Assign a username and password.<br> | ||
Please note that a username can only be assigned once. | |||
Additionally, assign the "TERRA CLOUD Hüllhorst" site to the account.<br> | |||
[[ | [[File:New_Company_User_Info.png|framed|without]] | ||
In the next step, "Services," your "Microsoft 365 managed backup" resources are stored for your end customer.<br> | |||
The resources consist of a Veeam backup for M365 servers and a target storage (repository).<br> | |||
After clicking the "Configure" link, followed by "Add," you can add an M365 backup server (proxy server) and a repository in the context menu.<br> | |||
You can limit your end customer using quotas; in this example, the end customer has no limits. <br> | |||
[[ | [[File:Add Repository-new.png|framed|without]] | ||
If you optionally select the "Job Scheduling" checkbox, you can give your customer the option to create their own backup job schedules.<br> | |||
Finally, the "Services" for your end customer should look like this:<br> | |||
[[ | [[File:Services overview.png|framed|without]] | ||
Under the "Billing" tab, you can define a price list for offered services. This step is entirely optional.<br> | |||
You can leave the "Bandwidth" settings at their default values. You do not need to limit the performance.<br> | |||
[[ | [[File:New_Company_Billing.png|framed|without]] | ||
Multi-factor authentication can optionally be enabled in the next step. Please note the note regarding third-party programs.<br> | |||
Finally, you can compose a welcome email that your customer will receive after completing the onboarding process.<br> | |||
Our SMTP server is automatically added to the reseller settings once a day to send the emails.<br> | |||
[[ | [[File:New_Company_Notifications.png|framed|without]] | ||
--> | --> | ||
< | <span id="Einrichtung_einer_Microsoft_365_Datensicherung"></span> | ||
=== Setting up a Microsoft 365 data backup === | |||
=== | |||
< | <span id="Microsoft_365_Organisationen_verbinden_und_verknüpfen"></span> | ||
==== Microsoft 365 | ==== Connect and link Microsoft 365 organizations ==== | ||
To configure data backup, please go to the [https://protection.terracloud.de Protection Portal].<br> | |||
<br> | <br> | ||
The link between a created company (end customer) and a Microsoft 365 tenant can be configured in the "Veeam Backup for Microsoft 365 Plugin." <br> | |||
You can find this in the plugin library list in the "Configuration" section. <br> | |||
[[ | [[File:Connect-M365-1.png|frameless|1200px|border|without]]<br> | ||
Go to the "Organizations" menu item and add a new one using "New." | |||
[[ | [[File:Connect-M365-2.png|frameless|1200px|border|without]]<br> | ||
First, select the company you want to link, and then select the object types you want to protect ("Protected Services"). <br> | |||
This selection determines which permissions the Entra ID application requires for tenant data backup. <br> | |||
[[ | [[File:Connect-M365-3.png|frameless|1200px|border|without]]<br> | ||
The Microsoft 365 region must then be specified if it differs from the "Default" default. <br> | |||
[[ | [[File:Connect-M365-4.png|frameless|1200px|border|without]]<br> | ||
Please register a new Entra ID application in the tenant to be backed up. <br> | |||
The abbreviation TCVDP in the example stands for TERRA CLOUD Veeam Data Protection and facilitates identification within Entra ID. <br> | |||
[[ | [[File:Connect-M365-5.png|frameless|1200px|border|without]]<br> | ||
To create the Entra ID application and grant it the required permissions, you must log in and authorize it as a Global Administrator. <br> | |||
Please copy the code and log in to M365 using the link provided. <br> | |||
[[ | [[File:Connect-M365-6.png|frameless|1200px|border|without]]<br> | ||
Confirm your login to the Microsoft Azure CLI to create and authorize the Entra ID application.<br> | |||
[[ | [[File:Connect-M365-9.png|frameless|1200px|border|without]]<br> | ||
After successful login and confirmation, the "Verification" status should change to "Verified." <br> | |||
If not, you can generate a new code using "Refresh code" and log in again. <br> | |||
[[ | [[File:Connect-M365-10.png|frameless|1200px|border|without]]<br> | ||
Finally, the status of the M365 Organization and the VSPC Company should be set to "Mapped." <br> | |||
[[ | [[File:Connect-M365-11.png|frameless|1200px|border|without]] | ||
< | <span id="Microsoft_365_Backup_Job_erstellen"></span> | ||
==== Create a Microsoft 365 backup job ==== | |||
==== Microsoft 365 | |||
To configure a backup job, select the "Backup Jobs" tab in the left menu bar in the "Management" section. <br> | |||
You can create a new backup job using "Create Job." <br> | |||
First, enter a name for the backup job and, optionally, a description.<br> | |||
We recommend choosing a name that reflects the job's backed-up content, as in our example.<br> | |||
[[File:New Backup Job.png|framed|without]] | |||
[[ | Please select the already [[TERRA_CLOUD_Veeam_Data_Protection#Microsoft_365_Organizations_connect_and_link|linked Microsoft 365 tenant]] that you want to back up.<br> | ||
The backup scope of your job is configured under the Backup Mode. The backup of the entire organization is preselected.<br> | |||
[[File:Backup scope.png|framed|without]] | |||
[[ | You can also customize the scope and define granular exclusions. <br> | ||
The next step is to add the schedule. Here, you can define the frequencies, days, and retries. <br> | |||
Optionally, you can allow or prohibit data backups within a backup window (e.g., during business hours).<br> | |||
[[File:Schedule.png|framed|without]] | |||
[[ | In the final summary, you can run the data backup immediately using the "Start the job when I click finish" option.<br> | ||
In | <span id="Wiederherstellung_von_Microsoft_365_Daten"></span> | ||
< | == '''Recovering Microsoft 365 data''' == | ||
== ''' | |||
< | <span id="Voraussetzungen"></span> | ||
=== | === Requirements === | ||
# Active Entra ID Backup Application, which is already created during [[TERRA_CLOUD_Veeam_Data_Protection#Microsoft_365_Organizations_connect_and_link|setup]] | |||
# | # Microsoft 365 credentials (affected user or global administrator) | ||
# Microsoft 365 | # TERRA CLOUD Veeam Data Protection Restore Portal Application added to the tenant | ||
# TERRA CLOUD Veeam Data Protection Restore Portal Application | <span id="Restore_Portal_Application_im_Mandanten_hinzugefügen"></span> | ||
< | === Add Restore Portal Application in the tenant === | ||
=== Restore Portal Application | |||
The TERRA CLOUD uses a Microsoft Entra ID Enterprise Application to perform restores in the backed-up tenants. <br> | |||
To enable this, the application must be added and authorized once per tenant. <br> | |||
Please use the "Connect-VB365RestorePortal" application, which is described in the following section. | |||
<span id="Connect-VB365RestorePortal_Anwendung"></span> | |||
< | ==== Connect-VB365RestorePortal Application ==== | ||
==== Connect-VB365RestorePortal | |||
===== Download ===== | ===== Download ===== | ||
You can download the "Connect-VB365RestorePortal" application via this [https://drive.terracloud.de/dl/fi4zJgp5t58rYGK4cKQngZ/Connect-VB365RestorePortal.exe '''Link''']. <br> | |||
<span id="Wiederherstellungsberechtigung_für_einen_Mandanten_erteilen"></span> | |||
< | ===== Grant restore permission for a tenant ===== | ||
===== | |||
'''Step 1:''' Start the application "''Connect-VB365RestorePortal.exe''" on an administrative system.<br> | |||
''' | In process steps 1 and 2, this checks whether the required Azure AD (now Entra ID) PowerShell modules are installed and installs them automatically if necessary. <br> | ||
'''Step 2:''' After checking the PowerShell modules, a Microsoft 365 login dialog opens in a new window. <br> | |||
''' | Please log in with a global administrator account of the tenant for which you want to perform the restore.<br> | ||
[[File:Restore-Portal-Add-Tenant.png|300px|none]] | |||
[[ | |||
<br> | <br> | ||
[[ | [[File:Connect-VB365RestorePortal-3.png|500px|none]] | ||
''' | '''Step 3:''' Please confirm the authorization of the Entra ID Restore Portal Application of the TERRA CLOUD via Azure CLI using the second Microsoft 365 login dialog. <br> | ||
After successful configuration, you should receive the following result: <br> | |||
'' | ''"The backup application 'TERRA CLOUD Veeam Data Protection - Restore Portal (V8.2)'[...] has been granted admin consent."'' | ||
[[ | [[File:Add-Restore-Portalpermission.png|500px|none]] | ||
< | <span id="Wiederherstellung_als_Benutzer_durchführen"></span> | ||
=== Restore as user === | |||
=== | |||
'''Step 1:'''<br> | |||
''' | Under the "Protected Data" menu item, you can open a new tab with the "Restore Portal" link to access the Restore Portal.<br> | ||
Please log in with the Microsoft 365 user for whom you want to restore something. <br> | |||
[[File:Restore_Portal.png|framed|without]] | |||
[[ | '''Step 2:'''<br> | ||
''' | Select the desired restore point from the calendar.<br> | ||
[[File:Restore-data1.png|framed|without]] | |||
[[ | '''Step 3:'''<br> | ||
''' | Now compile the restore set from the required files.<br> | ||
You can navigate through the backup and the various object types, as well as use the search function.<br> | |||
You can select individual files directly and restore them using the "Restore" function or add them to the restore set using "Add to Restore List." | |||
[[File:Restore-data2.png|framed|without]] | |||
[[ | '''Step 4:'''<br> | ||
''' | Please check whether all the desired files are included in the restore list under "Items." <br> | ||
You can then specify the "Restore Mode" to determine whether the files should be overwritten or retained in their original location.<br> | |||
Click the "Finish" button to start the restore. <br> | |||
[[File:Restore-Data3.png|framed|without]] | |||
[[ | <span id="Wiederherstellung_als_Administrator_für_andere_oder_mehrere_Benutzer_durchführen"></span> | ||
< | === Performing a restore as an administrator for other or multiple users === | ||
=== | |||
'''Prerequisite:'''<br> | |||
''' | You can authorize one or more users as "Restore Operators" through TERRA CLOUD Support. <br> | ||
Please provide us with the desired tenant, e.g., ''contoso.onmicrosoft.com'', and the desired user, e.g., ''admin@contoso.onmicrosoft.com''. <br> | |||
As a "Restore Operator," you can use the "Scope" to change your identity and perform the restore for other or multiple users. <br> | |||
The procedure is identical to restoring as a [[ERRA_CLOUD_Veeam_Data_Protection#Wiederherstellung_als_Benutzer_durchführen|user]]. | |||
[[File:Restore-with-RestoreOperator.png|frameless|1200px|border|without]] | |||
[[ | |||
---- | ---- | ||
< | <span id="Verbauchsdaten"></span> | ||
== '''Consumption data''' == | |||
== ''' | |||
< | <span id="Verbrauchswerte_über_das_TERRA_CLOUD_Technical_Center_ermitteln"></span> | ||
=== | === Determine consumption values via the TERRA CLOUD Technical Center === | ||
<div lang="de" dir="ltr" class="mw-content-ltr"> | <div lang="de" dir="ltr" class="mw-content-ltr"> | ||
Version vom 15. Mai 2025, 07:52 Uhr
Introduction
Product presentation TERRA CLOUD Veeam Data Protection
The Software-as-a-Service product TERRA CLOUD Veeam Data Protection offers you the opportunity to build or expand your own cloud backup platform.
At the heart of this platform is the multi-tenant portal protection.terracloud.de, which grants you access to various Veeam backup products.
TERRA CLOUD provides you with the necessary resources, such as Veeam Backup for M365 servers or TERRA CLOUD S3 storage.
At launch, you can operate a complete cloud backup solution for Microsoft 365 data for your end customers.
Additional data backup products (Veeam Agents, Backup and Replication) and storage targets will be added later.
Facility
Setup process overview
Setting up the data backup consists of four steps, with steps 2-4 being repeated for each end customer.
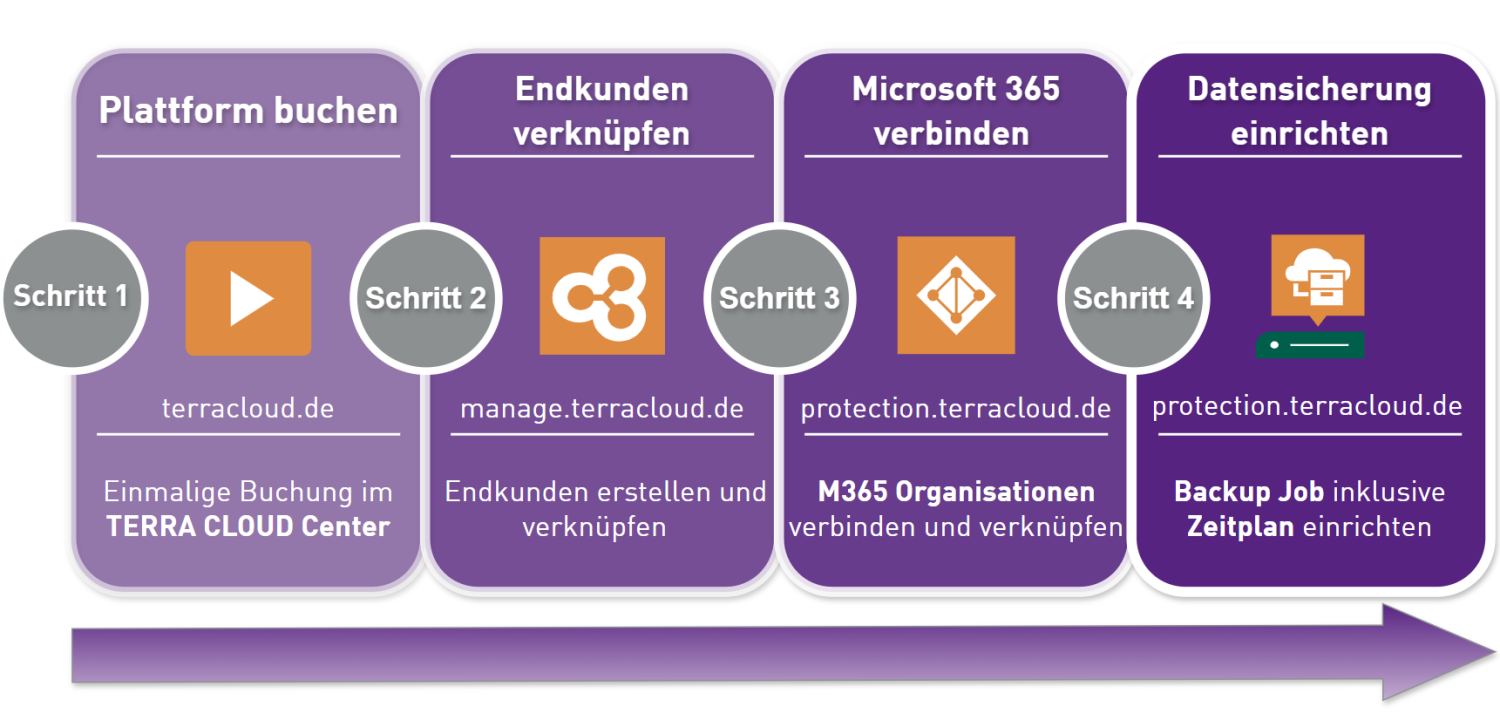
Deployment of the TERRA CLOUD Veeam Data Protection Platform
You can have your TERRA CLOUD Veeam Data Protection Platform created with a one-time order in the TERRA CLOUD Center.
Upon completion of the deployment, you will receive a confirmation email. Your initial login credentials will be displayed in the TERRA CLOUD Technical Center.
Further setup of your customers and data backups is done in the technical administration portal protection.terracloud.de.
Establishment of the portal "protection.terracloud.de"
First login and change of initial access data
First Login:
You will receive a confirmation email after the deployment is complete.
You can retrieve your initial login credentials for protection.terracloud.de via the Technical Center.
Note: The user role "Reseller Admin" is required to access the login credentials.
The login is structured as follows:
(Wortmann Customer Number)\(Wortmann Customer Number-Administrator)
Example:
111490\111490-Administrator
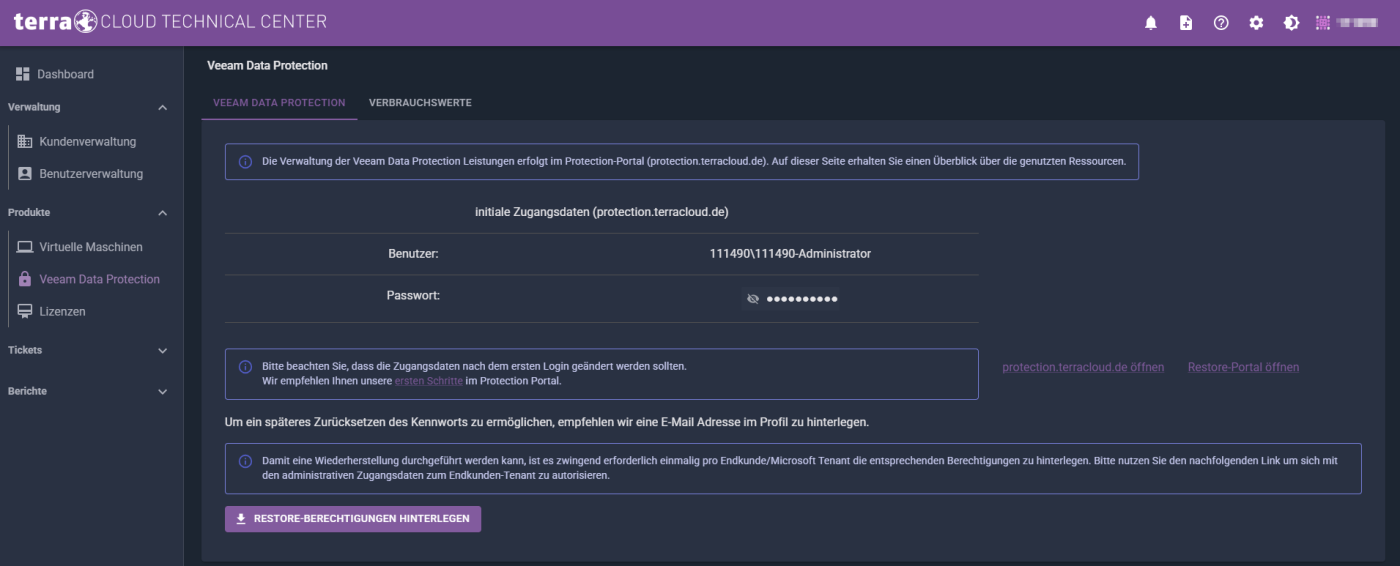
Changing the Initial login credentials and multi-factor authentication:
'
We recommend making the following adjustments to your initial administrator access (Service Provider Global Administrator) after logging in for the first time:
- Changing the password
- Activating and configuring multi-factor authentication
- Verifying the stored email address ("Forgotten password" function)
Editing a user:
Option 1:
Please go to the settings using the "Configuration" gear in the upper right corner.
In the "Roles & Users" section, select the Service Provider Global Administrator using the checkbox and edit it using the pencil icon.
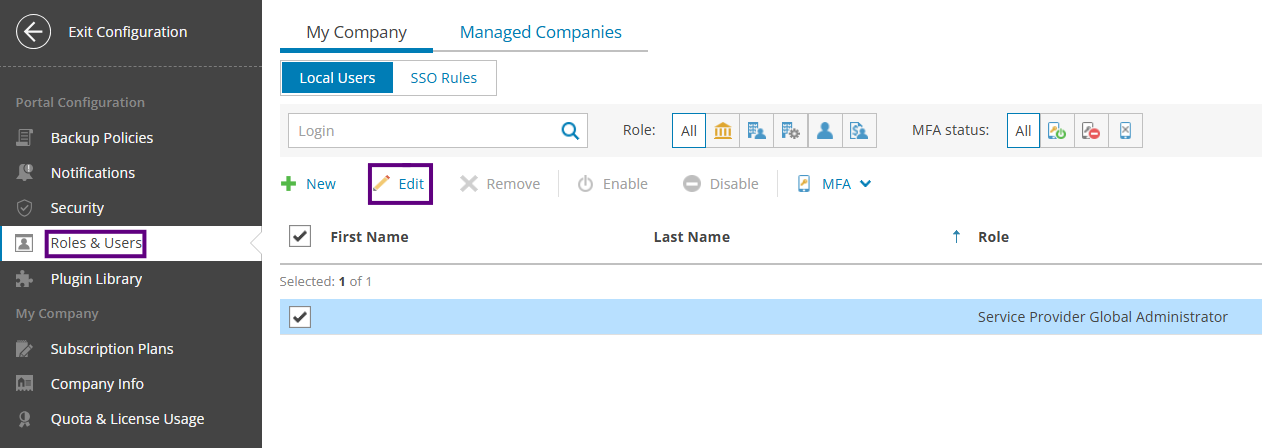
Option 2:
The currently logged in user can also be edited using the drop-down menu next to the username.

Adjusting the Administrator Profile:
Please assign a new password for this Service Provider Global Administrator user.
Check the email address stored in the "User Info" section; this is required for the "Forgot Password" function.
The address of the Cloud Master Account is stored by default. Change the address stored there if necessary.
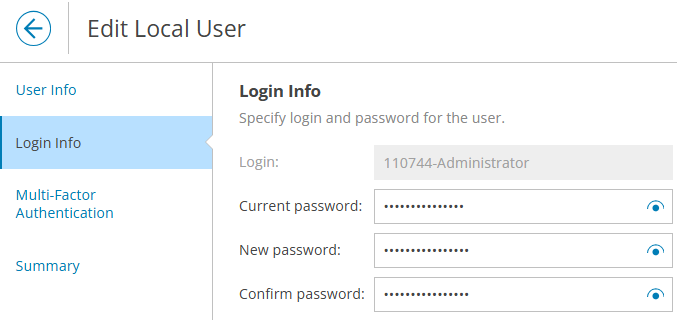
We recommend enabling multi-factor authentication for all users in the Protection Portal.

Further configuration will be performed the next time you log in.
In the final step, you will receive a summary of the configured changes.
Configure email notifications
Please follow the steps below to configure email notifications:
1. Configuring the TERRA CLOUD SMTP server
Please open the portal settings using the "Configuration" gear and select the "Notifications" menu item.
Check whether an SMTP server has already been configured by TERRA CLOUD. If so, you can skip this step.
If no SMTP server has been configured, please click "Configure."
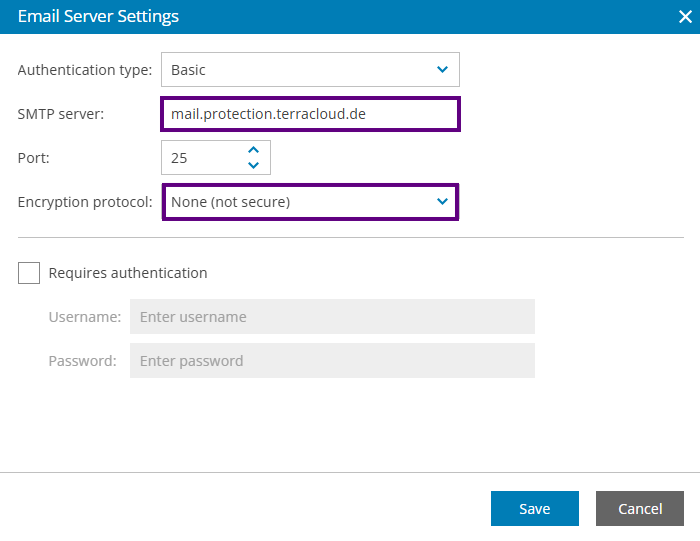
Please enter "mail.protection.terracloud.de" for the server and set the "Encryption protocol" to "None."
Since this SMTP server is located in the management infrastructure, encryption up to the SMTP server is not required.
Outgoing emails are encrypted if the receiving mail server requests it.
2. Setting up notifications
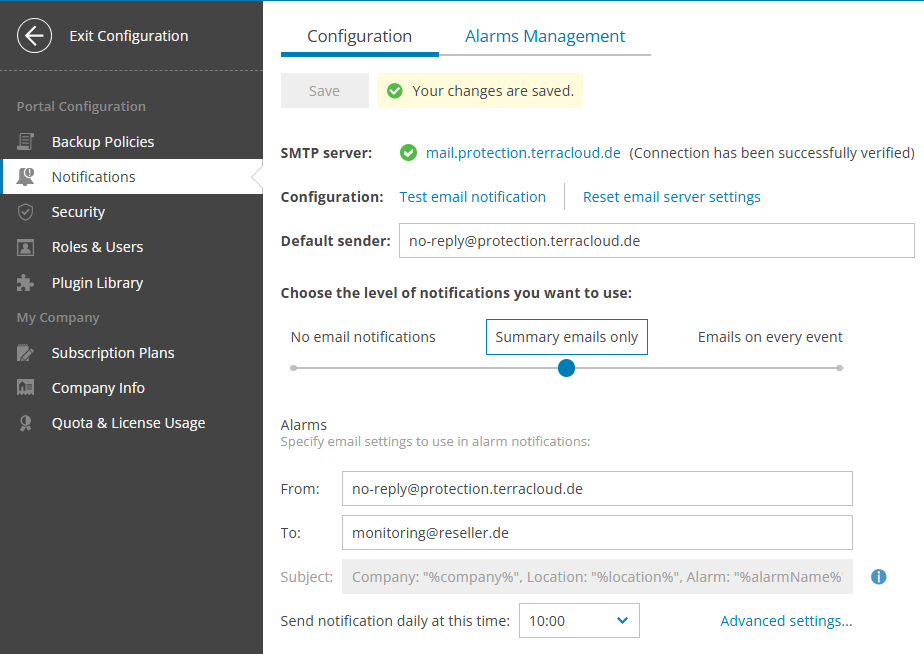
First, change the "Default sender" to "no-reply@protection.terracloud.de".
Select whether you want to be notified of every event or only receive summaries.
Enter the sender address and the desired recipient address again in the "Alarms" section.
The "Discovery Rules" and "Billing" sections are not required.
Configuration of Alarm Management
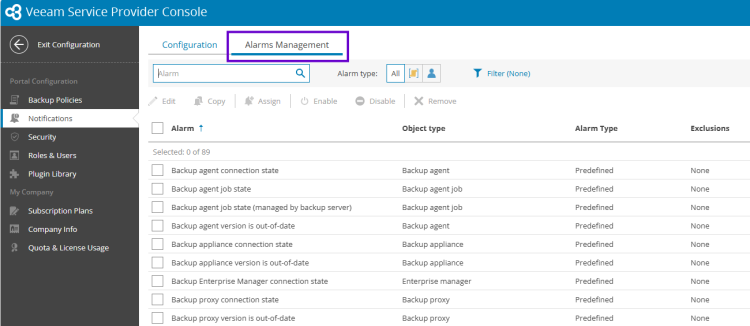
The Protection Portal offers its own monitoring function, which can be configured in the "Configuration --> Notifications --> Alarms Management" area.
Deactivating the "Managed companies quota" alarm
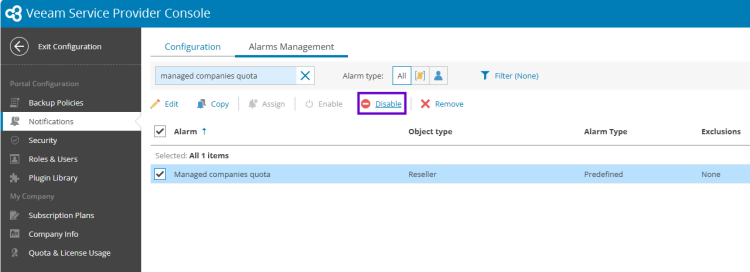
Please enter "Managed companies quota" in the search bar and disable this alarm.
TERRA CLOUD uses the Company Quota function to manage the provisioning of end customers via the TERRA CLOUD Technical Center.
For this purpose, the quota is set to the current number of managed end customers and only increased by +1 when a new end customer is provisioned automatically.
This automation causes the "Managed companies quota" alarm to be triggered incorrectly and should be disabled beforehand.
 Email notification when a Managed companies quota alarm is triggered.
If the alarm has not yet been deactivated, the following message will be displayed in the Protection Portal and/or sent to you via email.

Create and link end customers
General:
In the Protection Portal, end-customer organizations are represented by a "Company." Your "Reseller" organization can manage any number of companies and thus end customers.
Companies can only be created automatically via the TERRA CLOUD Technical Center and not manually in the Protection Portal.
This enables the clear assignment of TERRA CLOUD Veeam Data Protection usage data to an end customer from the TERRA CLOUD Center/Technical Center.
Deploy TERRA CLOUD Veeam Data Protection for an end customer
- Please navigate to the "Customer Management" section in the TERRA CLOUD Technical Center
- Select the desired end customer and go to the "SERVICE SETTINGS" tab
- Start the deployment by clicking "CREATE AND LINK END CUSTOMER" (see screenshot below)
 The automated deployment performs the following steps in the background:
- Create a company based on the end customer information from the Technical Center
- Assign your resources for data backup (Veeam Backup for M365 Server and Repository)
- Create a user account for the company
After successful completion, the created user account and a green check mark will be displayed.
The The displayed user access is a default of the Veeam Service Provider Console and is not required for setting up and managing data backups.
This provides insight into the data backup configuration within the company.

Setting up a Microsoft 365 data backup
Connect and link Microsoft 365 organizations
To configure data backup, please go to the Protection Portal.
The link between a created company (end customer) and a Microsoft 365 tenant can be configured in the "Veeam Backup for Microsoft 365 Plugin."
You can find this in the plugin library list in the "Configuration" section.
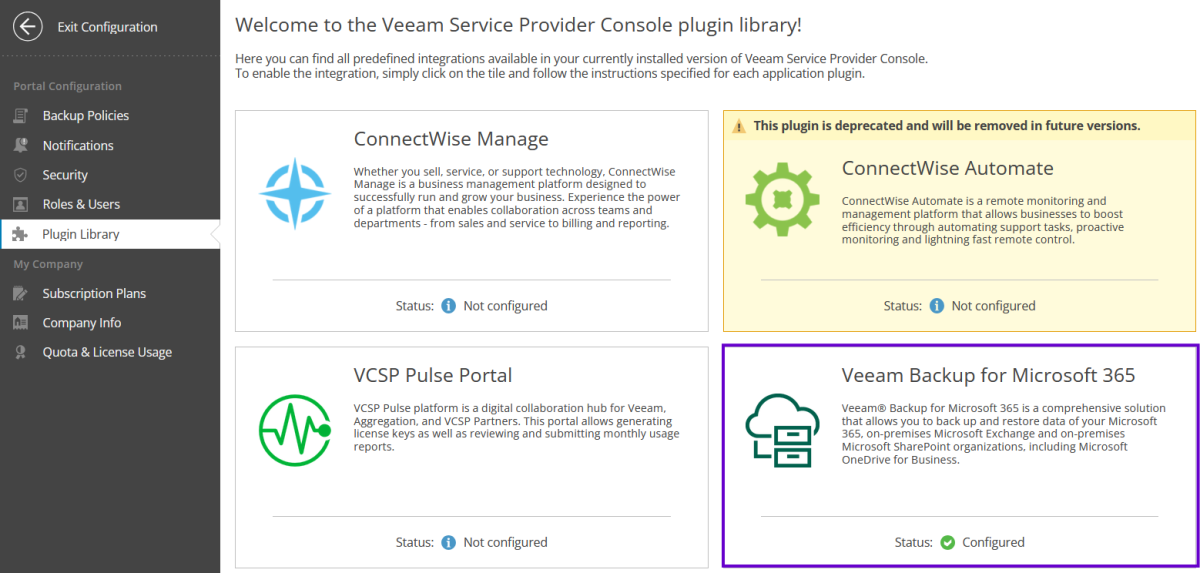
Go to the "Organizations" menu item and add a new one using "New."

First, select the company you want to link, and then select the object types you want to protect ("Protected Services").
This selection determines which permissions the Entra ID application requires for tenant data backup.
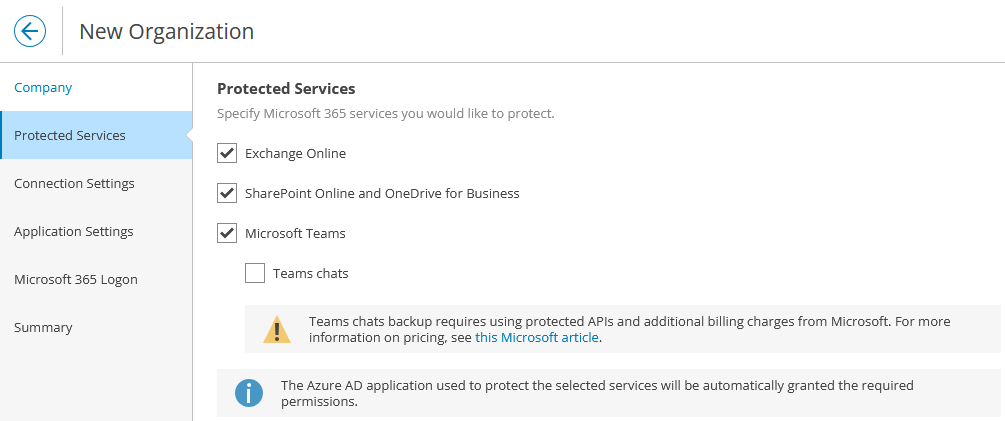
The Microsoft 365 region must then be specified if it differs from the "Default" default.
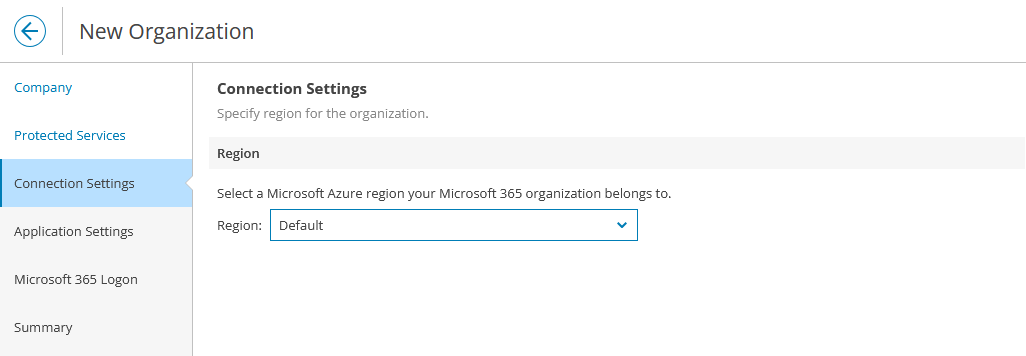
Please register a new Entra ID application in the tenant to be backed up.
The abbreviation TCVDP in the example stands for TERRA CLOUD Veeam Data Protection and facilitates identification within Entra ID.
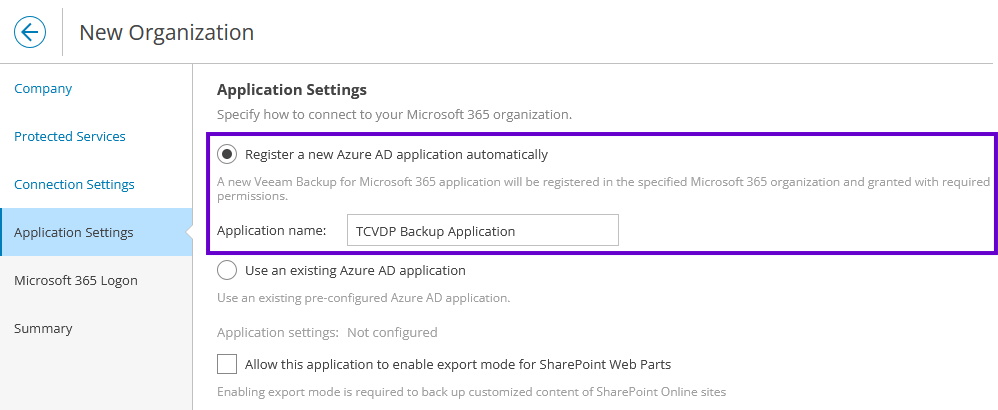
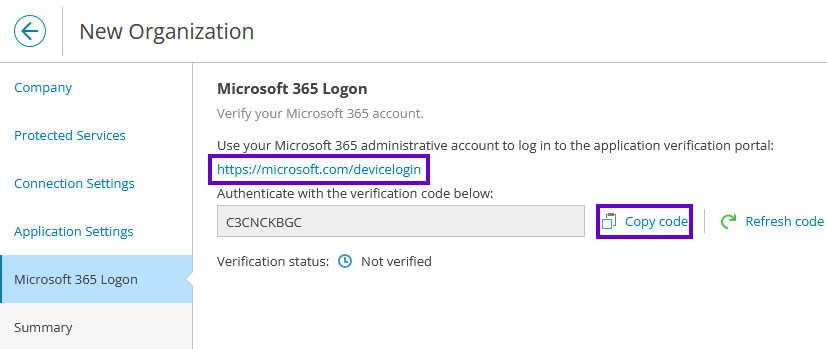
To create the Entra ID application and grant it the required permissions, you must log in and authorize it as a Global Administrator.
Please copy the code and log in to M365 using the link provided.
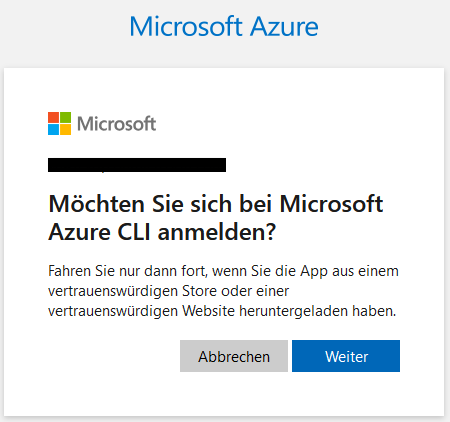
Confirm your login to the Microsoft Azure CLI to create and authorize the Entra ID application.
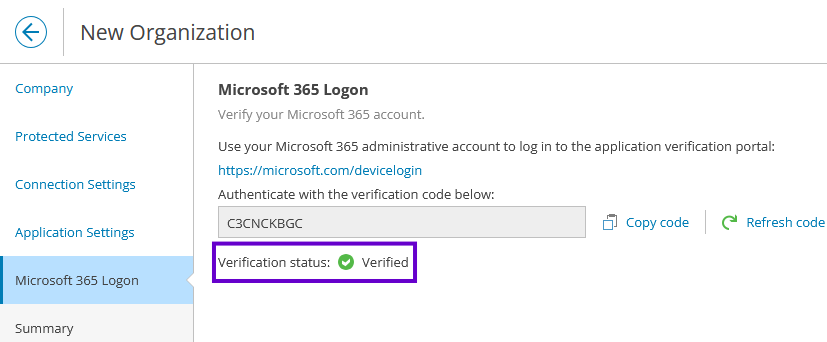
After successful login and confirmation, the "Verification" status should change to "Verified."
If not, you can generate a new code using "Refresh code" and log in again.
Finally, the status of the M365 Organization and the VSPC Company should be set to "Mapped."

Create a Microsoft 365 backup job
To configure a backup job, select the "Backup Jobs" tab in the left menu bar in the "Management" section.
You can create a new backup job using "Create Job."
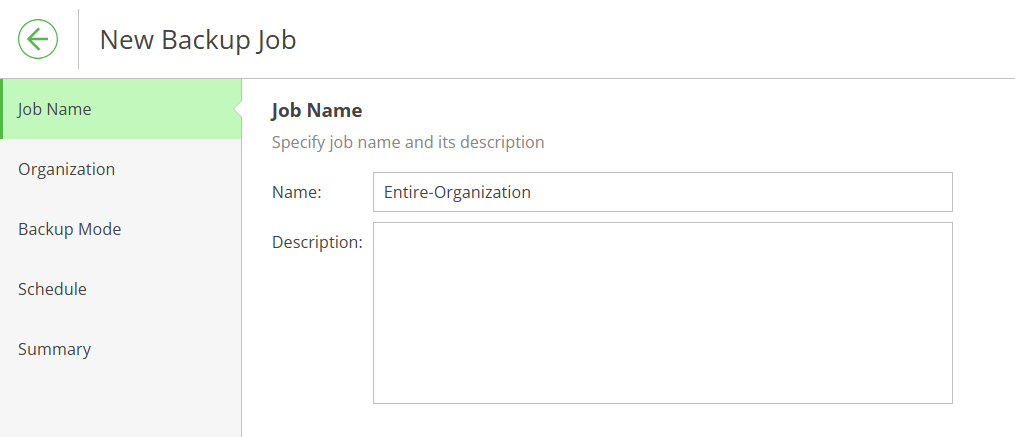
First, enter a name for the backup job and, optionally, a description.
We recommend choosing a name that reflects the job's backed-up content, as in our example.
Please select the already linked Microsoft 365 tenant that you want to back up.
The backup scope of your job is configured under the Backup Mode. The backup of the entire organization is preselected.
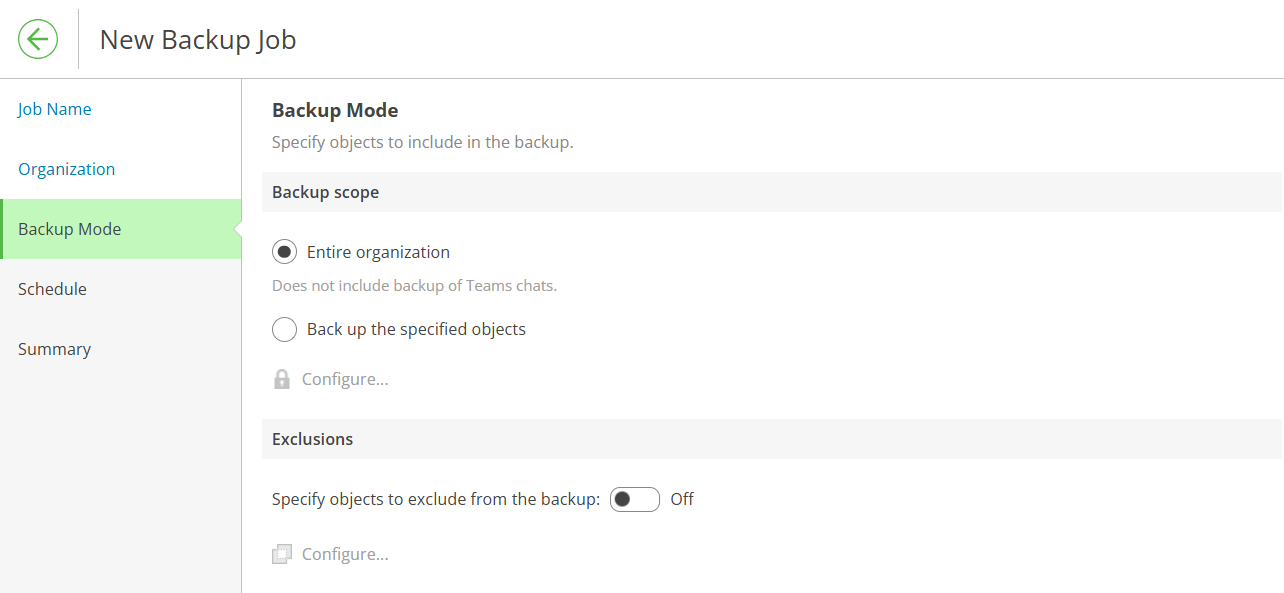
You can also customize the scope and define granular exclusions.
The next step is to add the schedule. Here, you can define the frequencies, days, and retries.
Optionally, you can allow or prohibit data backups within a backup window (e.g., during business hours).

In the final summary, you can run the data backup immediately using the "Start the job when I click finish" option.
Recovering Microsoft 365 data
Requirements
- Active Entra ID Backup Application, which is already created during setup
- Microsoft 365 credentials (affected user or global administrator)
- TERRA CLOUD Veeam Data Protection Restore Portal Application added to the tenant
Add Restore Portal Application in the tenant
The TERRA CLOUD uses a Microsoft Entra ID Enterprise Application to perform restores in the backed-up tenants.
To enable this, the application must be added and authorized once per tenant.
Please use the "Connect-VB365RestorePortal" application, which is described in the following section.
Connect-VB365RestorePortal Application
Download
You can download the "Connect-VB365RestorePortal" application via this Link.
Grant restore permission for a tenant
Step 1: Start the application "Connect-VB365RestorePortal.exe" on an administrative system.
In process steps 1 and 2, this checks whether the required Azure AD (now Entra ID) PowerShell modules are installed and installs them automatically if necessary.
Step 2: After checking the PowerShell modules, a Microsoft 365 login dialog opens in a new window.
Please log in with a global administrator account of the tenant for which you want to perform the restore.
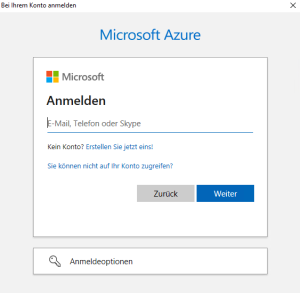
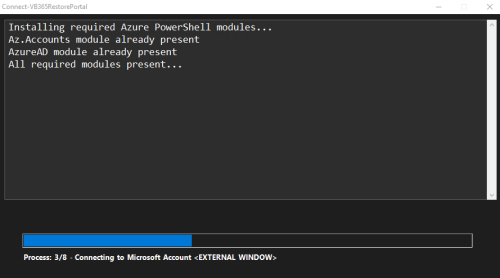
Step 3: Please confirm the authorization of the Entra ID Restore Portal Application of the TERRA CLOUD via Azure CLI using the second Microsoft 365 login dialog.
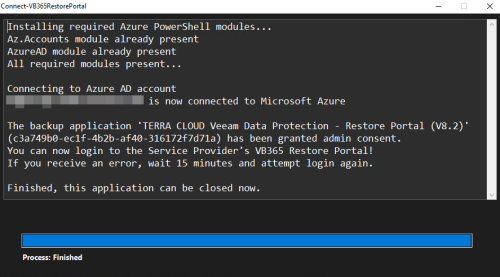
After successful configuration, you should receive the following result:
"The backup application 'TERRA CLOUD Veeam Data Protection - Restore Portal (V8.2)'[...] has been granted admin consent."
Restore as user
Step 1:
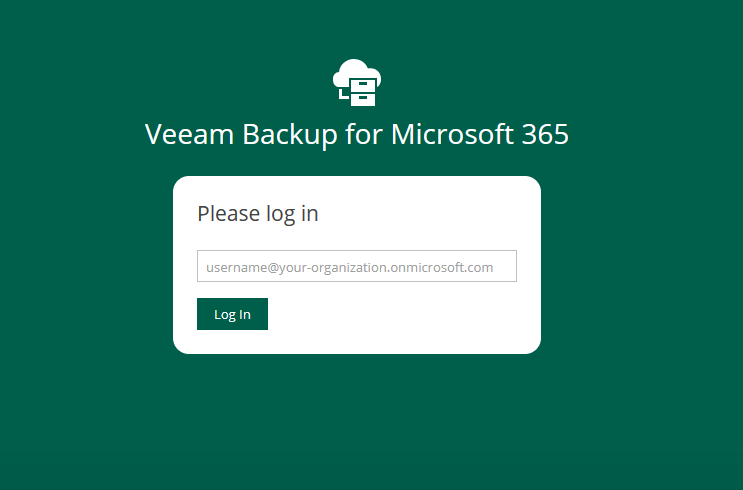
Under the "Protected Data" menu item, you can open a new tab with the "Restore Portal" link to access the Restore Portal.
Please log in with the Microsoft 365 user for whom you want to restore something.
Step 2:
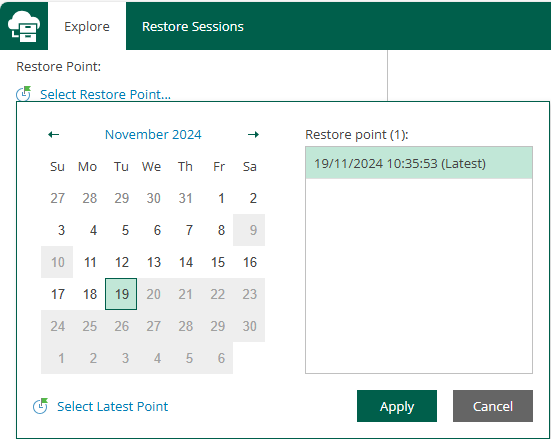
Select the desired restore point from the calendar.
Step 3:
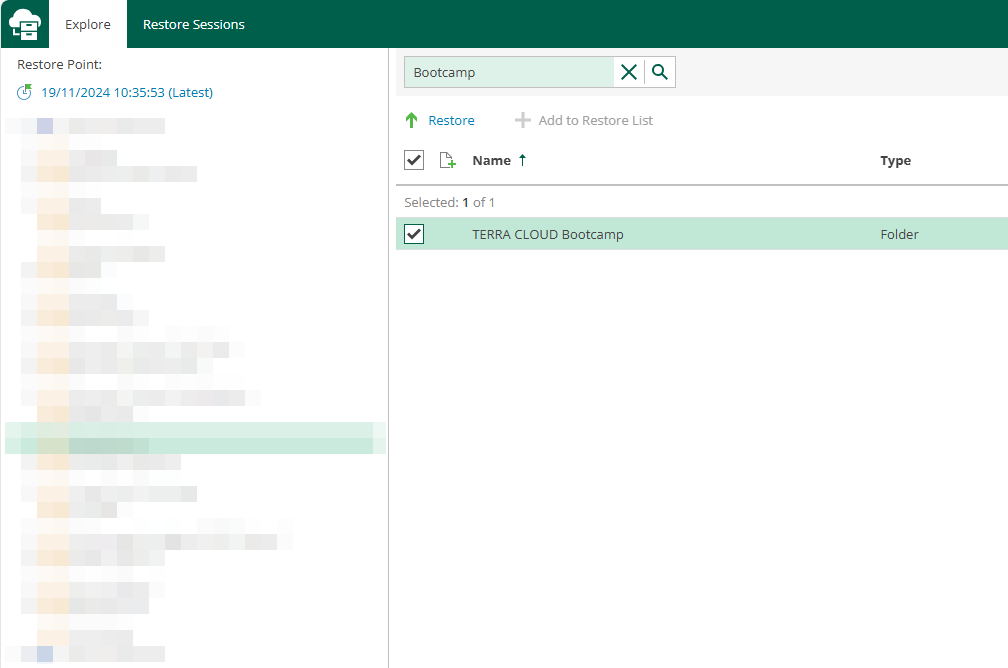
Now compile the restore set from the required files.
You can navigate through the backup and the various object types, as well as use the search function.
You can select individual files directly and restore them using the "Restore" function or add them to the restore set using "Add to Restore List."
Step 4:
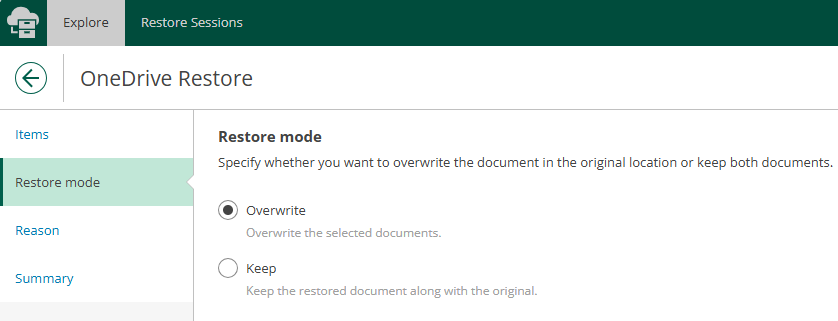
Please check whether all the desired files are included in the restore list under "Items."
You can then specify the "Restore Mode" to determine whether the files should be overwritten or retained in their original location.
Click the "Finish" button to start the restore.
Performing a restore as an administrator for other or multiple users
Prerequisite:
You can authorize one or more users as "Restore Operators" through TERRA CLOUD Support.
Please provide us with the desired tenant, e.g., contoso.onmicrosoft.com, and the desired user, e.g., admin@contoso.onmicrosoft.com.
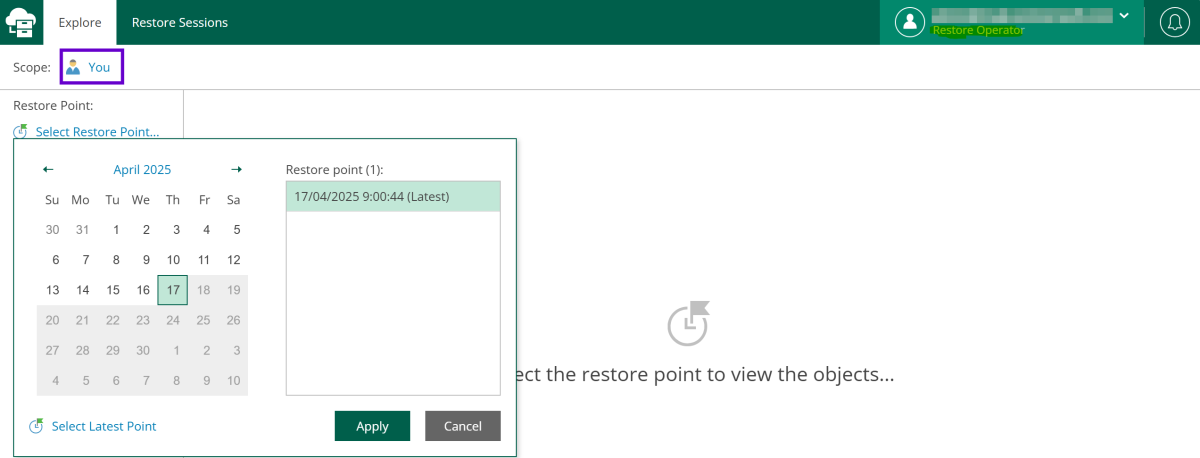
As a "Restore Operator," you can use the "Scope" to change your identity and perform the restore for other or multiple users.
The procedure is identical to restoring as a user.
Consumption data
Determine consumption values via the TERRA CLOUD Technical Center
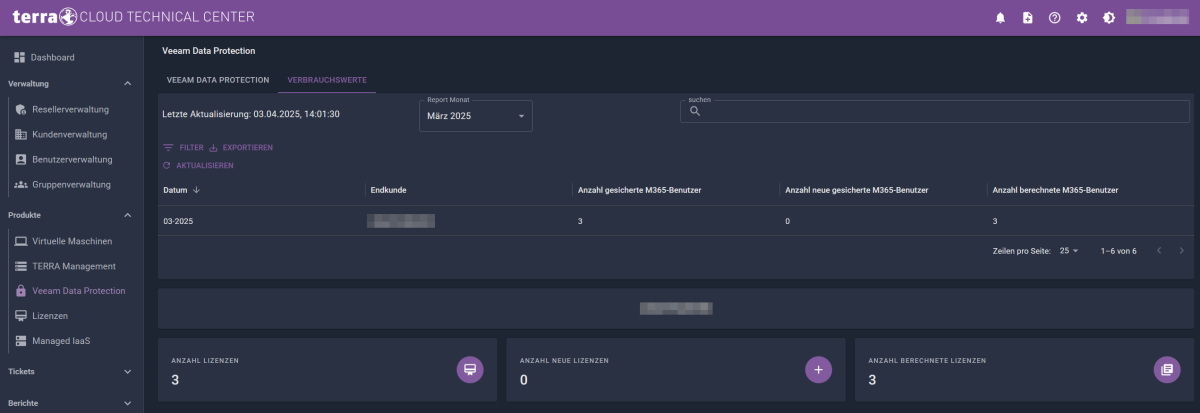
Das TERRA CLOUD Technical Center bietet Ihnen eine Übersicht je Endkunde und ein Zusammenfassung der Verbrauchsdaten für den ausgewählten Monat.
Innerhalb der Tabellenansicht können Sie die Werte wie gewohnt über die jeweilige Funktion filtern und als CSV exportieren.
Die Verbrauchsübersicht zeigt Ihnen die folgenden Werte an:
- Datum
-
- Gibt den abgeschlossenen und abrechnungsrelvanten Monat an der im Drop-Down Menü „Report Monat" ausgewählt wurde.
- Sofern nichts ausgewählt wurde wird Ihnen der letzte abgeschlossene Monat angezeigt.
- Endkunde
-
- Gibt den Endkunden an der mit dem gesicherten Microsoft 365 Mandanten verknüpft wurde.
- Anzahl gesicherte M365-Benutzer
-
- Summe aus den neuen und berechneten M365-Benutzern.
- Anzahl neue gesicherte M365-Benutzer
-
- Benutzer die im ausgewählten Monat neu in die Sicherung aufgenommen wurden, werden nicht berechnet.
- Dies gilt sowohl für die Ersteinrichtung des Mandanten als auch für neu hinzugefügte Benutzer bei Bestandskunden.
- Anzahl berechnete M365-Benutzer
-
- Benutzer die im ausgewählten Monat in Rechnung gestellt werden.
Unter der Tabelle mit den Verbrauchswerten je Endkunde erhalten Sie noch Ihre summierten Verbrauchswerte als Partner.
Wann verbraucht ein Microsoft 365 Benutzer eine Lizenz für das Backup?
Ein Microsoft 365 Benutzer verbraucht im Abrechnungsmonat eine Lizenz für das TERRA CLOUD Veeam Data Protection Microsoft 365 Backup wenn die folgenden Kriterien erfüllt sind:
- Die Onlinedienste Exchange Online und/oder SharePoint Online/OneDrive for Business werden verwendet und durch das Produkt gesichert
- Der Benutzer war Bestandteil mindestens einer Datensicherung innerhalb der letzten 31 Tage
Wichtiger Hinweis:
Die Wiederherstellung aus bereits erstellten Datensicherungen ist auch ohne aktive Lizenz möglich.
Wenn beide Kriterien zum ersten Mal erfüllt sind, wird der Benutzer als „neu“ hinterlegt.
Sofern ein Benutzer in den letzten 31 Tagen nicht gesichert wurde, wird keine Lizenz mehr verbraucht.
Was verbraucht keine Lizenz für das Microsoft 365 Backup?
Die folgenden Objekte können Teil der Sicherung sein, verbrauchen jedoch keine Lizenz.
- Microsoft Teams Objekte
- Gruppen und nicht persönliche SharePoint Sites
- Freigegebene Postfächer
- Ressourcen Postfächer
- Öffentliche Ordner
- Externe SharePoint Benutzer
- Microsoft Teams Gastbenutzer
FAQ
Microsoft Teams
Können Microsoft Teams Chats gesichert werden?
Die Chats zwischen einzelnen Benutzern und Gruppenchats können nicht gesichert werden.
Weitere Informationen zu den Einschränkungen der Veeam Backup für Microsoft 365 Teams Sicherung finden Sie hier.
Was würde gesichert werden wenn unter den „Protected Services" die Option „Teams chats" ausgewählt wird?
Die Option „Teams chats" erfordert die kostenpflichtige Nutzung der Microsoft Teams Export APIs und sichert die Beiträge in öffentlichen Teams Kanälen.
Welche Kosten entstehen für die Nutzung der Microsoft Teams Export APIs?
Eine Übersicht über die Kosten finden Sie in diesem Microsoft Beitrag.
Veeam wird als zertifizierter Partner in das Model B eingeordnet.
