IaaS/en: Unterschied zwischen den Versionen
Keine Bearbeitungszusammenfassung |
Keine Bearbeitungszusammenfassung |
||
| Zeile 7: | Zeile 7: | ||
The basis of an IaaS terra CLOUD always consists of a virtual SecurePoint firewall.<br> | The basis of an IaaS terra CLOUD always consists of a virtual SecurePoint firewall.<br> | ||
Accordingly, the SecurePoint Reseller link must exist in the Technical Center before ordering an IaaS package.<br> | Accordingly, the SecurePoint Reseller link must exist in the Technical Center before ordering an IaaS package.<br> | ||
We have written our own [https://wiki.terracloud.de/index.php/Technical_Center#SecurePoint_2 wiki-article] for this purpose.<br> | We have written our own [https://wiki.terracloud.de/index.php/Technical_Center/en#SecurePoint_2 wiki-article] for this purpose.<br> | ||
<br> | <br> | ||
The systems within a cloud can be accessed in several ways: <br> | The systems within a cloud can be accessed in several ways: <br> | ||
Version vom 3. Juni 2024, 12:42 Uhr
Introduction
This manual serves as a basis for managing virtual systems within the terra CLOUD.
The basis of an IaaS terra CLOUD always consists of a virtual SecurePoint firewall.
Accordingly, the SecurePoint Reseller link must exist in the Technical Center before ordering an IaaS package.
We have written our own wiki-article for this purpose.
The systems within a cloud can be accessed in several ways:
- Connection via the Technical Center (https://manage.terracloud.de/login)
- Connection via the VPN tunnel
- Connection via shared ports within the firewall
Service Informations
Please find all the information you need in the service information.
These contain, among other things, your public IP address, initial passwords, etc.
The service information can be found in the Cloud Center below the respective order, see also Service Information.
Connection to firewall
Private Cloud Strategy
Basically, every private cloud package from the TERRA CLOUD is delivered with a virtual Securepoint UTM appliance.
This starter guide serves as the basis for setting up a VPN tunnel and accessing the firewall's web interface.
Requirements for access
OpenVPN Client:
- Securepoint VPN Client - Download Link
- other OpenVPN client
- OpenVPN Client for MacOS - click here
VPN configuration file:
The VPN data for administrator access can be found in the Cloud Center below the respective order within the service information, see also Service-Information.
VLAN Requirements
Every virtual Securepoint UTM has 2x virtual network interfaces by default.
One of these communicates with the Internet, the other communicates with the systems in the package.
Since a Hyper-V VM can have a maximum of 8x network cards attached, we can provide a maximum of 6x additional VLANs.
Connect to the firewall
An existing VPN tunnel is required for the connection to the firewall.
Before establishing the connection, please check whether the standard port 1194 is enabled for VPN connections on your local firewall.
If port 1194 is blocked, establishing the VPN tunnel will fail.
Initial setup of the VPN connection in the Securepoint VPN Client
- Install the respective VPN client, in this example we are assuming the Securepoint VPN client.
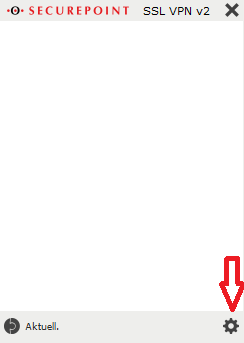
- Open the VPN client and click the gear at the bottom right to open the settings menu..
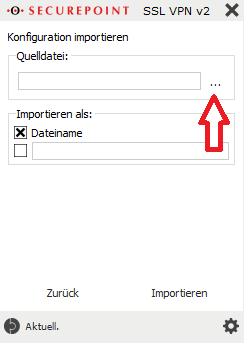
- In the context menu under Source file, click on the three dots to select the source file that was previously downloaded from the Cloud Portal, see also [Service Information].
- Select the opvn file from the previously extracted zip file and click “Import”.
- Optionally, the configuration can be assigned a name under “Import as:” under which the configuration will later be visible in the VPN client.
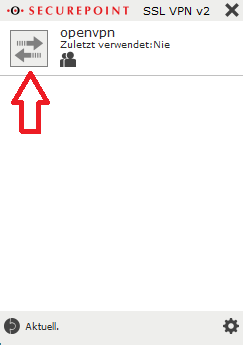
- Use the arrow button to start establishing the VPN connection
The required initial access data is:
User: ssluser-admin
Password: ChanTroFar93!
Connection to the firewall web interface
After the VPN connection has been successfully established, access the following address in any browser:
https://<firewall IP address>:11115
The IP address of the firewall was assigned by you when ordering the environment and can be accessed subsequently in the Cloud Center
can be viewed below the respective order within the service information, see also Service Information.
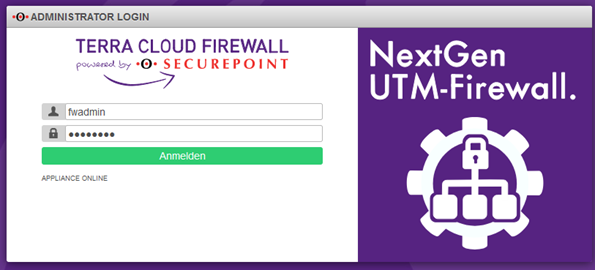
The required initial access data is:
User: fwadmin
Password: Terra001
Initial access to the firewall web interface
Note:
The WebGUI has changed visually since firmware version 12.6.2.
However, with a few exceptions, all points are still called the same, so you can continue to follow all the steps using the following instructions.
The first time you open the firewall web interface, a few things need to be done:
Assign firewall name
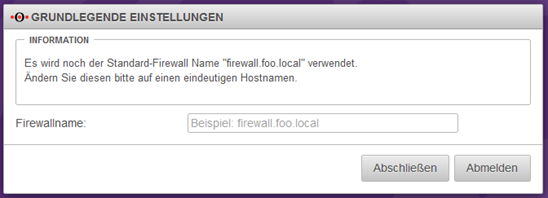
Please enter a firewall name, which must correspond to an FQDN, e.g. myfirewall.local.
The firewall name must not contain any umlauts, special characters or capital letters.
Then click on the Complete button.
Firmware Update
Depending on the preinstalled firmware version, you will receive a message that a newer firmware is available.
In this example we assume that version 11.8.9 is preinstalled.
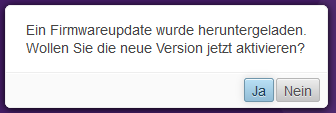
This query should be answered with Yes when the environment is commissioned for the first time.
You will then receive a view of the available new firmware, which will be imported using the “Start test run” button.
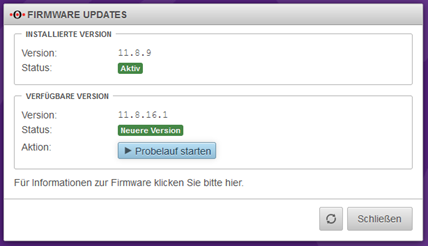
In order to use the new firmware, several license agreements must be checked and accepted.
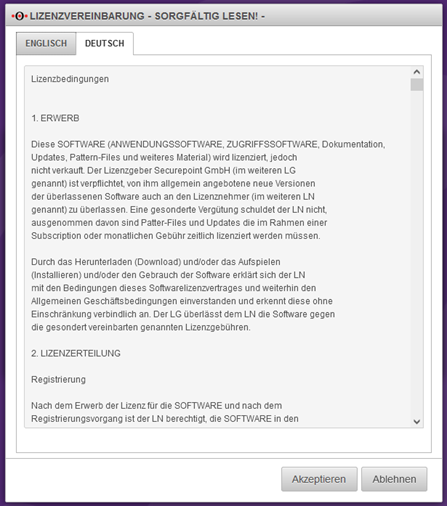
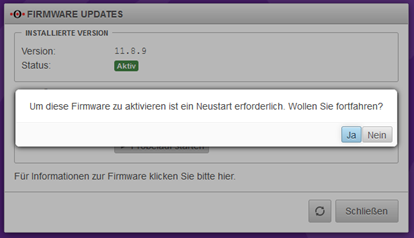
Finally, a restart must be carried out. This can take up to 5 minutes.
You can follow the restart via the console connection via the Technical Center (https://manage.terracloud.de).
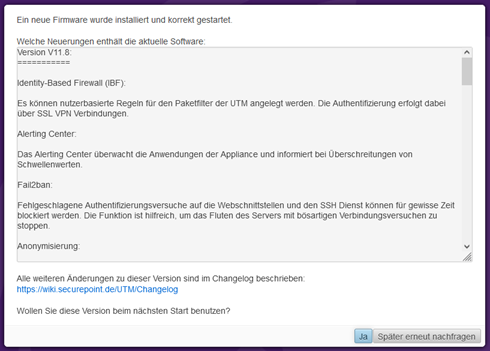
After the firewall has successfully restarted and you have logged in again, the new firmware must be confirmed as the new standard firmware.
Confirm virus scanner message
If you have booked the firewall with only one vCore, you will receive a message that the number of virus scanners on the firewall has been reduced for stability and performance reasons.
This message is normal and needs to be confirmed.

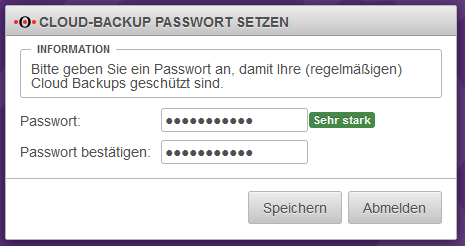
Set cloud backup password
Please enter a password to back up your firewall configuration in the Securepoint cloud.
This gives you the opportunity to import the firewall configuration from the Securepoint Cloud after reinstalling the firewall.
Your firewall will then be completely set up.
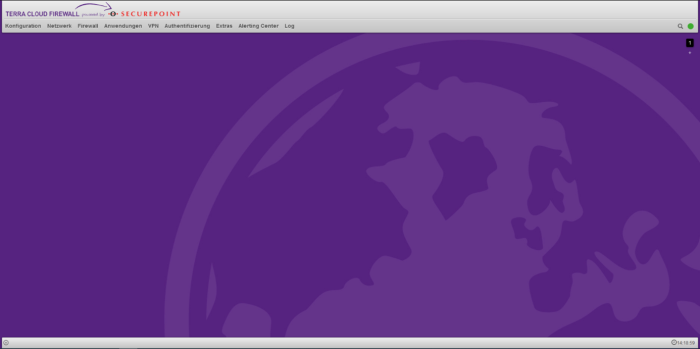
Change of initial passwords
We recommend changing the initial passwords after the handover. To do this, it is necessary to set up OTP for the respective user.
- In the firewall interface, open the menu item Authentication --> User
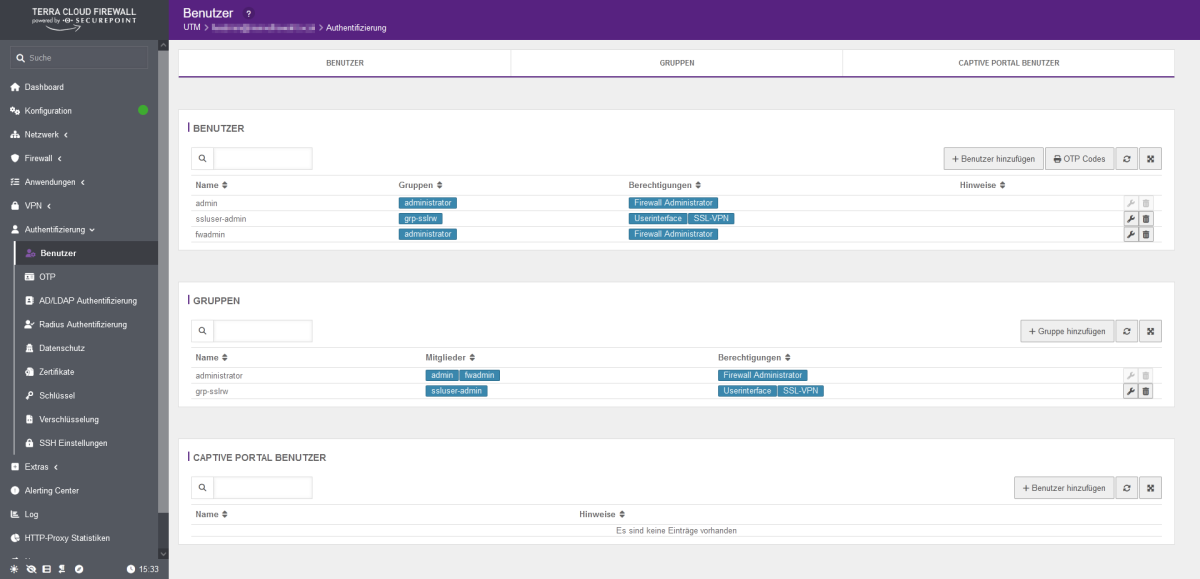
- Click on the configuration symbol (wrench) behind the respective user and enter the new password in the Password and Confirm password fields.
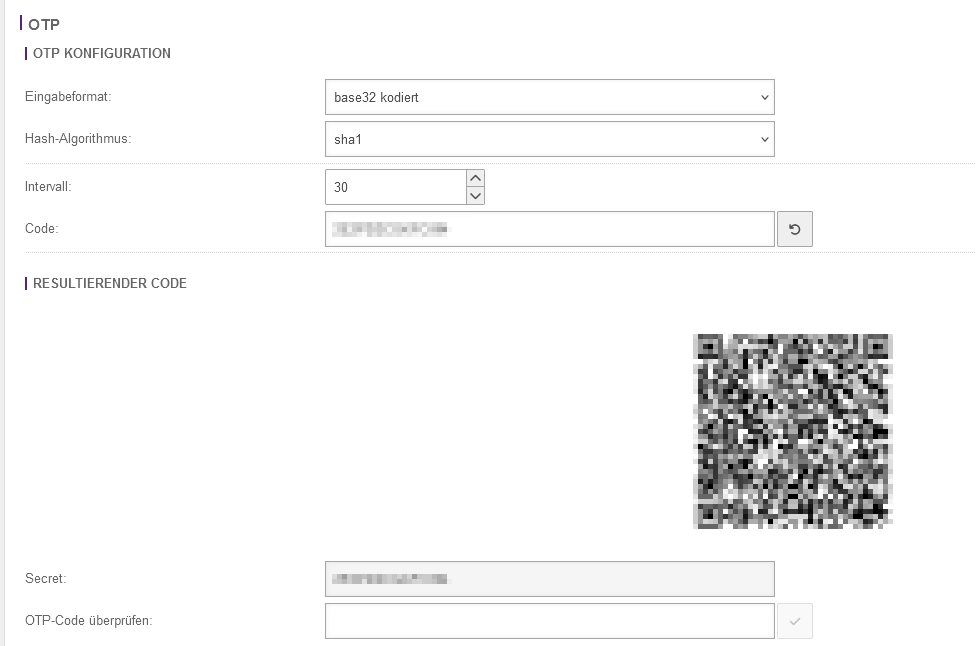
- If the OTP has not yet been prepared for this user, this must be done here. To do this, scroll all the way down and make the appropriate OTP settings. An input format, hash algorithm and an interval must be entered. Then please click on the button with the arrow in the Code field. This will generate a new code that you can use for your OTP app. Alternatively, please use the generated QR code. At the very bottom you have the option of checking the currently generated OTP code from your OTP app.
Note:
The OTP only needs to be prepared for use at this point.
Without further configuration, the OTP is not required for changing the password or logging into the WebGUI.
- Finally, click on the save icon at the top right.


You cannot change the user "admin".
This is an administrative account that is only used in the background for the firewall services.
Instructions and information on configuring the firewall can be found at:
http://wiki.securepoint.de/index.php/Howtos-V11
Email protection: spam filter with anti-virus package (optional)
Protection is implemented directly on the firewall included in the cloud environment.
The following options can be set:
- https://wiki.securepoint.de/UTM/APP/Mailfilter
- https://wiki.securepoint.de/UTM/APP/Mailrelay-Best_Practice
Internet protection: Content filter with anti-virus package (optional)
Internet protection is implemented on the cloud firewall in your cloud environment. The following options can be set:
UMA mail archiving
Log in to Securepoint UMA
If mail archiving has been booked, a Securepoint UMA is available to you in your package.
The web interface for configuration can be accessed via the following address:
The prerequisite for this is a VPN tunnel that has been set up or access via a VM within the network.
The access data for this is “admin” and the password you have assigned.
Further information on configuring and commissioning the Securepoint UMA can be found at the following link:
https://wiki.terracloud.de/index.php/UMA
Role installation
In addition to providing the base operating system, certain installation scripts are carried out for VM roles that provide you with the desired functionalities,
so that you can, for example, use an Actice Directory or Windows Terminal Services directly after it has been handed over to you.
The installations are standardized so that all of the “role VMs” we roll out have the same installation and configuration status.
The pre-installation of roles can be booked up to and including Server 2019.
IaaS AD Role
After the standard VM deployment, an Active Directory is installed on the system with the domain or NetBIOS names specified in the order. It also creates an OU structure that looks like this:
- OU<DomainName>
- User
- Computer
- Groups
The AD is configured accordingly so that new user objects and computer objects are created directly in the corresponding OU.
IaaS WTS Role
If the WTS role was activated when ordering, an additional installation and configuration of Windows Terminal Services takes place after the standard VM deployment.
The terminal server is not directly licensed. To complete the licensing, please follow the steps in the relevant document -> RDS-Activation
By default, the WTS services are NOT made available externally (via the Internet), but can only be accessed internally or via VPN. Access to the web access is possible via the address https://<Server FQDN>/RDWeb. To do this, name resolution must be possible from the client (either a member of the domain, access to DNS or create a corresponding entry in the HOST file). After provisioning, you log in via the user <NetBIOS>\Administrator with the corresponding password.
After the initial deployment, the following applications are published:
- Office 365 ProPlus
- Excel
- One note
- Outlook
- PowerPoint
- Skype for Business
- Visio
- Word
- System Tools
- Calculator
- Paint
- Remote Desktop
Migration-VM
Differences Hyper-V generations
Under Hyper-V you can choose between Generation 1 and Generation 2 of a virtual machine.
The boot process is fundamentally different. While Generation 1 uses the older BIOS, Generation 2 is already UEFI.
It is important to specify the generation correctly when ordering, as if the wrong selection is made, the virtual machine will not boot correctly!
Advantages of Generation 1 over Generation 2
- Support for older operating systems: In order to start in UEFI mode, Windows Server 2008/R2 requires certain components of Hyper-V that are not part of the basic Hyper-V installation.
- Some Linux operating systems have boot problems as a Generation 2 VM.
- VHD format is required
- Virtual COM ports are supported
Advantages of Generation 2 over Generation 1
- More security with Secure Boot (protection against bootloaders), TPM, Device Guard and Credential Guard
- PXE boot with Synthetic Adapter
- Faster boot or reboot time
Definition of the generation and data carrier for migration systems
The migration VMs are primarily intended to move existing IT infrastructures to the Terra Cloud.
An empty VM without an operating system is provided and FTP access is sent to the customer.
Here you have the option of uploading existing data carriers in VHD or VHDX format.
It is important that the size of the virtual disks sent in is covered by the IaaS order and that they are dynamic disks.
Example:
If a Mig-VM with 100GB system storage and 100GB data storage was ordered, this size (100GB each) may not be exceeded with the data carriers sent in.
In addition, the generation of the operating system of the virtual disks must also match the ordered generation (see Differences Hyper-V generations).
Alternatively, we can attach the booked storage empty to the VM and you load an installation ISO onto the FTP server, which we then make available to the machine.
This means you can also operate operating systems in the cloud that we do not offer as standard and install them yourself.
package update
To do this, please select the respective customer in the center.
Then click on the desired Terra Cloud package under point Orders -> Order subitems' Orders Details and point 3 Configuration.
There you can edit the package as you wish. Such as adjusting resources, adding or canceling new VMs.
If it is an order from you (NFR), you will find it as follows:
"Gear (Settings)" -> "My Orders" -> "Orders" -> "Order Subitems" -> "Orders Details" and point 3 "Configuration"
After booking, we will process the adjustments and once completed, the package will be activated again in the Cloud Center for further processing.
Extending an additional partition (IaaS / SaaS)
If it is a package that was ordered at portal.terracloud.de (P0000XXXXX), please write an email to support@terracloud.de
Please then indicate how large the partition currently is and how much it should be expanded to.
If several additional partitions of the same size are connected to your VM, we need to specify the storage location of the partition.
Navigate to Disk Management and open the properties of the partition you want to extend. Now to the Hardware tab.
Here the location is displayed in the following format: “Bus Number 5, Target Id 0, LUN 0”.
Extension of the system partition
In order to expand the system partition, downtime is always necessary during business hours (Mon-Thurs 8 a.m. - 5 p.m., Friday 8 a.m. - 4 p.m.).
Extend Linux system partition
In the following link you will find instructions on how to extend a system partition during operation.
Please note that this represents assistance on our part and we cannot accept any liability for consequential damage.
[Link]
If you want to extend the partition with "gparted", we can attach a corresponding ISO. To do this we need the package number/order number and the host name of the VM.
CPU/RAM changes of a VM
If the resources of a virtual machine need to be adjusted (RAM/vCores), a machine downtime is necessary.
You can let us know a desired date (even outside business hours).
We recommend shutting down the VM in good time before the specified date to ensure that all services can be shut down properly.
If the VM is not terminated, a shutdown is initiated. If the VM does not respond properly to the shutdown, the VM will be switched off.
Following the expansion, the VM will automatically start again.
Appointments for downtime outside of business hours can usually be accepted and implemented until 4 p.m. on the same working day.
Other
PTR-Record
The PTR record forms the reverse lookup for DNS queries.
The responsible MX record of a domain points to a public IP using an A record.
The following name resolutions are therefore created:
mail.terracloud.de -> 185.35.12.58
Many mail servers now use a reverse lookup to protect against SPAM and query the IP address at the same time.
185.35.12.58 -> mail.terracloud.de (PTR)
The PTR record therefore points to an A record via IP.
If this constellation does not exist or does not match, some mail systems may discard your emails as SPAM.
The PTR record can be set by sending a message to our support.
Connect and disconnect network addresses as a drive under Windows
- You have the option of including a network address as a drive under Windows.
- The integrated network address will then appear under “This PC” in the “Network Addresses” section like a normal drive and you can access it like a folder.
- You can integrate a network address as a drive as follows:
- Open “This PC” in Windows Explorer. In the top left corner, next to File, expand the “Computer” submenu.
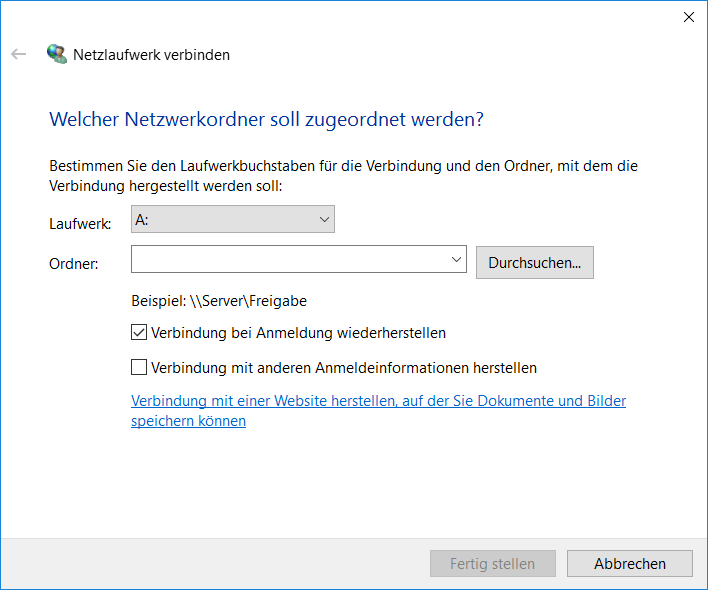
- Select the “Map network drive” option. The following window appears:
- Specify any drive letter (A: in this example).
- Enter the path, IP address or URL of the associated network address.
- An example is: https://terracloud.de.
- Now mark the option “Connect with different credentials” and press “Finish”.
- A Windows security window follows requesting login details for the website in question. Select “Save login details”,
- if you want to retain access without having to ask for a new password when you restart the PC.
- Windows Explorer will automatically open with the drive in question.
- You now have access to the files from the network address. The drive is also displayed under “This PC” and can also be selected there.
- You can disconnect a network drive by clicking "Computer" under "This PC" and clicking the black arrow under "Map network drive".
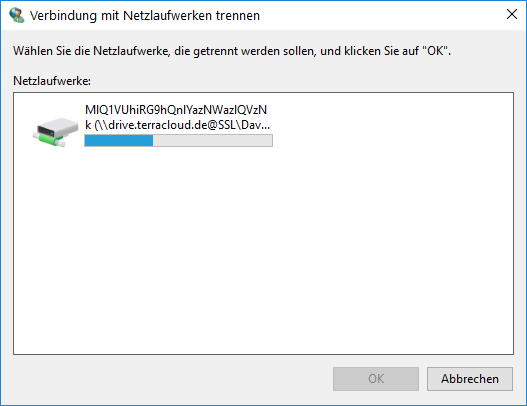
- Another menu opens with the options “Connect network drive” and “Disconnect network drive”. Select “disconnect” and the following window will open:
- Select the appropriate network drive and confirm your selection with “OK”.
Download activation after provisioning a VM
After deploying a VM, file download using Internet Explorer and Explorer is disabled by default.
You receive the error message “Current security settings do not allow downloading this file”. You can share this as follows:
- In your VM, open the Control Panel
- Select the “Network and Internet” section. There are two subtopics in this area
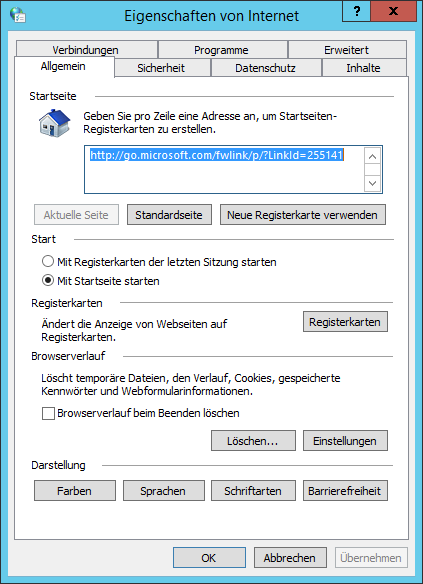
- Open “Internet Options”. The following window appears:
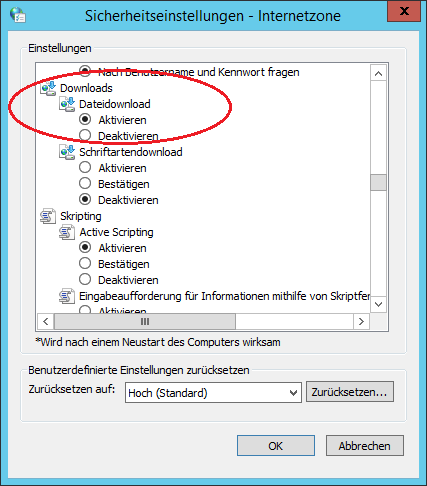
- Go to the “Security” tab and in the “Security level for this zone” section click “Adjust level”.
- Enable file download in the Download section.
- Confirm the new settings. You can now download files.
USB-Dongle
Sending
To send in a USB dongle, please use the submission form.
You can find this here.
Initial setup
Connect from the system within your TERRA CLOUD environment in which the USB dongle is to be integrated to our FTP server (ftp44.terracloud.de).
There you will find the appropriate client software.


First download the file "sehutnmanager-win-4.0.4.zip" or newer. Please pay attention to which operating system you are using.
Then unzip this file into the desired directory and run the file "sehutnmanager-win-4.0.4.exe".
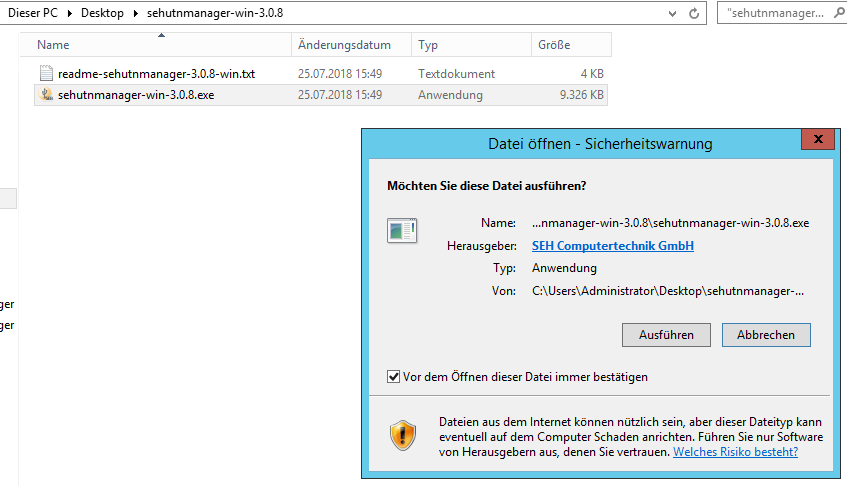
Install the software, please select the installation type Complete.

When you start the software for the first time, you will be asked whether the UTN server and USB dongle should now be searched for and selected.
You can confirm this with Yes.

If the UTN server and USB dongle are found, please add them using the Add button.


If you answered negatively to the first query, you can add the UTN server manually afterwards.
To do this, please go to UTN server --> Add...

In the search field Name or IP address, enter the IP address of the USB dongles, which we sent you in advance by email.

The UTN server and the USB dongle we have plugged in will then be displayed.
You can mark the latter and connect it using the Activate button.


The status of the USB dongle will then change from Available to Activated.

From now on, the USB dongle should be displayed as a locally plugged-in USB stick.
FAQ
Automatically activate USB dongle after restart
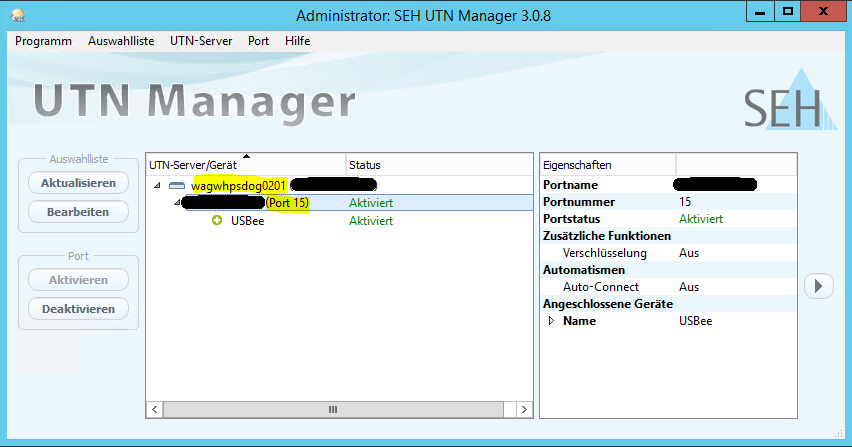
Please right-click on the dongle server in the SEH UTN Manager. Then select Auto-Connect....
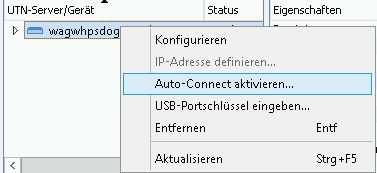
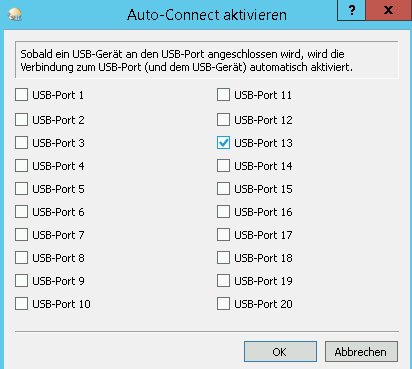
In the following window, select the corresponding port of the USB dongle.
You can find this in the SEH UTN Manager in the properties of the UTN server.
Then confirm your selection with OK.
In support cases
For support requests regarding your booked USB dongle, please send us a screenshot of the SEH UTN Manager from the affected client.
