Backup
Introduction
What characterizes the TERRA CLOUD backup solution?
Communication between all components involved is always encrypted. All you need to do is install an agent on the server to be backed up.
This then connects to our data center via ports 8086 and 8087.
Since the connection is from the server to be secured to the outside, no incoming firewall rules or NAT need to be configured.
Administration is carried out centrally via our backup portal.
In this portal you can see all the servers that have been linked to your account through agent registration.
The backup solution essentially consists of three components: Agent, Portal and Vault. The agent is the software component that runs as a service on your servers.
The portal is used to configure and administer these agents. The Vault is the data vault in which the data backups are stored.
Function overview
| TERRA CLOUD Backup - Functional Overview | ||||
|---|---|---|---|---|
| Fuse | Windows Agent | Linux Agent | vSphere Agent | Hyper-V Agent |
| Bare-Metal Restore | ||||
| Alterable backups (WORM) | ||||
| Hybrid Cloud Backup (Satellite) | ||||
| Backup of virtual systems (servers, VDI) | ||||
| Renewed Backup Attempts | ||||
| Initialbackup ext. HDD/FTP | ||||
| Protocol truncation (MS Exchange and MS SQL) | ||||
| Microsoft VSS Support | ||||
| Backup of physical systems (servers, clients) | ||||
| Backup of network shares | ||||
| Backup of files and folders | ||||
| Threat Detection | ||||
| Windows_Backup_Event_Triggers | ||||
| High Frequent Backup - Hourly Backups | ||||
| Restore | ||||
| Bare-Metal Restore | ||||
| Restore files and folders | ||||
| Restore from another computer | ||||
| Recovery to IaaS Cloud (DRaaS) | ||||
| Rapid VM Recovery (Satellite Vault) | ||||
| Rapid VM Recovery (Enterprise Vault) | ||||
| Storage | ||||
| Storage of backups for up to one year | ||||
| Storage of backups for up to ten years | ||||
| Automation | ||||
| Script-based control | ||||
| Automated BMR test restores | ||||
| Fully Automated Setup | ||||
| Patch management of the backup software | ||||
| Monitoring | ||||
| Interface for ext. Backup sensors | ||||
| Mail notification via the backup portal | ||||
| Included in TERRA CLOUD Backup Basic/Standard | |
| Also included in TERRA CLOUD Backup Enterprise |
Product presentation and initial setup
Would you like to get an overview of the TERRA CLOUD backup? Then we recommend the recordings of the TERRACASTS of the “TERRA CLOUD Backup” theme week.
Requirements
Supported operating systems
Windows Agent
Windows Server:
- Windows Server 2022: Essentials, Standard, Datacenter, Server Core
- Windows Server 2019: Essentials, Standard, Datacenter, Server Core
- Windows Server 2016: Essentials, Standard, Datacenter, Server Core
- Windows Server 2012 R2: Foundation, Essentials, Standard, Datacenter, Server Core
- Windows Server 2012: Foundation, Essentials, Standard, Datacenter, Server Core
- Windows Storage Server 2012: Standard, Workgroup
Windows Client:
- Windows 11: Home, Pro, Enterprise A)
- Windows 10: Home, Pro, Enterprise (version 20H2)
- Windows 8.1: Enterprise
- Windows 8: Enterprise
Notes:
A) UEFI firmware is mandatory.
Plugins:
Please refer to the release notes for the supported platforms and applications of the respective plug-ins:
Agent Doku/Release Notes
Linux Agent
- CentOS 7 (up to Update 9) A)
- Debian 12
- Debian 11 (up to Update 7)
- Debian 10 (up to Update 13)
- openSUSE Linux 15 (up to Service Pack 5) B)
- Oracle Linux 9 (up to Update 2)
- Oracle Linux 8 (up to Update 8)
- Oracle Linux 7 (up to Update 9)
- Rocky Linux 9 (up to Update 2)
- Rocky Linux 8 (up to Update 8)
- Red Hat Enterprise Linux Server 9 (up to Update 2)
- Red Hat Enterprise Linux Server 8 (up to Update 8)
- Red Hat Enterprise Linux Server 7 (up to Update 9)
- SUSE Linux Enterprise Server 15 (up to Service Pack 5) B)
- SUSE Linux Enterprise Server 12 (up to Service Pack 5) B), C)
- Ubuntu Server 22.04
- Ubuntu Server 20.04
- Ubuntu Server 18.04
- Ubuntu Server 16.04
Notes:
A) The Linux agent will be supported on CentOS 7 until end of support on June 30, 2024.
Because CentOS Stream is a pre-release version of RHEL and does not have long-term, stable releases, the Linux agent is not supported on CentOS Stream.
B) This platform is not supported when using the standard BTRFS file system.
A) The agent is supported on this platform, but BMR backups are only supported for BIOS-based systems (not for UEFI-based systems).
Supported file systems on Linux:
- ext2
- ext3
- ext4
- XFS
- GFS
- ReiserFS
- JFS
The BTRFS file system is not supported.
Supported Agent Versions
For Windows, Hyper-V and vSphere agents, the following agent versions must be used from February 26, 2024. Other agent versions can no longer be used for backups and restores. There are no specific minimum requirements for Linux agents.
| Operating system | Agent version x86 | Agent version x64 | Notice |
|---|---|---|---|
| Windows Server 2003 | 7.34.4009a | 7.34.4009a | EOL |
| Windows Server 2008 + R2 | 9.10.1013 | 9.30.1009 | EOL |
| Windows Server 2012 + R2 | - | 9.30.1009 | EOL |
| Windows Server 2016 | - | 9.30.1009 | - |
| Windows Server 2019 | - | 9.30.1009 | - |
| Windows Server 2022 | - | 9.30.1009 | - |
| Windows 7 | 9.10.1013 | 9.30.1009 | EOL |
| Windows 8 + 8.1 | 9.10.1013 | 9.30.1009 | EOL |
| Windows 10 | 9.10.1013 | 9.30.1009 | - |
| Windows 11 | - | 9.30.1009 | - |
Any operating system marked "EOL" can still be backed up with the appropriate agent version. However, neither Microsoft nor our software publisher offers support for these platforms. We would like to point out that TERRA CLOUD can only provide “best effort support”. In the event of an error, we cannot rely on the software manufacturer. It is strongly recommended that you keep operating systems up to date. If an update is not possible, periodic test restores should be performed.
| Operating system | Agent version x86 | Agent version x64 | Notice |
|---|---|---|---|
| Windows Server >= 2012 R2 | - | 9.12.1002 | - |
| Operating system | Agent version x86 | Agent version x64 | Notice |
|---|---|---|---|
| Windows Server >= 2012 R2 | - | 9.20.1008 | - |
| Operating system | Agent version x86 | Agent version x64 | Notice |
|---|---|---|---|
| Supported Linux distributions | 8.90.1020 | 9.21.1002 | See Release Notes for supported Linux distributions |
Network configuration
| Protocol | Port | Source | Destination | Function | Note |
|---|---|---|---|---|---|
| TCP | 443 | Agent | Portal | Automatic agent updates | 185.35.13.210 |
| TCP | 2546 | Agent | Vault | Connection to the vault for data backup, synchronization and recovery | Secondary vault must also be released. See backup.terracloud.de -> Quick Links -> Vault Finder |
| TCP | 8086 | Agent | Portal | Registering an agent on the portal | 185.35.13.210 |
| TCP | 8087 | Agent | AMP | Managing agents via the portal | 195.4.212.128/25 |
| Protocol | Port | Source | Destination | Function | Note |
|---|---|---|---|---|---|
| UDP | 123 | Satellite | Internet | NTP time synchronization | - |
| TCP | 443 | Satellite | Portal | Interface updates and support Connect function | - |
| TCP | 2547 | Satellite | Basevault | Heartbeat / Management | ALT Satellite Vault Version <= 8.62 |
| TCP | 12546 | Satellite | Basevault | Heartbeat / Management | NEW Satellite Vault Version > 8.62 |
| TCP | 12547 | Satellite | Basevault | Data transfer for backup replication | - |
Vault
A vault is a virtual system that is operated in the TERRA CLOUD or a partner data center.
This system communicates with the backup agents and receives backups and stores them according to the defined retention periods.
Backup packages include access to a shared backup platform in the form of a Vault account.
Vault-Account
The Vault account is a unique organizational unit on a Vault system; it is required for the authentication of a backup agent on the Vault.
The name of the vault account is made up of your customer number at Wortmann AG and the name of your end customer in the TERRA CLOUD Center in capital letters.
Example:
12345-ENDKUNDEXY
You need the Vault account, for example when you create a new Vault profile, so that the agent can use the data from the profile to authenticate itself to the Vault system.
The Vault account is stored for the “Account” and “Username” fields.
Process of the handshake between agent and vault system
Currently, the connection setup between an agent and its vault during a backup looks like this:
- The agent creates an encrypted tunnel to the vault and checks the public key of the TLS certificate.
- The Vault checks the agent's so-called Unique Identifier and approves the backup if there is a match.
- The agent then performs the backup and transmits the encrypted data via the previously opened tunnel.
On February 26th, 2024 we will make an adjustment to our vault systems so that the process will proceed as follows in the future:
- The agent creates an encrypted tunnel to the vault and checks the public key of the TLS certificate.
- The vault (also known as the primary vault) checks the agent's unique identifier and delegates it to its replication partner (also known as the secondary vault) if there is a match.
- The agent then checks whether a connection can also be established to the secondary vault.
- After the verification is complete, the secondary vault delegates the agent back to the primary vault to initiate the backup.
- The agent performs the backup and transmits the encrypted data via the previously opened tunnel.
These adjustments enable smooth pivoting between the primary and secondary vault, for example during an outage. In addition, a software check ensures that the agent can restore from the secondary vault in case of doubt or to improve performance.
Please note that starting February 26, 2024, backups will be completed with warnings if there is no connectivity to the replication partner:
RSYN-W-07716 Failed to connect to or negotiate backup with alternate vault
Therefore, you should ensure that all your agents can reach the secondary vault via TCP port 2546 by February 26, 2024.
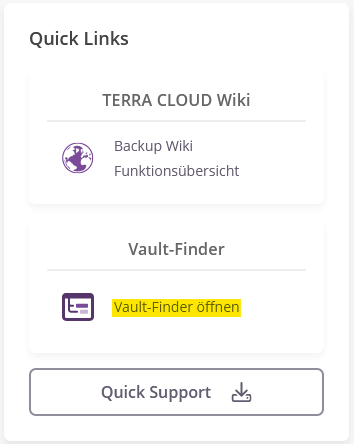
To find out the address / IP of the secondary vault, you can use the Vault Finder from the quick links in the Backup Portal:
General
Retention periods
TERRA CLOUD Backup offers you a data backup retention period of up to 365 days in the Standard license model.
The retention period of a data backup on the Vault is determined by the selected retention type.
Retention Types
A retention type consists of two parameters that determine the retention time of a data backup.
Online storage(days):
This parameter specifies the minimum number of days the data backup must be stored on the Vault.
Online copies:
This parameter specifies the minimum number of backup copies required for this backup job.
Important: Linking the parameters
In order for a data backup to be considered expired and to be removed, BOTH parameters must be exceeded.
The safeset must therefore be at least the defined X days old AND there must be at least Y data backups for the backup job.
Preconfigured retention types
The following retention types are already predefined and are automatically created when the agents are installed.
Please note that 50 safe sets are included free of charge per backup job; additional safety points can be provided for an additional charge.
Note:
From April 1st, 2024, 50 safe sets can be configured free of charge per backup job.
24-Hours(hourly backup):
This retention type is automatically created by an Intraday schedule and cannot be edited.
It is required for the function High Frequent Backup.
The data backups are kept for a maximum of 24 hours.
48-Hours(hourly backup):
This retention type is automatically created by an Intraday schedule and cannot be edited.
It is required for the function High Frequent Backup.
The data backups are kept for a maximum of 48 hours.
Daily(daily backup):
This retention type is suitable for one backup per day.
In total, the data backups are retained for 30 days each and there must be at least 30 data backups in the job.
4xDaily(four daily backups):
This retention type is suitable for four backups per day.
In total, the data backups are kept for 10 days each and there must be at least 40 data backups in the job.
Monthly(monthly backup):
This retention type is suitable for one backup per month.
In total, the data backups are kept for 365 days and there must be at least 12 data backups in the job.
Former default retention types
The following standard retention types have been used in the past for TERRA CLOUD backup and may still be stored on the systems:
Daily (7/7 Version):
This retention type is suitable for one backup per day.
In total, the data backups are kept for 7 days each and there must be at least 7 data backups in the job.
Weekly(weekly backup):
This retention type is suitable for one backups per week.
In total, the data backups are kept for 31 days each and there must be at least 5 data backups in the job.
Create individual retention types
If you do not want to use or add to the standard retention types, you have the option of defining your own retention types using the agent's advanced settings:

Individual storage type "Yearly"
Yearly (annual backup):
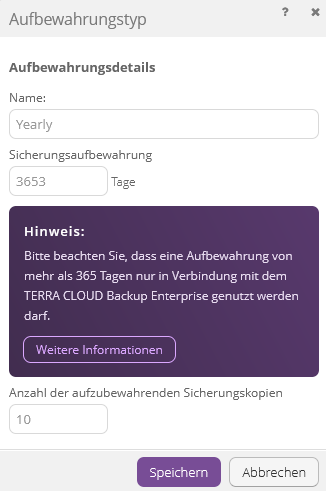
This individual retention type is suitable for one backup per year and must be created for the configuration of the [10 year retention].
In total, the data backups are kept for 3653 days each and there must be at least 10 data backups in the job.
Note:
Please note that this retention type may only be used in conjunction with the TERRA CLOUD Backup Enterprise product.
Bare metal restores are only supported for backups up to 365 days old.
Consumption values for licensing
The consumption values of a TERRA CLOUD backup account consist of:
- Natively protected data set of backup jobs
- Number of protected systems
- Number of active safesets of the backup jobs
On the 15th calendar day of a month, the above-mentioned consumption values are determined and made available to you in the form of the consumption report on the 16th calendar day.
Consumption values of the active safe sets
50 active safe sets are included in the inclusive quota per backup job and can be distributed depending on the [scheme] and [configuration].
In order for a safeset to be considered expired and to be deleted, the retention parameters “Online storage (days)” and “Online copies” must be exceeded.
This can result in more than 50 safesets being present in the vault at the time of consumption measurement because expired backups have not yet been removed from the vault.
The TERRA CLOUD backup license model therefore includes a free buffer zone of 10 safe sets.
If 61 or more safe sets are used, all safe sets above the inclusive quota will be invoiced.
| Zone | Safe set number |
|---|---|
| Inclusive quota | 01 - 50 safe sets |
| Buffer zone | 51 - 60 safe sets |
| Additional consumption | 61 - ∞ Safe sets |
Portal
The configuration is carried out as an example as documented in the following sections. The administrator account “backupadmin@terracloud.de” was used for this configuration.
This corresponds to your specialist dealer administrator account (backup master account).
Structure of TERRA CLOUD Backup Portal
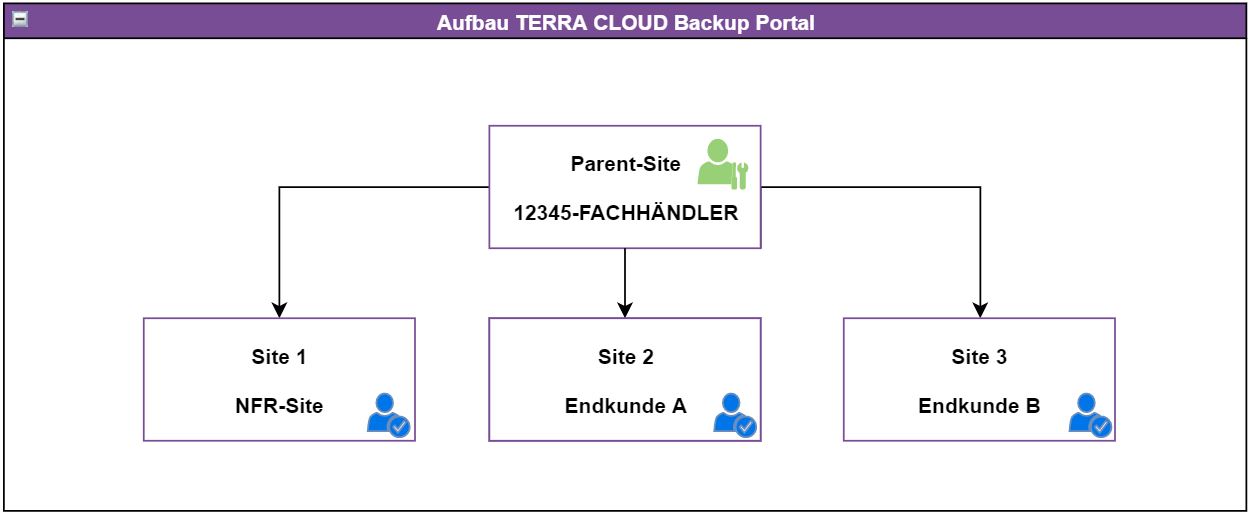
Description:
This diagram shows the structure of the backup portal.
The upper level consists of the parent site, which you can recognize by its name consisting of your Wortmann AG customer number and the name of your company.
You can use this level to administer (child) sites and use all functions of the portal centrally. You can create users for both levels, these are stored in the diagram in green for the parent site and in blue for the end customers' sites.
Please create your own site for your company, as marked with the NFR site in the diagram.
You can then move the agents for your systems into this site or register them directly into it via a user within the site.
Note:
Please only register agents in the parent site if they will then be moved to the associated customer site for further configuration.
Create site
A site is a sub-area within your portal to separate and manage a group of computers to be secured.
Subsites ensure the clear separation of agents and backups from different customers.
Click Sites in the navigation bar, then click Create New Site.
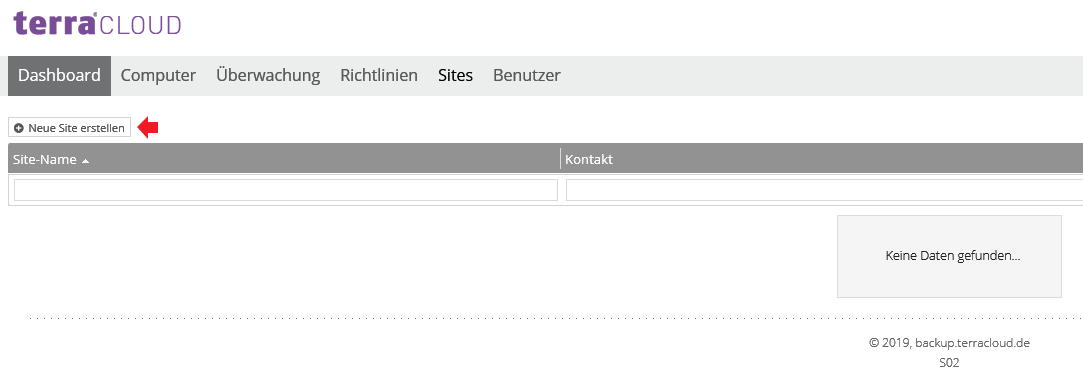
Now give the site a name.
A useful name is the name of the end customer, which can be combined with a customer number assigned by you, e.g. 12345-End Customer.
Optionally, you can configure the customer number and contact addresses for the site. Then click “Save Site”.

Now give the site a name. A useful name here would be the name of the end customer.
Optionally, you can configure the customer number and contact addresses for the site. Then click “Save Site”.
Create user
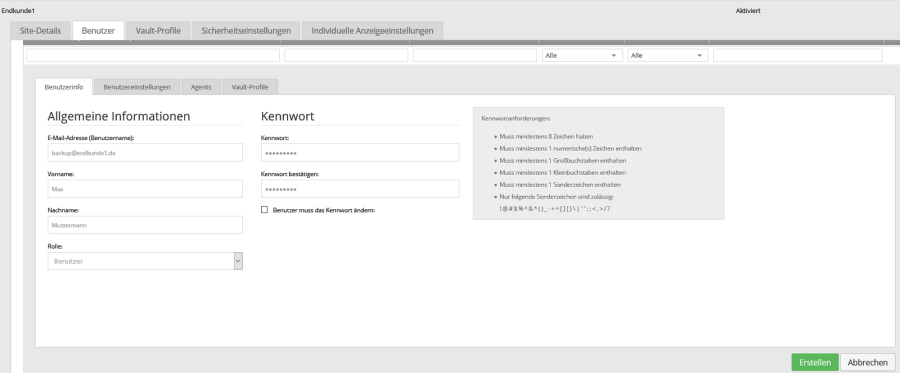
You can create different users for your end customer's site.
If you specify a user with the role "User" or "Administrator" instead of your parent site administrator when registering the agent, the agent will be registered in the end customer site.
Note:
Further information about the different user roles can be found in the Authorization Concept.
In the following screenshot you can see the configuration of a user with the "User" role.
Please note that you can still Assign Agents to Users to users who do not have the "Administrator" user role
Configure notifications
You can configure email notification for the site using the “Notifications” tab.
The address on file will be notified as soon as the selected events occur.
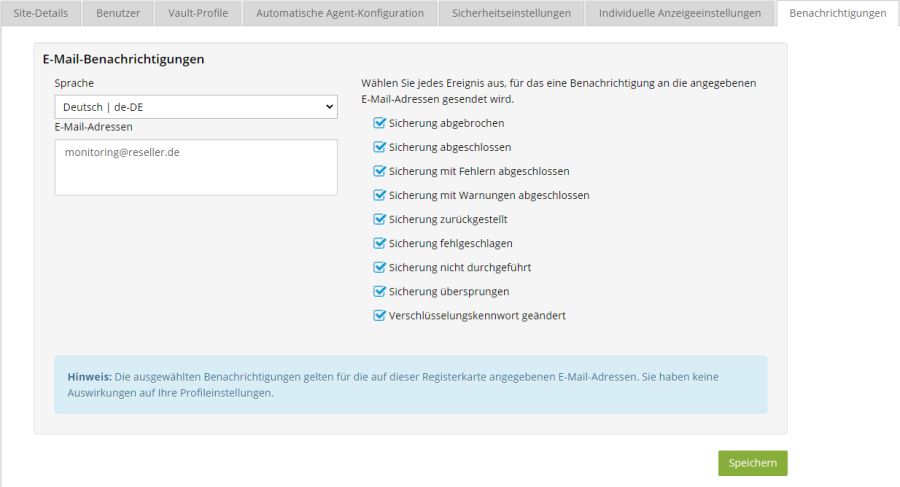
Please note that the portal-side email notification is currently not yet available for all agents. See function overview
Encryption password changed' option:
This can, for example, warn you in the event of unauthorized access if an attacker wants to gain access to future backups by changing the encryption password.
The encryption password cannot be changed retroactively for existing safesets.
Note:
The change in the encryption password is also reflected in the "Status Feed".
The basic configuration for your first end customer site is now complete.
Configure Vault Profiles
After providing a TERRA CLOUD backup package, you will receive the access data for the vault account for your tenant.
The credentials are required for authentication between the agents and the vault (storage target).
You can save the credentials in a Vault profile, e.g. For example, you don't have to enter it manually when registering an agent with the Vault.
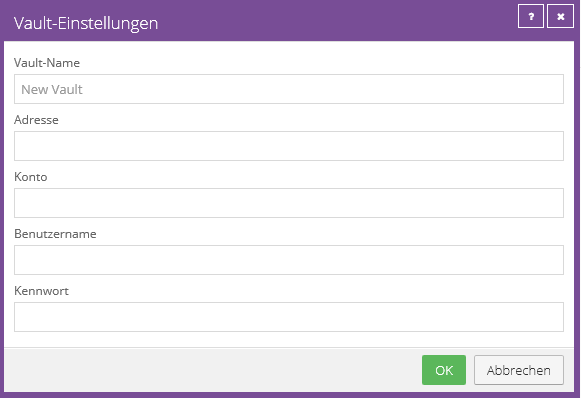
Please click "Add New" to create a Vault profile.

Vault name:
The Vault Name is the displayed name of the Vault profile.
Recommendation: To simplify matters, we recommend the FQDN of the vault (e.g. vault-wmh2-P001.terracloud.de).
The chosen vault name has no technical function, but only serves as a designation.
Address:
Please enter the FQDN of the vault (e.g. vault-wmh1-P001.terracloud.de).
Account:
Please enter the submitted Vault account (e.g. 45814-ENDCUSTOMER).
Username:
Please also enter the submitted Vault account (e.g. 45814-ENDCUSTOMER).
The account and user name have been created identically to simplify setup.
Password:
Please enter the submitted password. This Vault password is used to authenticate the Vault account and is not used to encrypt user data.
Create the Vault profile via "OK".
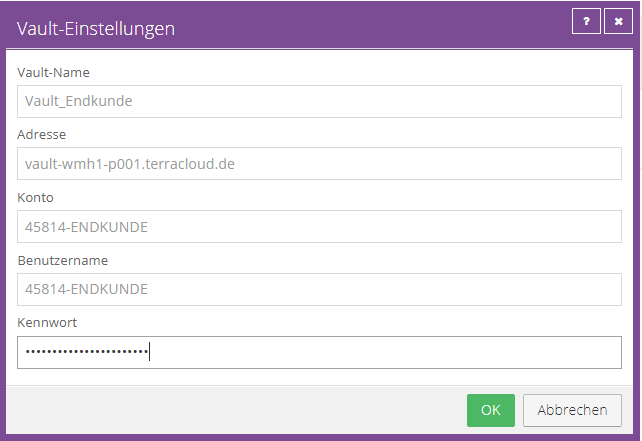
The saved Vault profile should then be visible.

Automatic agent configuration
To have new agents automatically configured in the portal, please activate the "Automatically configure new agents" option under the "Automatic agent configuration" tab.
Requirements:
- Agent version 8.90a or newer
- Submission of a default encryption password in the installation process
Please select a Vault profile and a job template. You can either use the already stored best practice template "Entire System Image" or create your own template.
Default encryption password:
In order to create a backup job completely automatically, an encryption password must be defined.
With automatic agent configuration, the encryption password is passed as the default encryption password during the installation process.
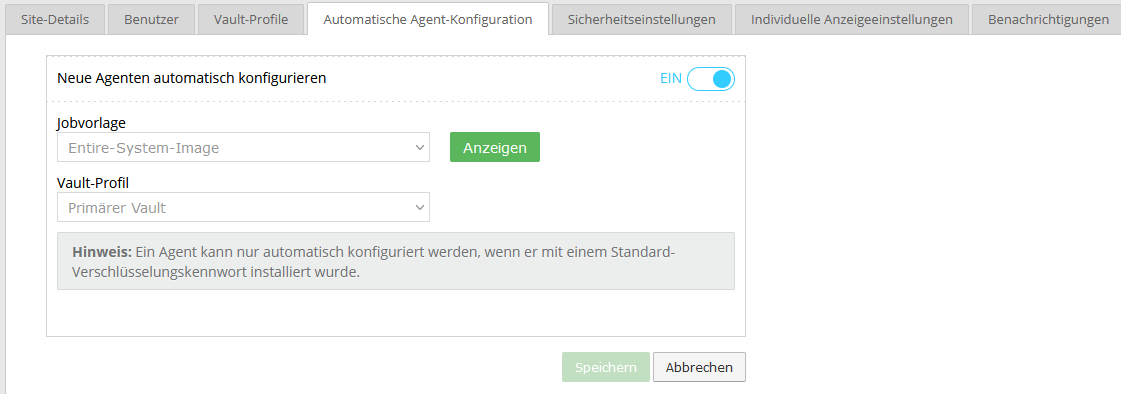
Create your own job templates
You can create your own job templates by clicking on the "View" button next to the preset job template and creating an editable copy of the job template.
You can adapt this copy as you wish and, after saving it, use it for automatic agent configuration.
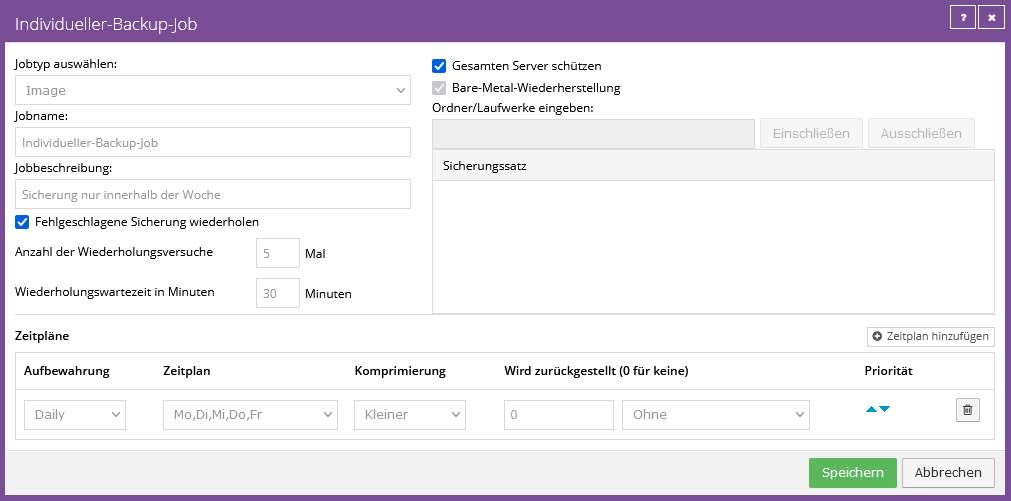
Example for your own job template:
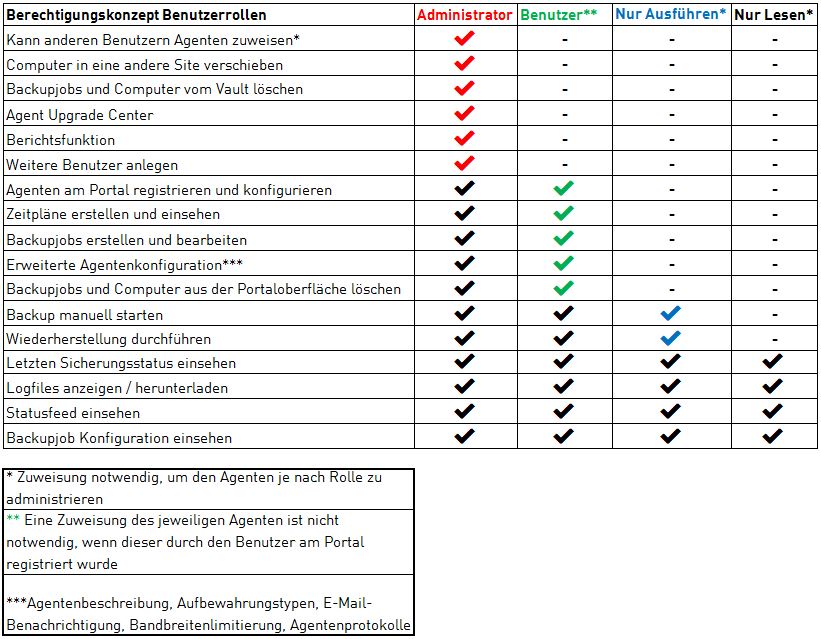
Authorization concept
This diagram shows the four different roles that can be assigned to a user.
You can create users either within a site or at the reseller level in your parent site; further information can be found in the diagram for the Structure TERRA CLOUD Backup Portal
Computer
All registered systems are displayed in a table on the Computer tab. If you open the overview while logged in to a site, only the computers of the respective site (end customers) will be displayed.
This part of the portal offers you the opportunity to fully administrate, configure and much more with the agents in a multi-client capable manner.
Skipped backups
This function shows you whether and how many data backups were skipped.
A high rate of skipped backups can result from the following circumstances:
- The intervals between data backups are too short and the next data backup is started during runtime
- A very long data backup duration ensures that the subsequent data backup is skipped
Data backups may be skipped if the following two conditions are met together:
- The backup job is executed more frequently than once per day, through multiple backups per day or the [High-Frequent Backup]
- A data backup is already in progress or the Vault is performing important maintenance work on the backup job
Through the use of e.g. B. High-frequency backups, with up to 24 backups per day, the vault only has a short time window for maintaining the backup job.
To ensure that outdated data backups can be removed despite the high backup frequency, the agent is allowed to skip backups.
Skipped backup rate:
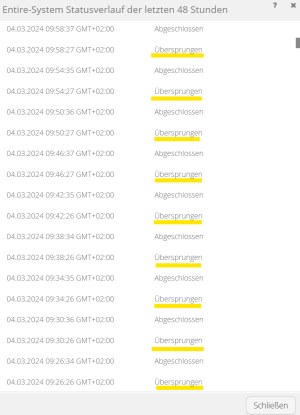
You will be shown the percentage of data backups skipped in the last 48 hours.
In this example, due to a misconfiguration, backups were made almost every minute to illustrate how this display works.

If you click on the value, you will be shown an overview of the data backups with information about whether they were skipped:
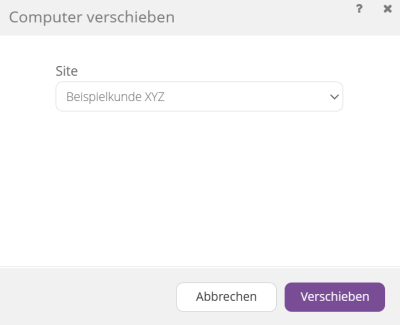
Move computer to another site
You can move as many computers as you want to another site using the Move Computers action.
This function makes it possible, for example, to assign systems that were accidentally registered in the Parent-Site to the end customer's site.
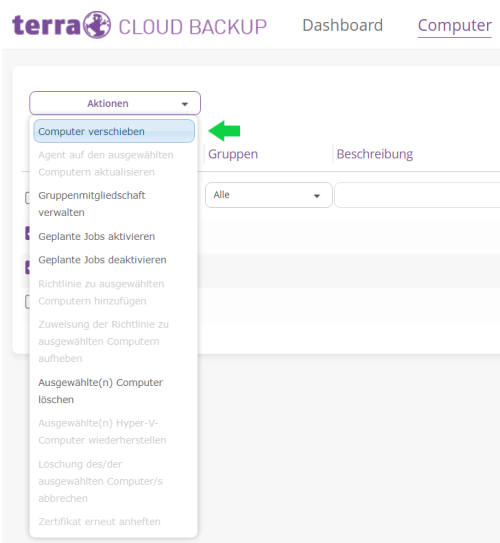
Please select the desired site for the selected computers:
Assign agents to users
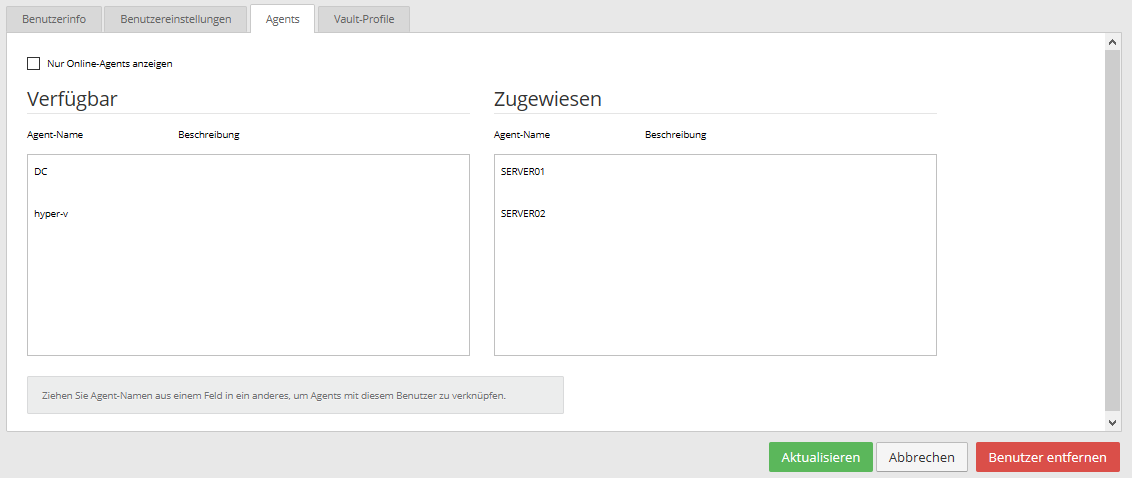
Users who do not have the "Administrator" role must be assigned to agents who can be managed by them.
You can do this either via the user configuration within the site or via the Sites tab within your parent site.
In this example, only SERVER01 and SERVER02 have been assigned to the user for management.
Deletion of data backups
Delete computers from the portal and vault
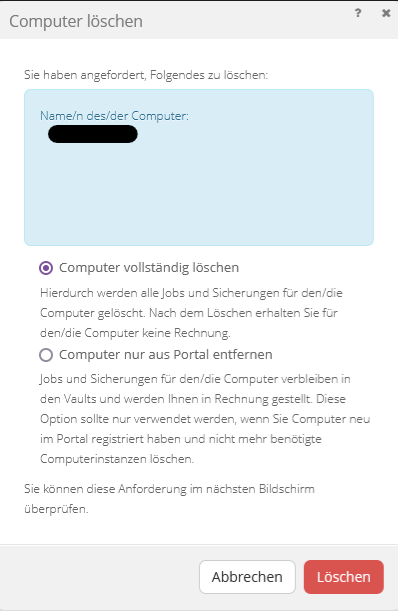
You can have a computer's data backups completely deleted as an administrative user via the Backup Portal.
This type of deletion includes:
- Deletion of the computer from the portal (online or offline computer)
- Delete the backup of all backup jobs of this computer on the primary and secondary vault
- Delete the registered computer on the Vault
Procedure for deleting a computer:
- Select the desired system using the checkbox on the left side of the backup portal
- Under Actions, select Delete selected computer(s).
- Switch to the “Completely Wipe Computer” option
- Enter "CONFIRM" in the input field of the dialog to confirm the deletion
The deletion job will be executed after a quarantine period of 24 hours.
Cancel deletion job:
Within the quarantine period of 24 hours, you can select the computer as described above and cancel the deletion request using the "Cancel deletion of the selected computer(s)" action.
Delete backup jobs from the portal and vault
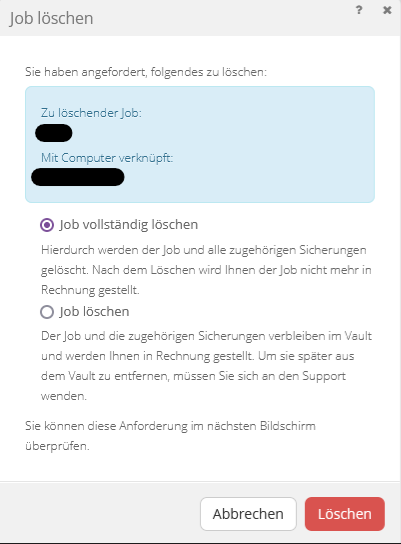
You can have the data backups of a backup job completely deleted as an administrative user via the Backup Portal.
This type of deletion includes:
- Delete the backup job from the portal
- Delete all data backups of the backup job on the primary and secondary vault
- Delete the registered backup job on the Vault
Procedure for deleting a backup job:
- Open the "Select Action" drop-down menu for the desired job under the "Job" tab of the respective computer
- Choose the “Delete Job” option
- Switch to the “Delete Job Completely” option (screenshot below)
- Enter "CONFIRM" in the input field of the dialog to confirm the deletion
The deletion job will be executed after a quarantine period of 24 hours.
Cancel deletion job:
Within the quarantine period of 24 hours, you can select the backup job as described above and cancel the deletion job using the "Cancel deletion" action.
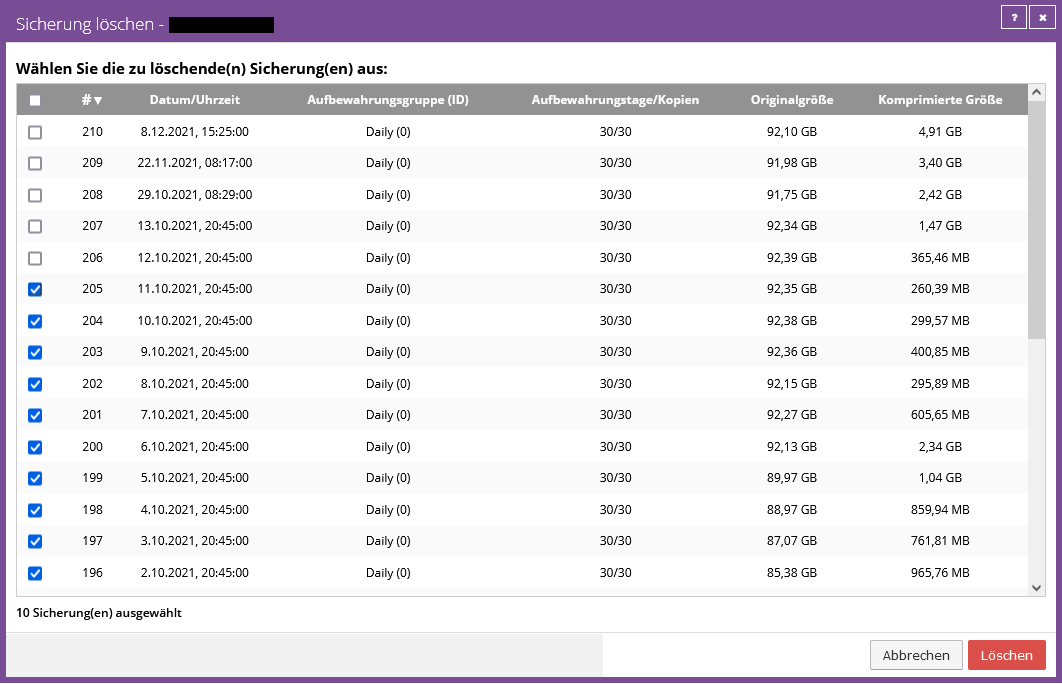
Delete individual data backups (safesets) from the vault
You can have selected data backups of a backup job completely deleted as an administrative user via the Backup Portal.
This type of deletion includes:
- Delete the selected data backup of the backup job on the primary and secondary vault and, if applicable, the satellite
Procedure for deleting individual data backups (safesets):
- Open the "Select Action" drop-down menu for the desired job under the "Job" tab of the respective computer
- Choose the “Delete Backup” option
- Select the safesets to be deleted and click "Delete" (screenshot below)
- Enter "CONFIRM" in the input field of the dialog to confirm the deletion
Note:
The deletion of individual data backups (safesets) is carried out immediately and cannot be stopped after confirmation!
Adjustment in the backup portal after a data migration
After migrating the data/backups to, for example, a dedicated vault system, the configuration must be adjusted in the backup portal.
After the migration, the backup agent should connect to another vault system and, if necessary, also use other access data for authentication.
The procedure differs slightly depending on the migration method. Please make the following adjustments after consultation in the migration process (support ticket).
Vault account migration
With this variant, the entire vault account is moved to another vault system. A vault account is an organizational unit for an end customer.
You will receive the access data and the name of the vault account when you provide the account, e.g. 12345-DEMO.
Please carry out the following steps after successfully moving the account:
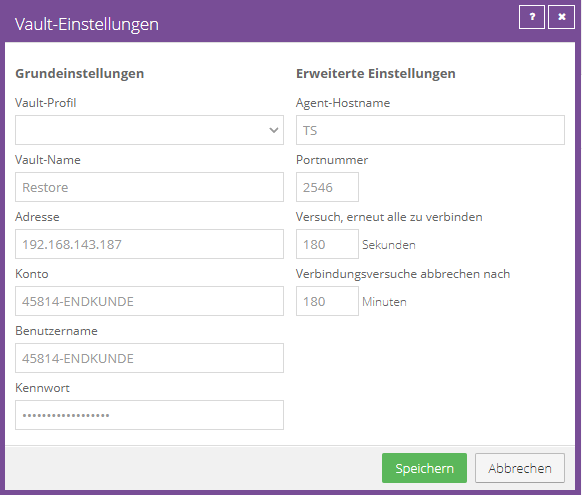
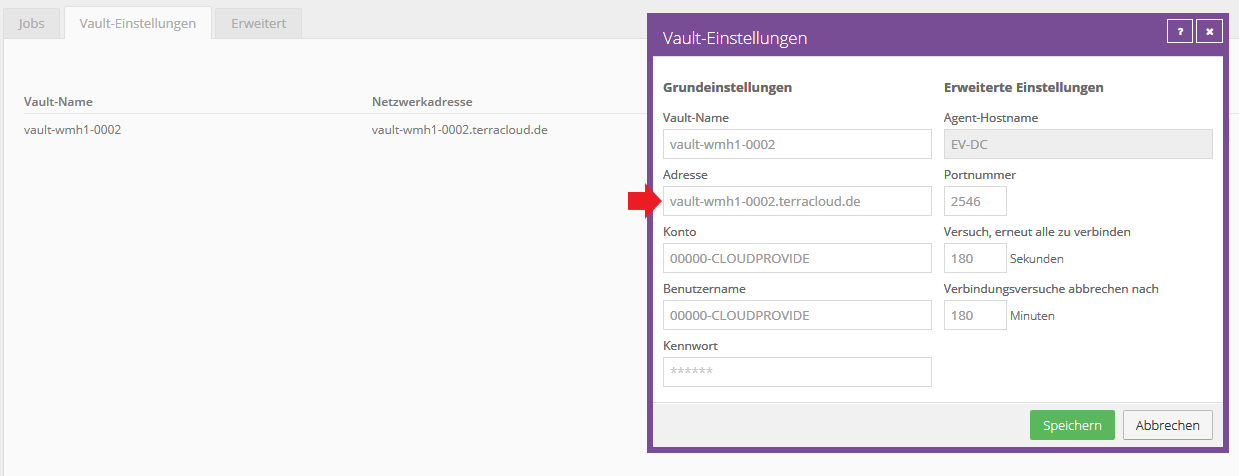
- For each agent, access the "Vault Settings" in the Backup Portal
- Edit the current vault connection and swap the FQDN of the old vault system with that of the new vault system
- Also customize the vault profile for this site
The following screenshot shows the current vault connection that needs to be edited.
Migration of data to a new vault account
The prerequisite for this method is a new vault account, e.g. B. on a TCBE vault system. With this variant, only the affected computers and their backup jobs are moved.
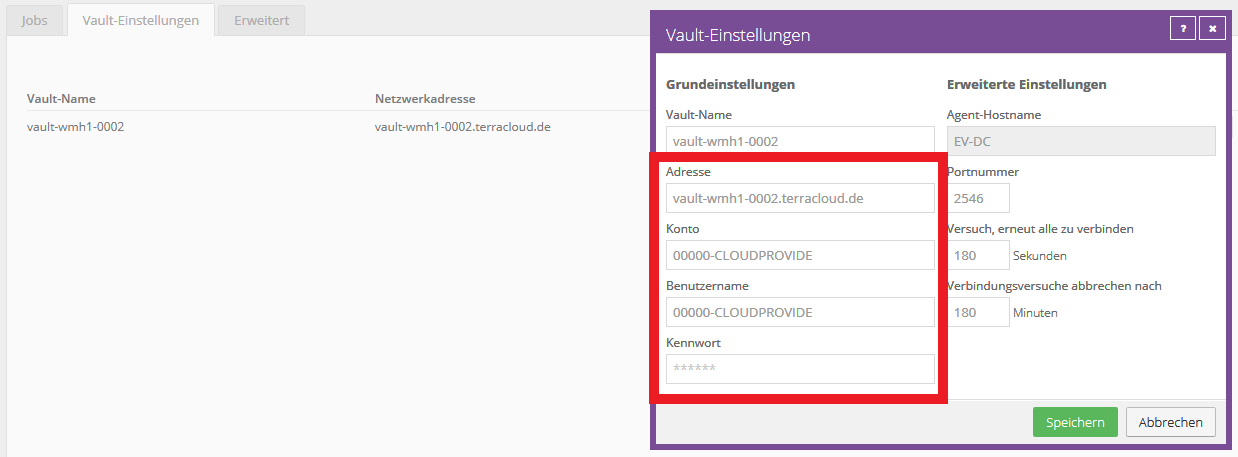
Since authentication will now take place via the new account, all positions in the vault connection must be changed.
- For each agent, access the "Vault Settings" in the Backup Portal
- Edit the current vault connection and replace all vault credentials with those of the new vault account
- Also adjust the vault profile of the affected site
Reports
The reporting function gives you access to various data sets from the TERRA CLOUD backup via various preconfigured reports.
The underlying database receives new records twice a day through the TERRA CLOUD Vaults.
Please note that in connection with a TERRA CLOUD backup satellite, only data sets for the existing safe sets and consumption as of the base vault are available.
TERRA CLOUD backup satellites are not connected to the reporting function.
Requirements:
In order to view reports, the “Vault account” must be synchronized with the respective site.
Automatic synchronization of the Vault account – How it works:
- Below the “Vault Settings” is the Vault Registration (1)
- the “Vault Account” (2) will be transferred to the site (3)

For the synchronization to work, the following requirements must be met:
- The Vault account may NOT be used across sites (same Vault account in different sites)
- The agent was registered in a self-created site (https://backup.terracloud.de/Sites).
Different Vault accounts can be used within a site as long as they are not used in other sites.
Necessary permission of the user:
To access the Reports page, you must be logged in as a user with the Administrator role.
Reports can be scheduled and automatically sent by email (PDF, XLS, CSV).
Backup Verification Report
This report provides you with an overview of the most recently performed automated Recovery Tests by your vSphere Recovery Agents.
On the one hand, you have the option of exporting this view as a PDF document, and on the other hand, you can configure a regular export including email delivery using the "E-mail/Schedule" menu item.

Agent Upgrade Center
The Agent Upgrade Center offers you the opportunity to upgrade Windows agents from version 8.7x via portal.
Update Individual Agents
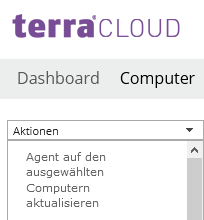
You can select systems via the “Computer” tab and initiate the agent update under “Actions”.
Status display
In addition to the current version, you can use the icon to see whether the agent can be updated (purple dot) or is currently being updated.
As soon as an agent has been successfully updated, a checkmark will be displayed next to the version number. If you move the cursor to the symbol next to the version number, the respective meaning will be displayed, e.g. "New agent version available".
In the following screenshot you can see an agent that is currently being updated.

Update Agents for Entire Sites
To do this, access the Agent Upgrade Center via your master login and select the desired agent and then the respective sites.
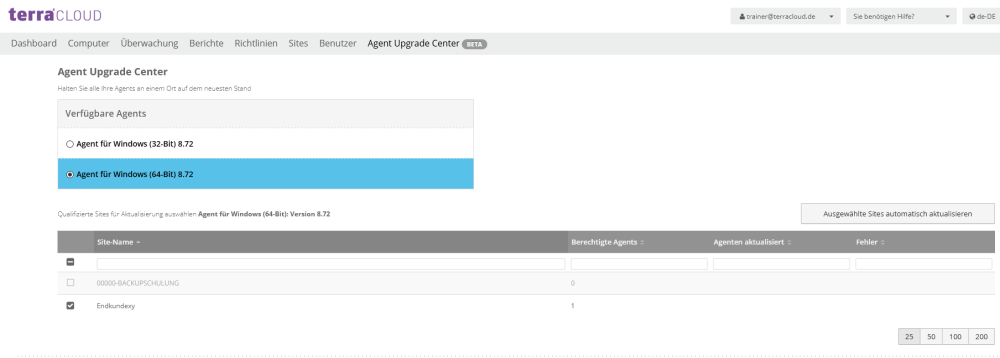
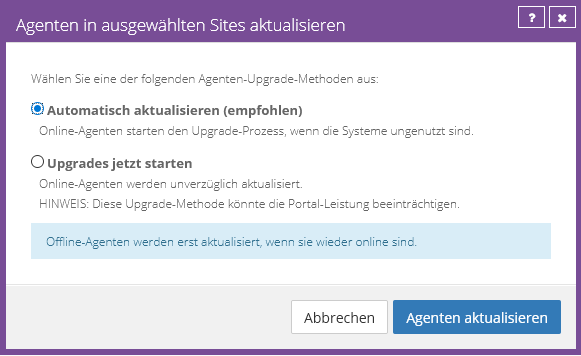
Then select whether you want the agents to be updated automatically or immediately:
Windows Agent
Installation via Setup
Please download TERRA Backup Agent. To do this, log in to your portal and select the appropriate version under Downloads on the right.
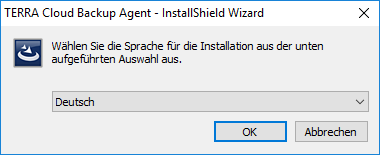
Now start the installation on the server to be backed up. First select the desired language in which you would like to be guided through the installation.
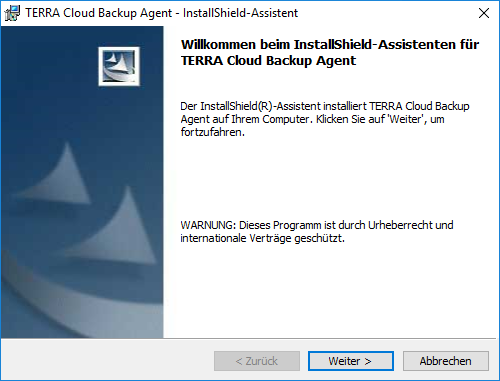
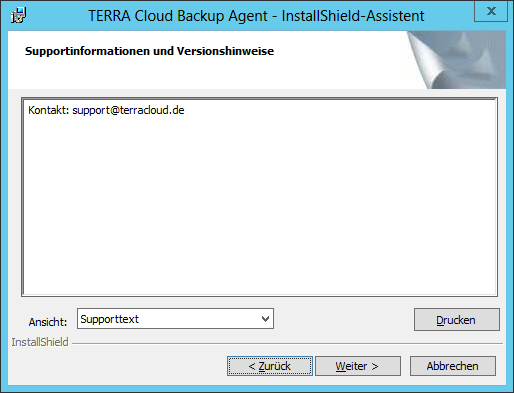
On the "Support Information and Release Notes" page, click Next
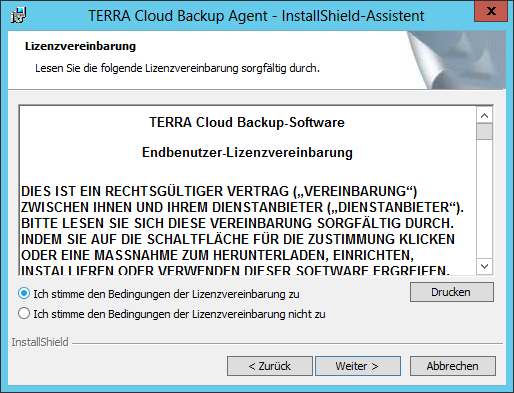
Accept the license terms and click Next.
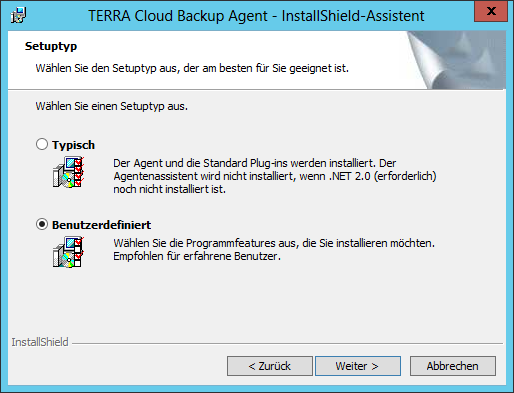
In the next installation step, select “Custom” and click Next.
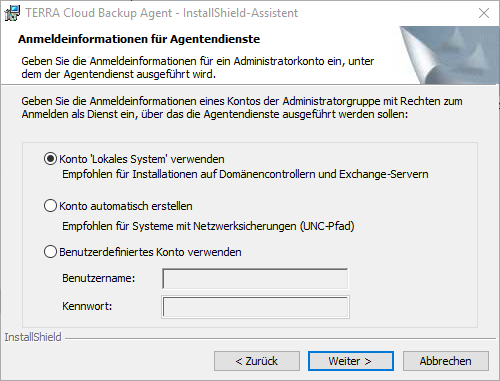
The local logon credentials can usually be adopted. Click on Continue.
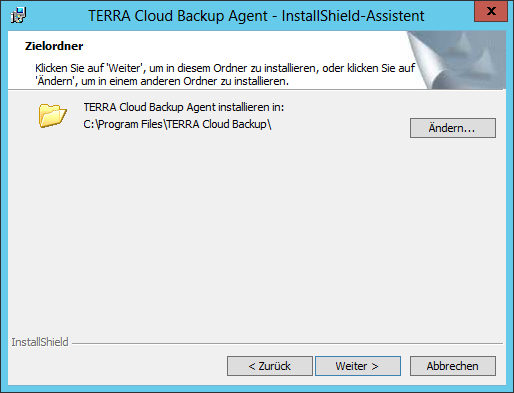
Select the desired installation directory. Then click Next.
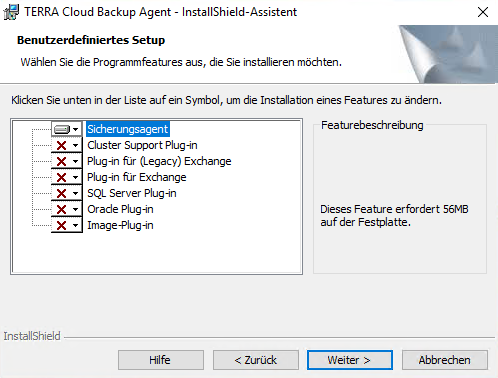
In addition to the actual backup agent, other plug-ins can be installed. Depending on the type of server, individual Microsoft SQL database instances or Exchange mailboxes can be backed up.
Select the plug-ins you want and then click Next.
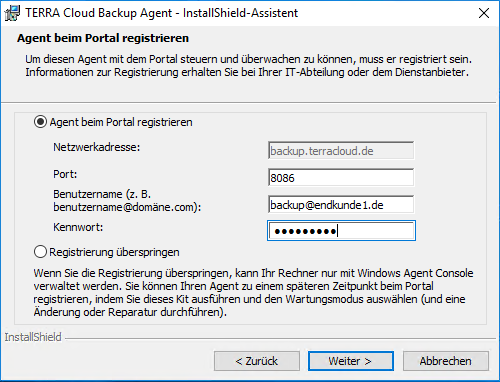
Enter the email address and password of the user created in 5.2.1. Confirm with Next.
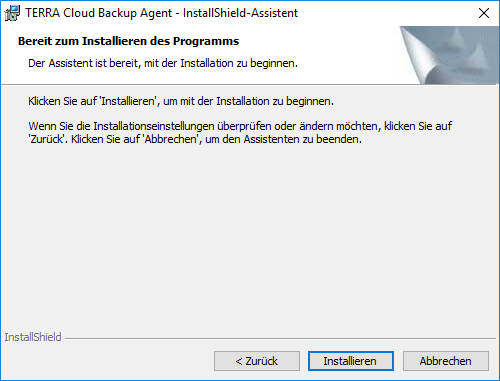
Confirm with Install.
If you are then redirected back to agent registration, the access data you entered is probably incorrect or you are having problems with the
Network connection. First try pinging backup.terracloud.de. If this works, you can use Telnet to check whether port 8086 can be reached.
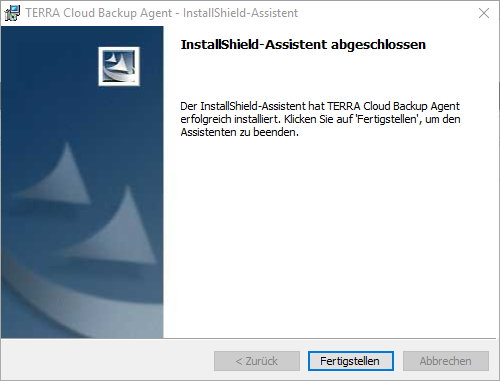
After 5 minutes at the latest, the server you just registered should appear under “Computer” within your portal.

On the right side under “Site Name” you can read “End Customer1” in our case. This is because we registered the agent with the user backupkunde@endkunde1.de,
which belongs to the “End Customer1” subsite. This way we can now filter for computers that belong to the “End Customer1” subsite. This allows you to quickly list all computers in an organizational unit.
Silent installation under Windows
The agent can also be installed in silent mode. This is helpful if the agent is to be rolled out automatically on multiple systems.
An example of the silent installation including the image plug-in:
Agent-Windows-x64-x-xx-xxxx.exe /s /v" REGISTERWITHWEBCC=True AMPNWADDRESS=backup.terracloud.de AMPUSERNAME=backupkunde@firmaXYZ.de AMPPASSWORD=password FEATUREVOLUMEIMAGE=ON /qn"
Explanation:
Agent-Windows-x64-x-xx-xxxx.exe: The agent (x64) setup is called.
REGISTERWITHWEBCC=True: The agent should be registered on the backup portal.
AMPNWADDRESS=backup.terracloud.de: The address of the backup portal is passed.
AMPUSERNAME=backupkunde@firmaXYZ.de: The user of the customer site is transferred.
AMPPASSWORD=password: The password you assigned for the customer site user.
Parameters for plugins:
Plug-ins can be added after the AMPPASSWORD separated by a space as in the example above.
Image Plugin: FEATUREVOLUMEIMAGE=ON
Exchange Plugin (Legacy): FEATUREEXCHANGE=ON
Exchange Plug-in (From 2010): FEATUREEXCHANGE2010=ON
SQL Plugin: FEATURESQL=ON
Cluster plugin: FEATURECLUSTER=ON
Oracle Plugin: FEATUREORACLE=ON
Installation in another directory:
If required, please specify the following parameter directly after /s /v" to install in another directory:
SILENTINSTALDIR=\"Path
Example:
SILENTINSTALLDIR=\"C:\Program Files\Example\
Silent Agent Registration
The following entry in the command line is sufficient to re-register the agent on the portal:
C:\Program Files\TERRA Cloud Backup\Agent\buagent.exe" -cmdline --reregister --amplogin backupkunde@firmaXYZ.de --amppassword USERPW --ampserver "backup.terracloud.de" --ampport 8086' '
The Terra Cloud Backup services must then be restarted.
To do this, start Powershell with administrator rights and enter the following:
Get-Service -DisplayName "TERRA Cloud Backup*" | Restart service
Associate Agent with Vault
Every newly registered computer is initially displayed as “Not configured” in the portal. First, at least one vault (data safe) must be assigned to the computer.
Click on the server you want to configure (DC in this example). This will open the settings for this computer. Then click on “Configure manually” on the right.

Now click on “Add Vault” on the right.
Then select the Vault profile created in 4.2.1 under “Vault profile”, in our case this is “Vault_Endkunden1”. All fields should then be automatically filled with the set values.
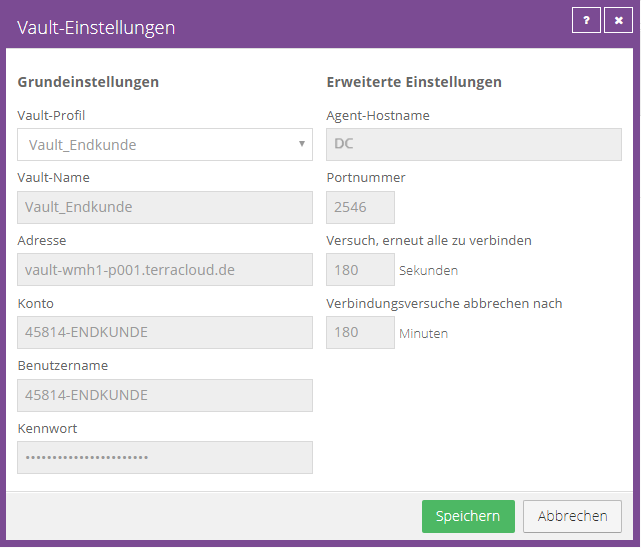
The agent establishes a test connection to the vault. If the connection cannot be established, for example because incorrect access data was entered, you will receive an error message.
If everything is OK, the vault will now appear under the “Vault Settings”.

Advanced Agent Configuration
Individual settings can be configured for each computer. These include, for example: B. Mail notification and bandwidth limitation.
Go to “Computer” in the portal. Select a server and then click on “Advanced” to make specific settings.

Options:
Under this point you can add a description to the system, for example: B. to store the ticket number in the description in a support case.
We recommend the option “Log errors and stop backup” for current Windows agents; this is the default setting after installation or update.
The option "Log errors and continue backup" offers the advantage that backups can also be carried out if, for example, B. VSS problems can sometimes go through.
The files not backed up in this job will result in an increased delta afterwards.
Retention Types:
The currently stored retention types are displayed here; after installation, “Daily” and “Monthly” are stored by default.
You can use this tab to create your own storage types, which you can then choose from in the schedule. When configuring, please note that 50 safe sets per job are included free of charge.
Notifications (agent side):
As of August 2021, the “Notifications” tab is only available if an agent-side mail notification is already configured.
This agent function has been replaced by the [via the TERRA CLOUD Backup Portal].
Enable agent-side notification manually:
If you want to continue using agent-side notification, you can configure it using the following steps.
1. Stop the "TERRA Cloud Backup Agent" and "TERRA Cloud Backup BUAgent"
services on the desired system
2. Open the "global.vvc" file in the TERRA CLOUD Backup Agent
installation directory
3. Please add the following lines, if they are not present, after the curly braces of the "OpenFile" block
  notification {
  MailOnError = True
  MailOnFailure = True
  MailOnSuccess = True
  }
4. Start the services "TERRA Cloud Backup Agent" and "TERRA Cloud Backup BUAgent"
on the desired system
5. Open the TERRA CLOUD Backup Portal and update your browser if necessary
6. Complete the configuration using the “Notification” tab, which is now visible again
Performance:
Bandwidth limitation and execution priority can be configured under this point.
According to current knowledge, changing the execution priority has no noticeable effect, so we recommend keeping the default value.
Bandwidth limitation is particularly recommended for weak connections during your customer's working hours.
At least 1.5 Mbps should be allocated for a backup.
Agent log files:
Under this tab you can view all global (cross-job) log files of the agent, which can be helpful for troubleshooting.
For example, log files of the BUAgent can be viewed; this service (TERRA Cloud Backup BUAgent) is responsible for the agent's communication with the backup portal.
Agent Update
The TERRA CLOUD Backup Agent can be updated as follows:
Windows (manual):
- As of agent version 8, the agent can be updated directly via the setup of the newer agent version
- When you start a setup of a newer agent, you will be asked if you want to update
Windows (Agent Updater):
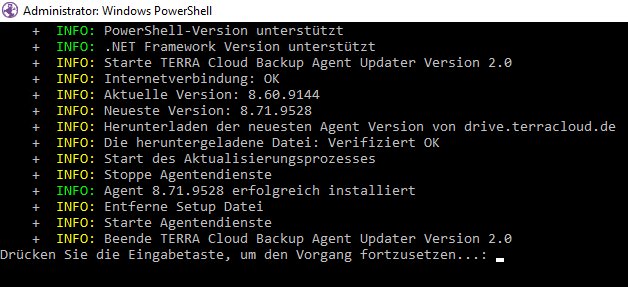
- Agents from agent version 8 can be updated using the Windows Agent Updater
- You can find the Windows Agent Update in the download area of the backup portal
- You will receive feedback about the individual steps, as shown in the illustration
Windows (Agent Upgrade Center):
You can update multiple agents centrally via the TERRA CLOUD Backup Portal. Instructions can be found at:
Agent Upgrade Center
Linux Agent
Documentation Linux Agent
You can find extensive documentation and further information in Linux Agent User Guide.
Preparing the installation for a bare metal backup
The bare metal backup of the TERRA CLOUD Backup Linux agent requires the software Relax and Recover, in a supported version, on the system to be backed up.
We recommend installing the software via the package manager of the respective distribution and, if necessary, updating it to the supported version.
The currently supported version of Relax and Recover can be found in the release notes of the TERRA CLOUD Backup Linux agent.
Please note that TERRA CLOUD cannot provide support for the installation or commissioning of the Relax and Recover software.
Installation
Step 1: Please download the TERRA Backup Agent.
To do this, log in to the TERRA CLOUD Backup Portal and copy the link address of the required agent (32 or 64 bit) from the download area.
Please download the agent setup, e.g. using the wget command and the copied link address.

Step 2: Please unpack the archive with tar -zxf PACKAGE-NAME.tar.gz.

Step 3: Please then switch to the unpacked agent directory and start the installer shell script using ./install.sh

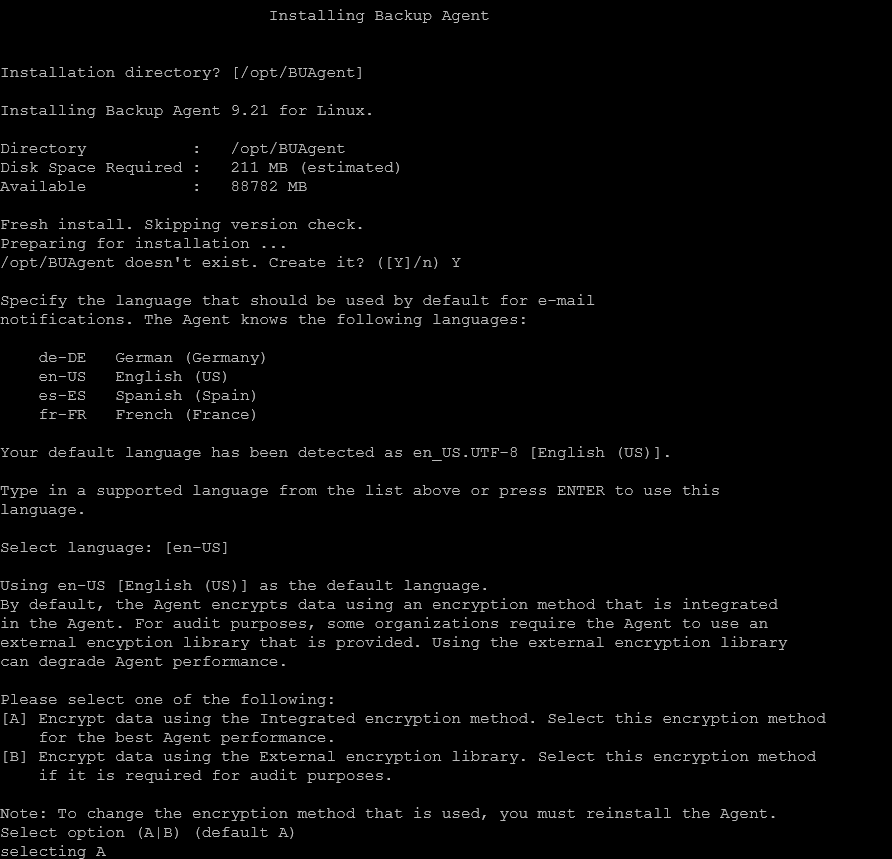
Step 4: Please first read and confirm the license agreement and follow the instructions of the installation wizard to configure the installation.
In the screenshot of the example installation, the default settings for the following queries were selected:
- Installation directory /opt/BUAgent
- Language email notification (outdated agent email notification)
- Encryption method
You can accept the default values by confirming the queries with ENTER.
Step 5: Please indicate whether a bare metal restore backup is required.
If you answer YES, please note that [Relax and Recover] must already be installed on the system in a supported version.
The default value for the Relax and Recover directory is /sbin/rear.

Step 6: Please register the Linux Agent on the TERRA CLOUD Backup Portal:
- Portal address = backup.terracloud.de
- Portal connection port = 8086 (default value)
- Portal username = User of the end customer's site
- Portal password = Password of the user of the end customer's site
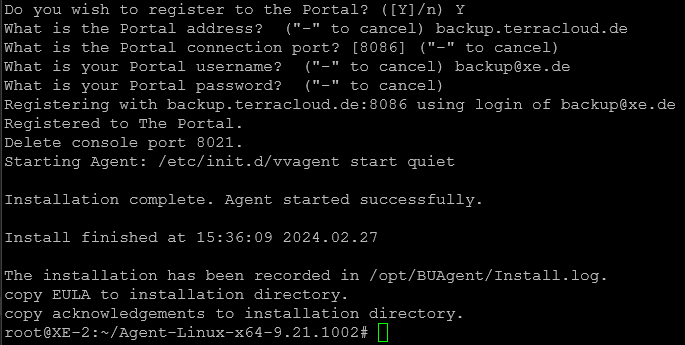
Step 7: Please check in the TERRA CLOUD Backup Portal whether the agent has been successfully registered on your end customer's site.

Backup Jobs
File-based backup
How it works
The backup software accesses the file system of the system to be backed up. The files are read and divided into 32KB blocks; a checksum is calculated for each of these blocks. The delta can be determined in subsequent backups using the checksums. The blocks identified for backup are compressed and encrypted.
Fast File Scan
The "Quick File Scan" or "QFS Quick File Scanning" function allows the Windows agent to pre-filter files based on the timestamp (modified date) in the file system to determine the delta. Files whose modification date is newer than the last backup are read in and compared with the delta file of the last backup using the calculated checksums of the 32KB blocks. Only blocks that have not yet been backed up will be included in the backup.
Advantages and disadvantages file-based
Advantages:
- BMR backup possible
- Included as standard with the agent, no additional plugin is required
- No reboot required after installation
- Granular troubleshooting possible
- Files/directories can be excluded
- Can be administered from the agent console without portal access
- Script-based restore possible via VPR file
- Threat detection feature can be used
Disadvantages:
- Slower with lots of small files
- Navigation via portal when restoring individual files
Best Practice
1.In the best case scenario, use a file-based backup job only to back up individual files and folders
2.Add the “Entire Server” option to existing file-based BMR backup jobs
3.Use an image-based job to configure new BMR backups
4. File-based backup jobs are only recommended for up to a million files; above a million files we recommend an image backup job
Create file-based backup job
Click on the “Jobs” tab. Then click “Create new job for local system”.

The “Create new job” window opens.
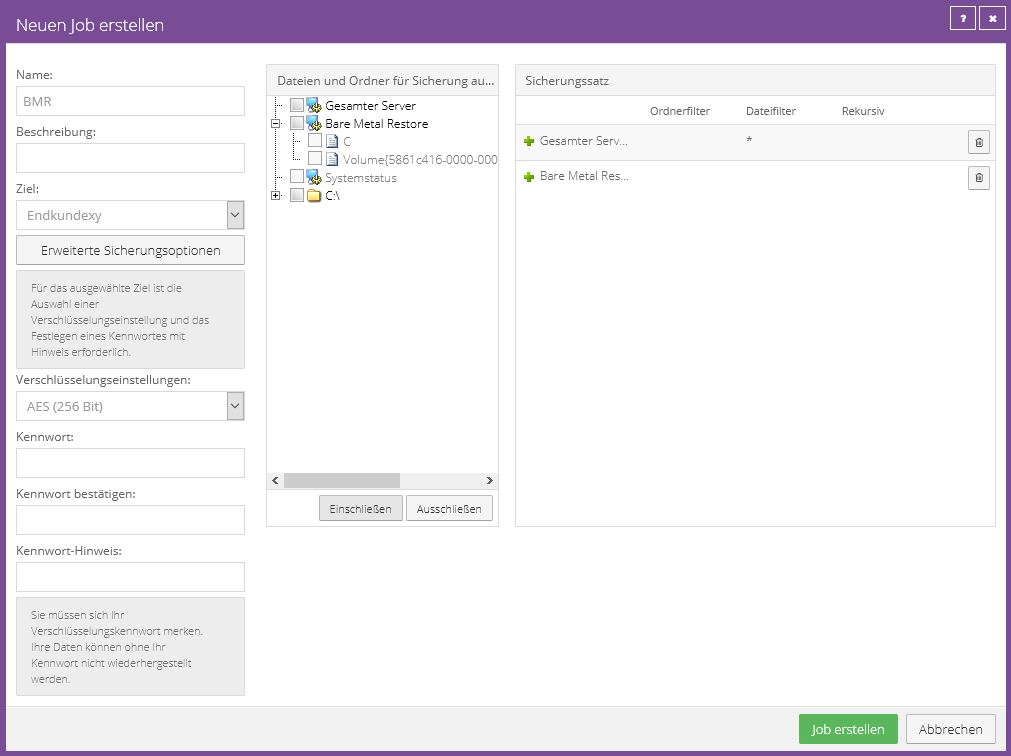
Please first give the job a name. The name “BMR” (for Bare Metal Restore) is used in the example.
The default encryption algorithm is AES 256 bit, which is considered very secure.
Then enter an encryption password (maximum 31 characters). Resetting an encryption password is not possible!
In the middle area you will find the directory structure that the agent transmits to the portal.
Here you can easily select all the directories and folders you want to back up.
In this example, the BMR and Entire Server options have been configured. Please note our
This not only backs up the actual system files, but also the bootloader. This means you can restore an entire server later.
With the “Bare Metal Restore” the entire c:\ system partition is backed up in addition to the data required for booting.
On the right you will then see the backup set. Objects marked with “+” are saved. If you would like to exclude individual data from the backup,
select the file and click “Exclude”. Objects marked with “-” are excluded from the backup.
Confirm the setting by clicking on “Create job”.
A window will then automatically open to configure the schedule.
Configure complex exclusions/inclusions in file-based jobs
The following instructions can be used for both local file-based backup jobs and UNC jobs (network shares).
When configuring one of the job types mentioned above, the portal can only be excluded or included to a limited extent.
Using the Backup Portal, you can only select one directory per exclusion entry in the job configuration and exclude folders and/or files in the respective subdirectory.
This means that the entry only applies to the level below.
Example complex exclusion:
You want to exclude all directories that end with _Backup in a backup job because they
Contains data backups that should not be included in the TERRA CLOUD backup.
D:\Data\*\*\*_Backup\*.*
In this exclusion there are two levels of different directories, each containing subdirectories ending in _Backup.
These directories and their contents are excluded using the syntax shown.
However, this complex exclusion expression cannot be configured in the portal and must therefore be copied manually into the job's configuration file.
Deposit exclusion in the job configuration:
1. Configure any exclusion
for the job
2. Stop both TERRA CLOUD Backup Agent
services
3. Open the JOBNAME.vvc file in the agent installation directory
4. Swap the exclusion created by step 1 with the one you want as in the following example
Exclude = "D:\*\*\*_Backup\*.*"
5. Start both services again
6. In the Backup Portal, check the job configuration and schedule and save it again if necessary
7. If you modify it manually, you will receive a warning in the Backup Portal, which you can simply confirm
8. After confirming the warning, please check whether the configuration has been applied as desired
For a complex inclusion, you can use these instructions analogously.
Ransomware Threat Detection
This file-based backup option allows the agent to scan the system for potential threats during backup.
If a possible threat is detected, the data backup is marked as a “potential threat”.
The current and all subsequent backups will retain this flag until one of the actions is taken.
Note: The agent does not check for possible errors in a seed backup or the first backup
Ransomware threats when threat detection is enabled in a job.

Handling potential threats
If ransomware threat detection fails, the following options are available through the Manage Potential Threat action.
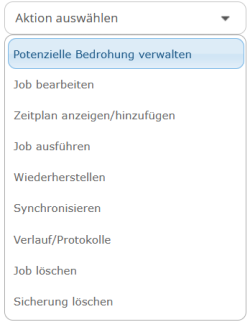
1. The "Recovery" option allows you to configure granular recovery and delete the infected backup individually after recovery.
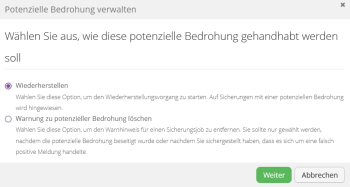
2. In case of a hoax, you can select the "Delete a potential threat alert" option and confirm the deletion of the alert.
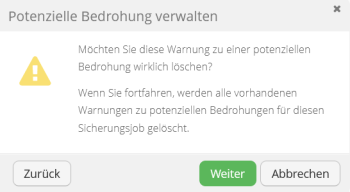
Image-based backup
How it works
In contrast to a file-based backup job, which protects individual files and folders when backing up, an image job backs up all blocks of a selected volume. It is possible to set up a BMR backup if all system-relevant volumes are backed up.
Changed Block Tracking
The image plug-in installs a changed block tracking driver, which requires a restart after installation. This can be used to determine which blocks have changed in relation to the last backup.
Advantages and Disadvantages Image-based
Advantages:
- BMR backup possible
- Faster for lots of small files
- Recommended for natively protected data volumes of 1TB or more
- Requires less processing power than file-based backup
- Convenient Restore (Image is attached)
- Navigation via Explorer when restoring
Disadvantages:
- Exclusion of individual files and folders is not possible
- Restore only possible on disks of the same size/larger
- Restart required after plugin installation
- No granular troubleshooting possible
- ReFS is not supported
- Threat detection feature cannot be used
Best Practice
1. The restart can be done at a later point in time (usually after the end of work). The agent can be configured without restarting.
2. To protect the entire system, including the possibility of a bare metal restore, select the "Entire Server" and "BMR" options.
3. If data (such as local backups / dumps) needs to be excluded, you can move it to a separate volume and explicitly not include this volume in the backup set. The "Entire Server" option cannot be used in this case.
Create image-based backup job
Requirement:
The image plug-in must be installed on the system.
If the plug-in is not yet installed, you can run the agent setup again and use the "change" option to install the plug-in later.
Create job:
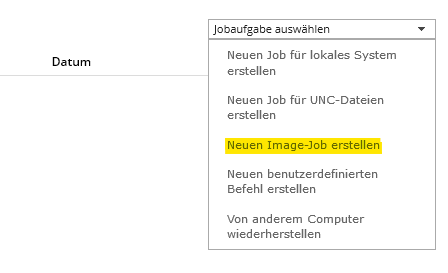
In the backup portal, please select the image job under "Select job task" as shown in the following screenshot:
Configure job:
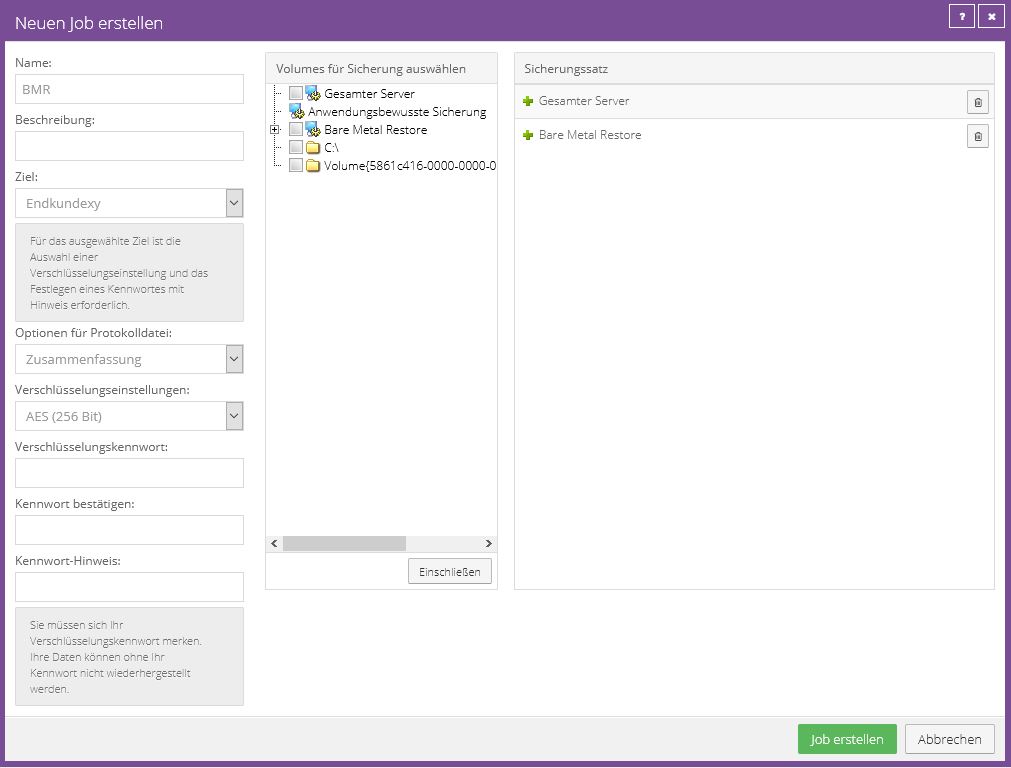
In this screenshot you can see an example configuration from an image job. In this, the “Bare Metal Restore” and “Entire Server” options were selected and included in the backup set.
Instead of showing the file system, the agent only shows individual volumes.
Application Aware Backup' option:
In addition to a BMR backup, this option also enables the transaction logs of a Microsoft SQL Server to be truncated and backed up.
In order to use this, you must provide the access data required for the SQL instance.
We recommend not using this option and using your own SQL job for a comprehensive backup of a SQL instance.
Entire Server' option:
If you add this option to the backup set, all partitions (volumes) of a system will be included in the backup. This excludes removable storage media (e.g. external hard drives or USB sticks). Partitions (volumes) added later are automatically included; there is no need to adjust the configuration.
Note:
For an image-based backup job, BMR protection is automatically provided by the "Entire Server" option, but in order to be able to offer a standard configuration for file- and image-based backup jobs, the option was changed BMR additionally added in the screenshot above.
UNC-Backup Job
Documentation
Complete setup instructions can be found in Chapter 5.4 of the Windows Agent User Guide at Agents Doku/ Release Notes (Documentation -> EN -> Windows Agent -> User Guide )
How it works
The Windows agent connects to the stored network share and saves the selected files. For authentication, a user must be provided with read and write permissions.
Best Practice
1. A UNC backup job should protect a maximum of 500,000 files or 1 TB of native data. If more data needs to be backed up, we recommend distributing it across several UNC backup jobs.
2. Since backing up a network share via a DFS namespace is not supported, we recommend backing up the server share directly without using the namespace.
3. Recommended backup method for files stored on NAS systems (e.g. from Synology, QNAP).
Schedule Recommendations
The schedule determines when a data backup should be started and with which retention type it should be saved.
The following articles go into more detail about various recommended schedule configurations.
Renewed backup attempts
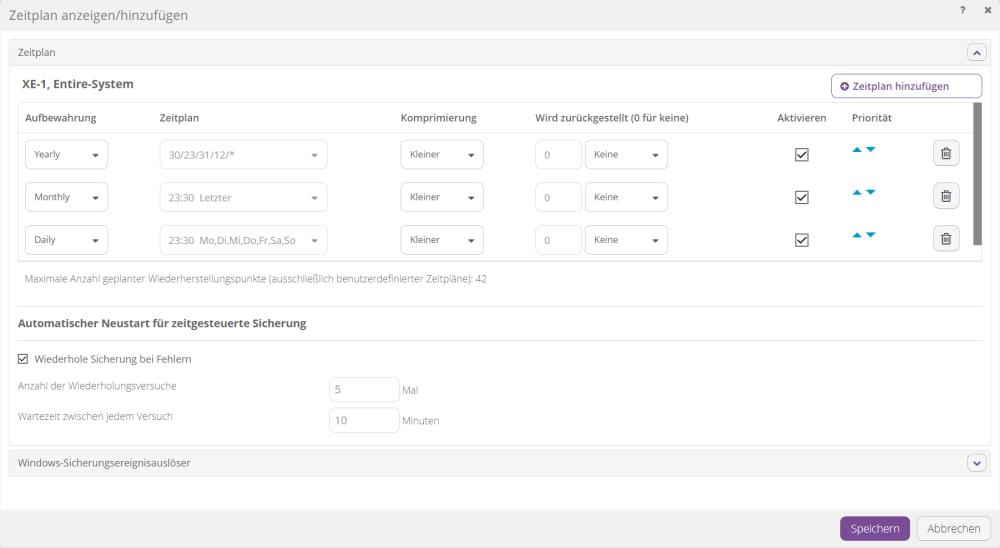
The “Automatic restart for time-controlled backup” function offers the option of restarting an incorrect or failed data backup.
This can be particularly helpful if, for example, in the first backup attempt. B. a Microsoft VSS shadow copy cannot be created.
We recommend waiting a few minutes between backup attempts so that e.g. B. Load peaks can be avoided.

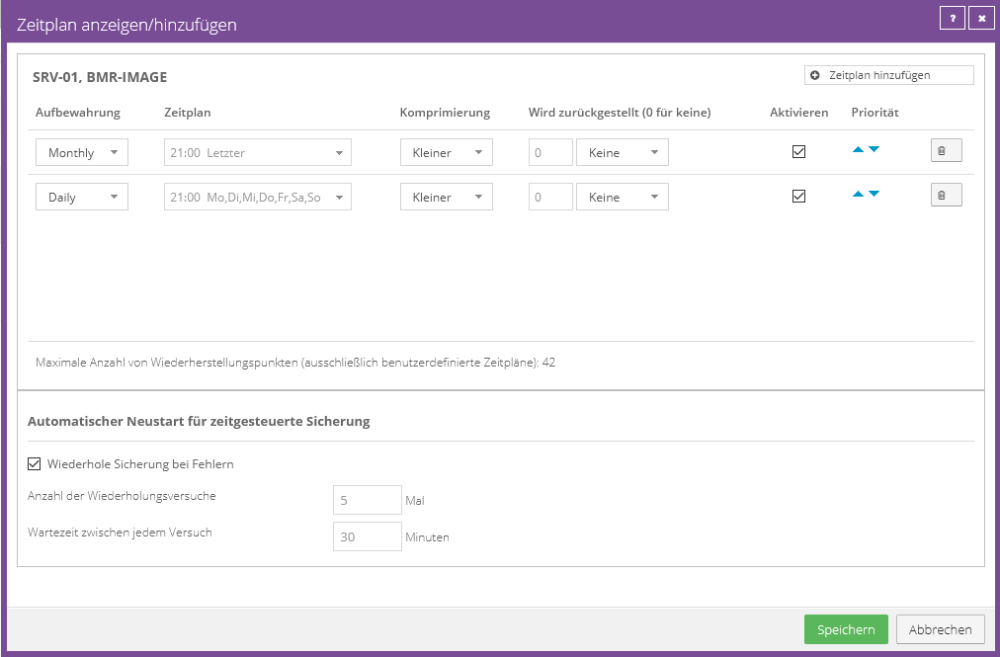
Daily and Monthly Backup
This schedule runs one backup per day, using a Daily or Monthly retention type.
The last calendar day uses the Monthly retention type, and all other days use the Daily retention type.
The time was configured identically due to the priority, so that every day except the last calendar day, line 1 does not apply and line 2 must be checked.
Since the conditions in line 2 are met on any other day, this is executed.
This configuration prevents daily and monthly backups from being created on the last calendar day.
Example configuration:
Four daily backups
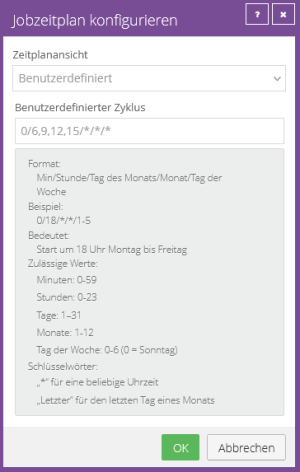
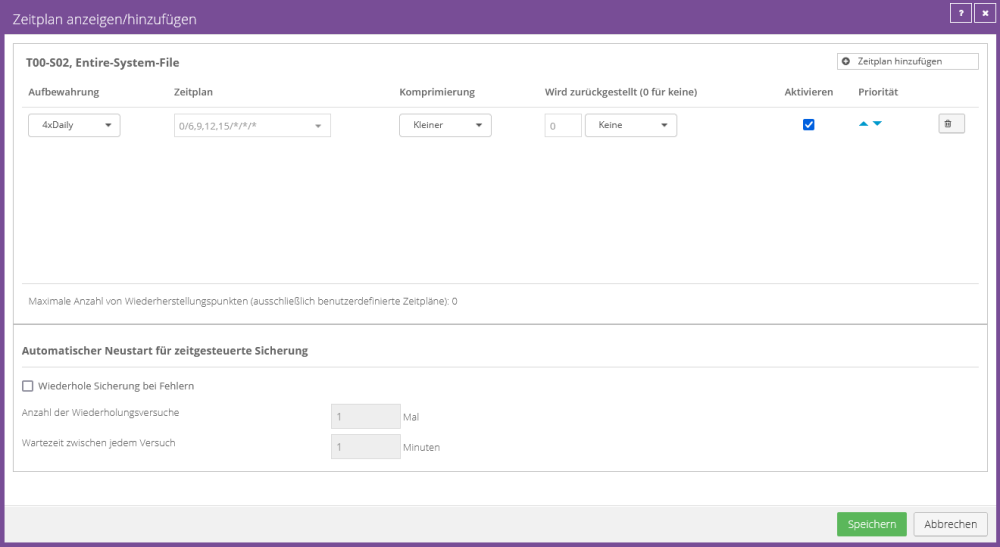
This schedule runs four backups per day, with retention type "4xDaily".
The backup times were set at the beginning and end of the working day plus two additional backups within the working day.
In the example configuration below, the backup is performed on the hour at 6 a.m., 9 a.m., 12 p.m. and 3 p.m.
If the system data is changed 24/7, it is recommended to distribute it at equal intervals, e.g. E.g. 0/6/12/18
Example configuration:
Backing up clients using the Windows backup event triggers
Unlike a scheduled server backup, a client system's usage time can vary, making a fixed backup schedule less suitable.
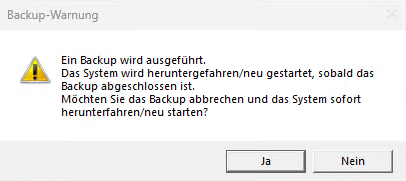
The Windows backup event triggers, which start the data backup dynamically depending on the time of triggering, are suitable for these purposes.
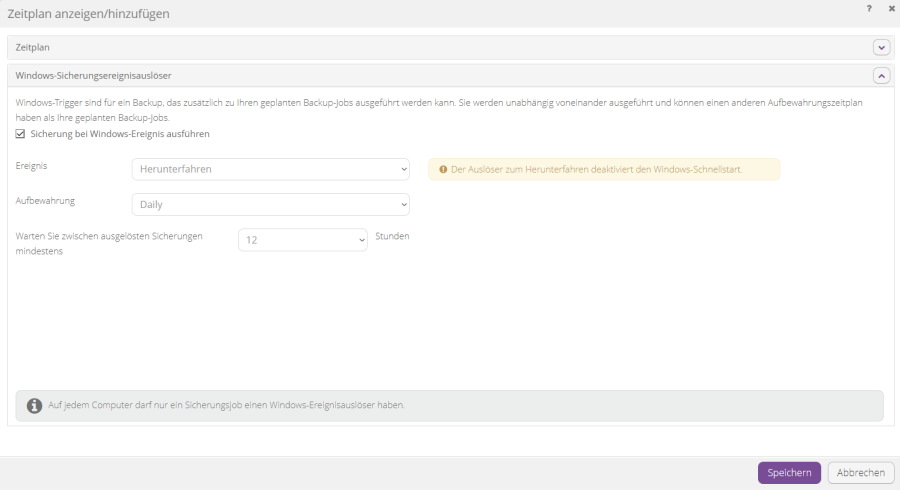
The following Windows events can be selected as triggers:
Event:
1. Shutdown
Before the system is shut down or restarted, the user receives a message asking whether the data backup should be performed before shutdown.
2. Login
A user login starts the data backup.
Waiting time between backups:
The triggering can be limited to once or twice a day, for example. B. If you restart multiple times, you won't be asked for a backup every time you restart.
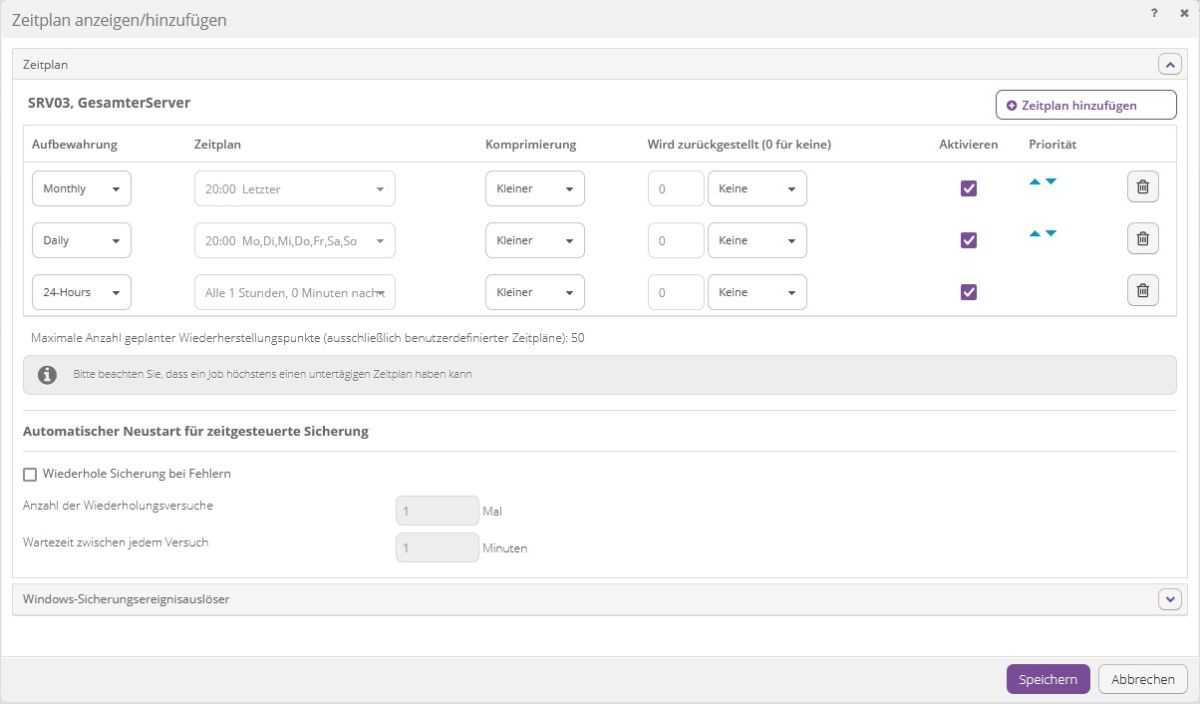
TERRA CLOUD BACKUP Enterprise: High Frequent Backup - Hourly backups
The High Frequency Backups feature enables hourly backups and thus an RPO of 60 minutes.
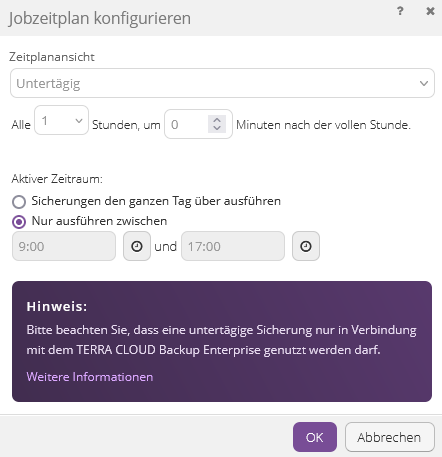
Hourly backups must be created with retention types [Retention Types|"24-Hours" and "48-Hours"] using the "Intraday" schedule view.
In the example shown below, all 50 safesets of the [quota] are scheduled.
It was assumed that most changes to the data set are made between 9 a.m. and 5 p.m.
This schedule performs a total of eleven backups per day in the following distribution:
- Nine backups are performed hourly between 9 a.m. and 5 p.m. with the retention type "24-Hours"
- One backup at 8 p.m. with the retention type "Daily" or on the last calendar day "Monthly"
Note:
Please note that the hourly backups may only be used in conjunction with a TERRA CLOUD Backup Enterprise Vault.
Example configuration:
- Please add a new line to your schedule using "Add schedule"
- Select the "Intraday" schedule view for this line
- Configure how often the high-frequency backup should back up within a day, e.g. every full hour between 9 a.m. and 5 p.m. (see screenshot)
- Confirm the configuration with "OK".
- Finally, you can decide how long the data backups should be kept using the two new retention types available, 24-hours and 48-hours
Full schedule:
TERRA CLOUD BACKUP Enterprise: 10 years retention
In order to keep one data backup per year for 10 years, the [individual retention type "Yearly"] must first be created.
In the example schedule shown below, all 50 safesets of the [inclusive quota] are scheduled.
It was assumed that all documents to be archived are stored on the system and backed up on December 31st.
This schedule carries out one data backup per day at 11:30 p.m. with the following retention types:
- Daily on all days of the month, except the last day
- Monthly on the last day of the month, from January to November
- Yearly on the last day of the year
Run job manually
If you wish, you can also run jobs manually.

Click “Start Backup”.
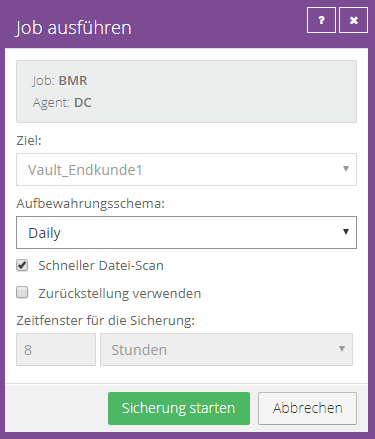
Completed backup process:
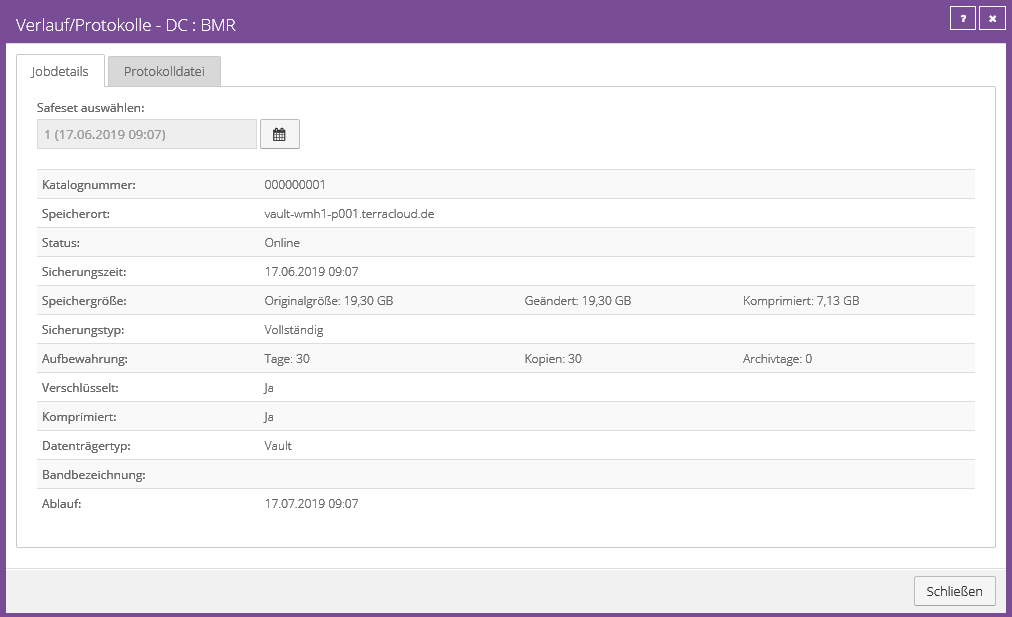
Since the agent is able to compress, in this case only 7.13 GB of data was transferred and stored in the vault for a complete Windows Server 2016 VM. The original size of the system is 19.30.
This is an initial backup, as 19.30 GB is also stored under Changed.
We can also see under the “Jobs” tab that the backup process was completed successfully:
 Further details can be viewed by clicking on “Completed” in the middle.
Defering function
The deferral option allows a backup to be completed after a defined period of time, regardless of how much data from the initial backup has already been transferred.
After the defined security window of, for example, eight hours, a safeset is created.
A deferral can be defined in the schedule and in manual execution:
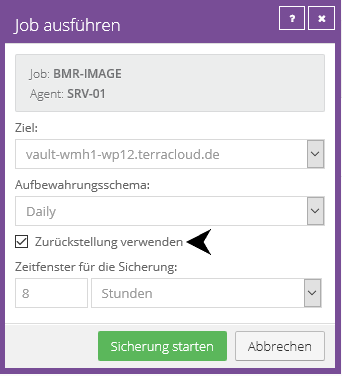
Important:
A backup with active deferral results in an incomplete backup.
Restoring from a backup with active holdback can only be done for a file-based job.
Recommendation:
The defer feature can be used exclusively for initial backup. You can select the deferral during manual execution or store it in the schedule.
We recommend placing a reminder in the agent description that the defer feature is active in the schedule. After the first successful completion of the backup without deferral, you can remove the feature from the schedule and the reminder from the agent description.
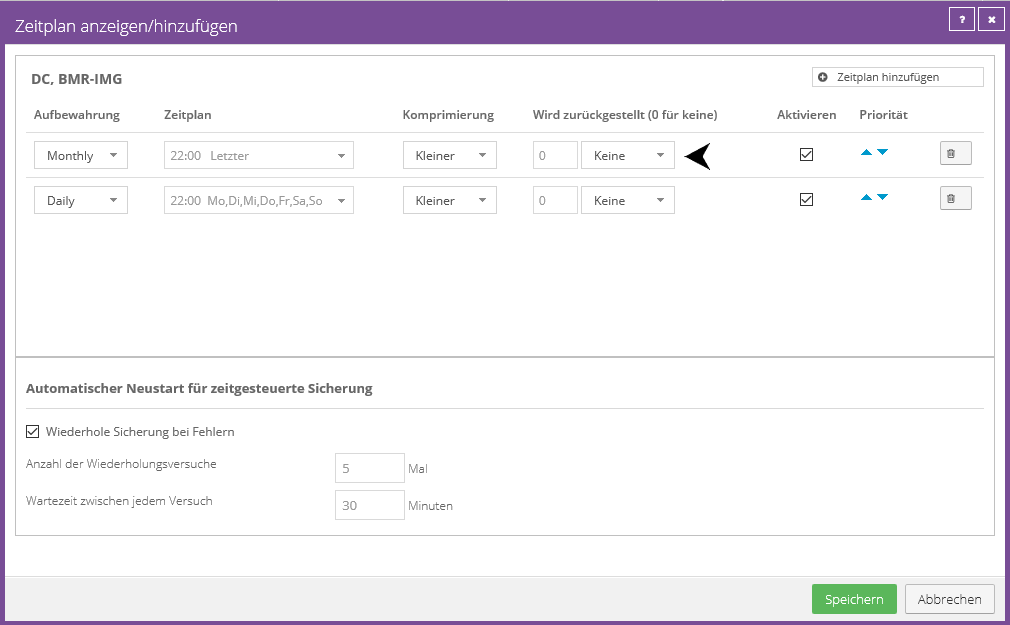
Deferral can be used to split the initial backup or seed backup into multiple backup operations. You will receive a warning in the log file until the backup job has been completely completed. With a BMR job, BMR protection is only available after the first successful completion without deferral.
Example:
Day 1:
The backup job is started for the first time with a deferral and ends the backup after a defined period of 8 hours and Safeset 1 has been created.
Day 2:
The backup will start again and create Safeset 2 after 8 hours.
Day 3:
On the third run, the backup job completes before the 8 hour period, Safeset 3 is created and the seed backup is completed successfully.
The status of the backup job changes from "Postponed with Warnings" to "OK".
Restore a backup job
After backing up data from a system, you can select “Restore” under “Actions” in the backup jobs.
Windows
Restore from a file-based backup
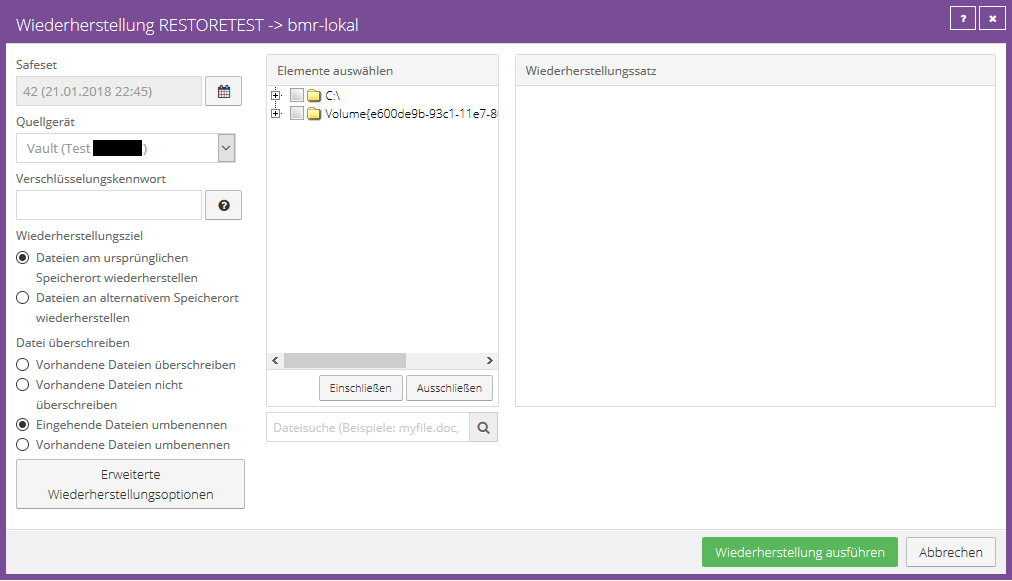
You can use the calendar button to select the safeset from which you want to restore the data.
Enter the job's encryption password. The Hint button displays your password hint once clicked.
The folders and files to be restored can be set using check boxes for complete folders or files and then included in the recovery using “Include”.
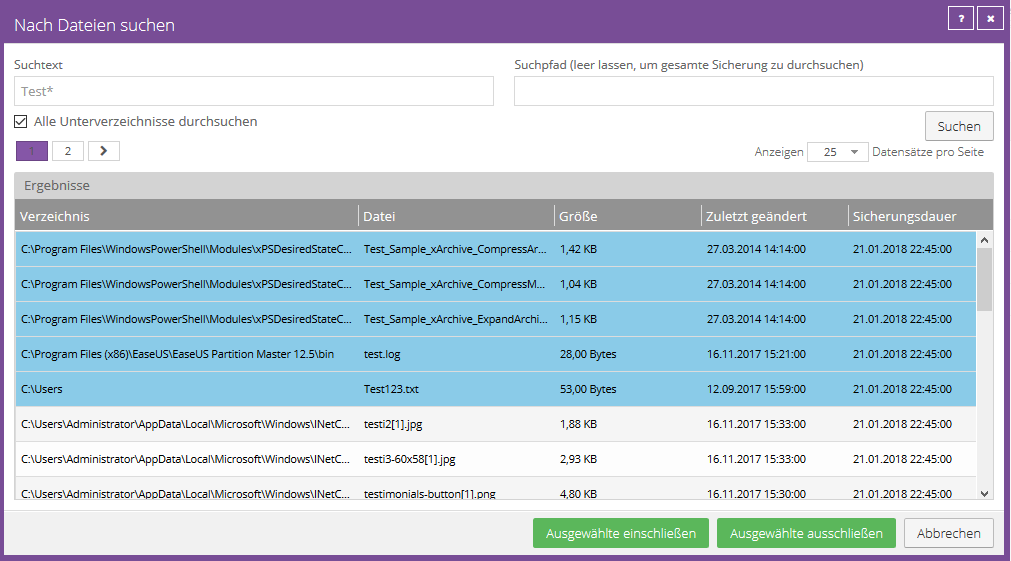
With the search function it is possible to search for specific files without looking for the file path.
The wildcard characters * (for any number of characters) and ? (for a single character).
However, the question mark cannot be used for an umlaut (ö,ä,ü). Select the appropriate files and add them to the recovery by clicking “Include Selected”.
To search for files in a specific backup folder, enter the desired path in the Search Path field.
When you include a folder in a restore, the subdirectories and files in that folder are also included by default.
If you only want to restore a portion of the subdirectories or files in a folder, you can add filters to the include record.
It is also possible, for example, to add a filter to restore only files with .doc or .docx extensions in a folder.
If you exclude a folder from a restore, the subdirectories and files in that folder are also excluded by default.
If you only want to exclude a portion of the subdirectories or files in a folder, you can add filters to the exclude record.
For example, you can add a filter to exclude only files with .exe extensions in a folder from recovery.
You have the options to restore the files to the original location or to an alternative location.
If you decide to use an alternative storage location, you can use the folder button to select the desired storage location.
You also have the options to overwrite existing files, not overwrite (this adds a numeric extension, e.g. .0001), rename incoming files and rename existing files.
Overwrite existing data
If you try to restore multiple files with the same name to an alternate location and select Overwrite Existing Files, only the last file restored will be retained.
Other files with the same name will be overwritten. To add a numeric extension (e.g. .0001) to a recovered filename, select Do not overwrite existing files.
For example, if you restore a file named "filename.txt" to a location where there is a file with the same name, an extension is added to the restored file name (for example, "filename.txt.0001").
Under no circumstances should you select the entire C: volume and let it overwrite the existing volume. This will result in serious damage to the system!
Rename existing files
To add a numeric extension (e.g. .0001) to an existing filename, select Rename Existing Files.
For example, if you restore a file named "filename.txt" to a location where there is a file with the same name, an extension is added to the existing file name (for example, "filename.txt.0001").
The name of the restored file is still “filename.txt”.
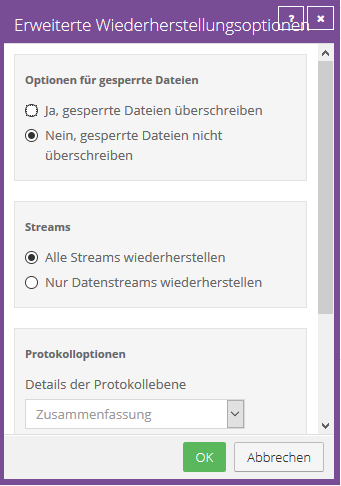
Advanced Recovery Options
Locked File Options
When restoring data from a local job, you can specify whether locked files should be overwritten by restored files with the same name.
To do this, select one of the following options:
- "Yes, overwrite locked files"
Files in the system that are locked during recovery will be overwritten with the recovered files upon reboot. This option must be enabled for system state or system volume restores.
- "No, do not overwrite locked files"
Files in the system that are locked during recovery will not be overwritten with the recovered files with the same name upon reboot.
Streams
When you run backups, information from your files is captured in different streams.
The original data created by a user is called a data stream.
Other information such as security settings, data for other operating systems, file references and attributes are stored in separate streams.
When restoring data from a local job, you have the following options to choose from:
- "Restore all streams"
Restores all information streams. Use this option when restoring files to a system with an identical platform.
- "Restore data streams only"
Select this option for cross-platform restores. With this option, conflicts do not arise due to system-specific data streams.
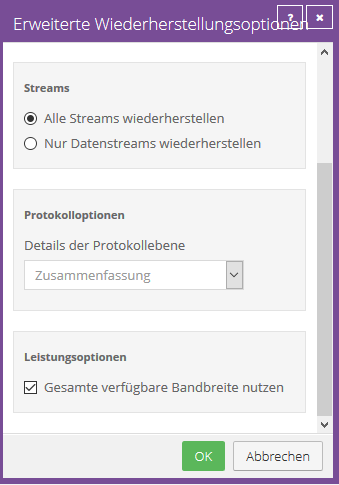
Protocol options
From the list, select one of the following logging levels:
- Files: Provides more detailed information and is typically used for troubleshooting. Provides information about files that are being restored.
- Directory: Provides less detailed information than the Files logging level. Provides information about folders that will be restored.
- Summary: Provides top-level information including Vault/Agent version and backup size.
- Minimal: Provides top-level information including Vault/Agent version.
Changing the logging level only affects log files that are created afterwards. Log files that have already been created are not affected by this change.
Performance options
To use all available bandwidth for recovery, select "Use all available bandwidth."
Bandwidth throttling determines how much bandwidth an agent can consume for backups and restores.
For example, you can limit traffic so that online users are not impacted and allow unrestricted usage at night so that scheduled backups or restores can occur as quickly as possible.
Bandwidth throttling values are set at the machine (or agent) level and apply to backups and restores.
When three jobs are running simultaneously on a computer, each job receives 1/3 of the specified maximum bandwidth.
Possible bandwidth settings: Maximum bandwidth (upper limit) in MB per second that the agent is allowed to consume for all backups and restores.
Period of time during the day when throttling is activated. Only one time window can be specified.
There is no throttling outside the time window. The days of the week that throttling is enabled.
Once the bandwidth throttling window begins during an ongoing backup or restore, the maximum bandwidth is dynamically applied to the running process.
If the throttling window ends while a backup or restore is in progress, bandwidth throttling is removed.
If you change an agent's bandwidth settings while a backup or restore is in progress, the new settings do not affect the ongoing process.
The bandwidth settings are applied when the backup or restore starts and are not changed afterwards.
Restore from another computer (file based)
It is possible to restore some or all of the data backed up on one computer to another computer with the same characteristics.
To restore the data from another computer, you can redirect the data from a backup job in the Vault to another computer.
If the data was backed up with a plug-in, the same plug-in and the corresponding installation (e.g. Microsoft SQL) must also be present on the target computer.
The new computer then downloads information from the vault to restore the data to the new computer.
Example: Computer A backs up its data with Job A, Computer B restores Job A's data (Computer A's data) to Computer B.

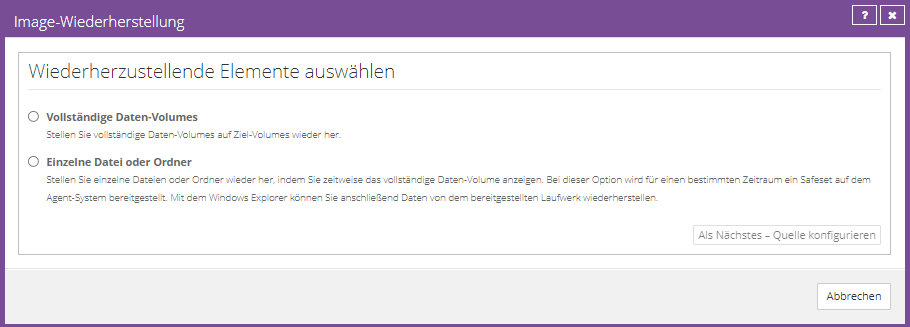
Restore from an image-based backup
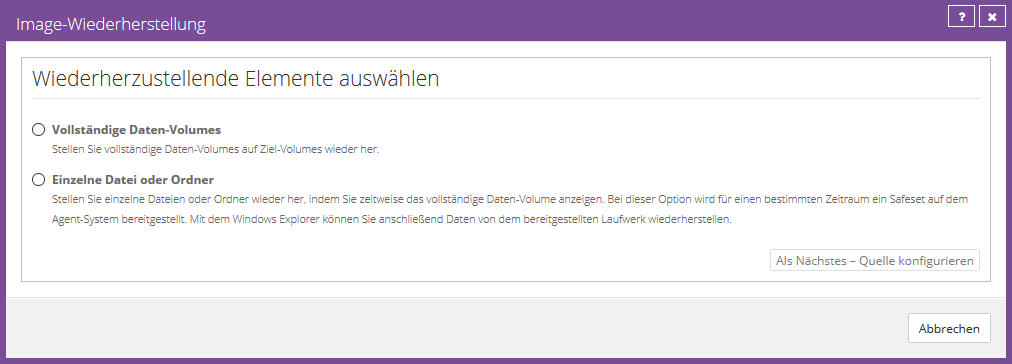
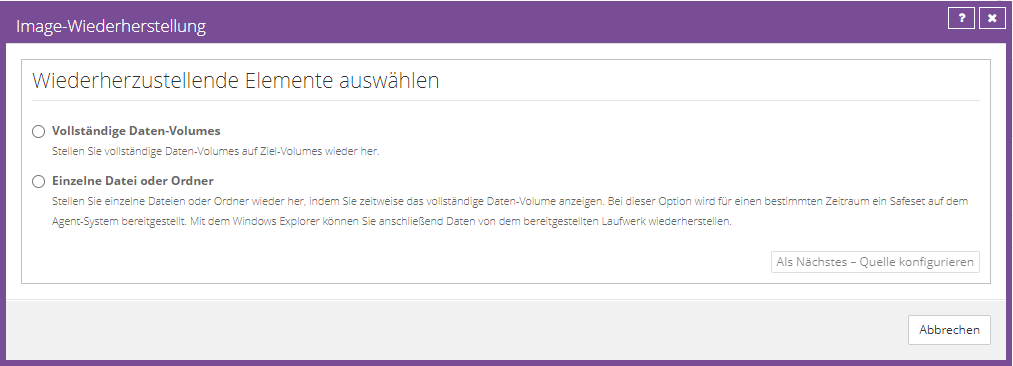
You can choose whether you want to restore a complete partition or individual files or folders.
Select the manufacturing you want and click “Configure Source Next”.
Volume Recovery
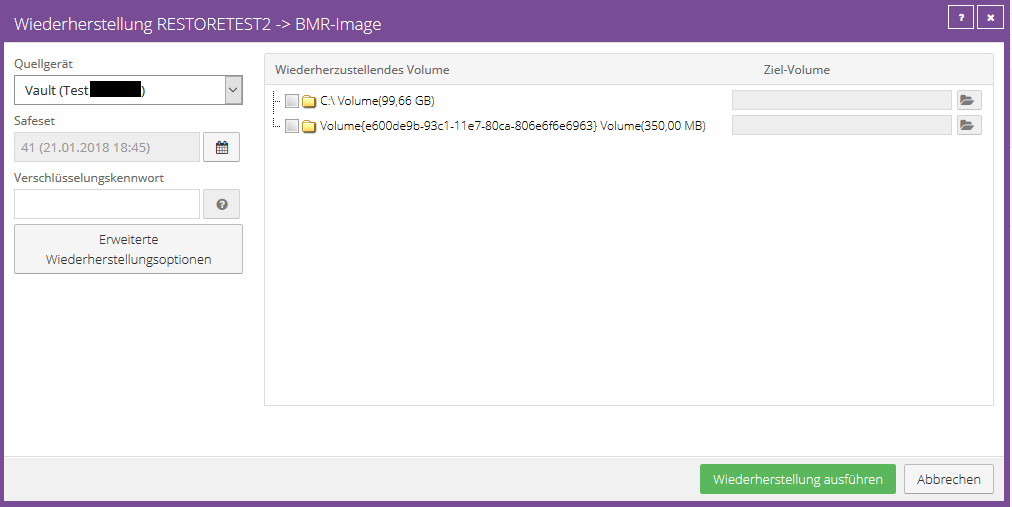
Select the desired volume to be restored.
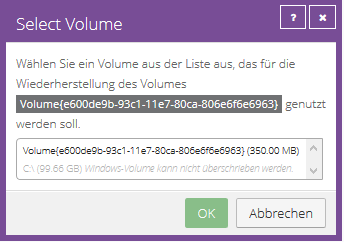
Next, select an existing volume to restore to.
Click “OK” and then click “Run Restore” to start the restore process.
File or folder recovery
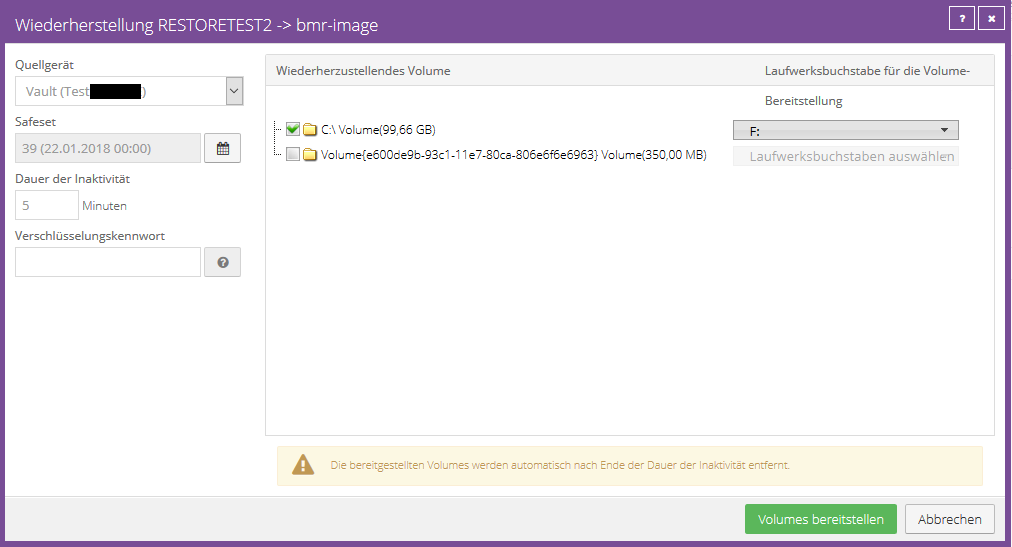
Select the volume from which individual files or folders should be restored and assign a valid drive letter. (Please do not use A & B)
Now click on “Mount Volumes”. The backed up volume is mounted on the affected agent and you can restore the required files or folders to a local volume by dragging and dropping them.
Under “Duration of inactivity”, set a generous time limit for how long the drive should be mounted. By default we recommend the value 60 minutes.
Restore from another computer (image based)
You can restore successfully backed up data to another computer with the same agent configuration.
To do this, you can transfer/copy existing backup jobs in the Vault to another computer.
Since an image job is a plugin job, the image plugin must exist on the target agent.
Example: Computer A is down/no longer in use, but now you need to restore data from Computer A. To do this, copy the job from computer A to computer B to perform a restore.
Select Computer B in the backup portal.
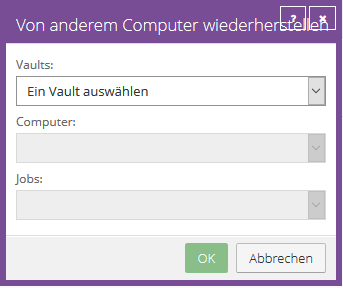
From the Select Job Task menu, click Restore from Another Computer.
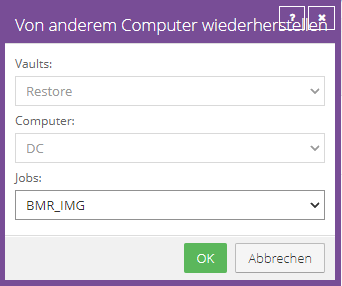
The Restore from Another Computer dialog box opens.

In the "Vaults" list, select the vault in which the backup of Computer A was stored. If the restore is to be carried out across vaults, the agent must first be registered with the source vault.
Once the correct vault is selected, you will find Computer A in the Computers tab.
After computer A is selected, you will find its job in the Jobs tab.
Confirm with OK once a selection has been made.
The portal attempts to download required job information to Computer B. Once these are downloaded, the job will appear in Computer B's Jobs tab.
A recovery process will start automatically. Once you have selected the desired restore here and entered the encryption password to decrypt required information, you can proceed with a normal image-based restore.
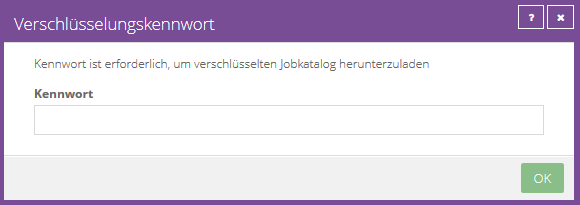
If an error occurs while downloading the job information, the restore cannot continue.
This can happen if the job information is not available or a required plugin is not installed on the target computer.
Make sure the required plugin is installed on the target computer before repeating the process. (Change installation via Agent Setup or via the "Select job task" action)
Linux
Restoring a backup is the most common usage, allowing you to restore anything from a single file to a directory structure to an entire system.
To start a restore, select a job (that is, highlight it) and do one of the following:
- Select Actions and Restore.
- Click the recovery icon (or use CTRL+R).
- Right-click a job in the left pane.
The recovery wizard will start. It offers the following options:
- Select a source device, vault, or directory type. Depending on which option you choose here, you can also select a vault and a backup. You can also choose to restore from a specific backup set or a series of backup sets.
- Enter the password if the backup is encrypted. If the backup is not encrypted, this window may not appear. If you forget the password, you will not have access to the backup data.
- Select the recovery objects (files or directories). You can expand the directories (if any) and select or deselect files to restore.
- Enter recovery destination options. You can choose to restore files to the original location or another location, create subdirectories, and overwrite existing files.
- Select the other recovery options. You can overwrite locked files and select all streams or only data streams. You can choose a log file with different levels of detail.
- Click the Finish button to start the restore process. The restore will be performed and the process information will be displayed.
You may want to view the log files after the process is complete. The recovery logs are identified by the prefix “RST” in the log list.
Assign alternative static IP for a BMR restore
By default, a BMR restore restores the original network configuration.
If you would like to assign an alternative configuration, for example to carry out a test restore, we recommend starting the system without network access first.
With a Hyper-V, for example, you could initially boot into the recovery ISO without a connected external vSwitch. After adjusting the network configuration, you can connect the VM to the vSwitch. This ensures that the system never goes online with the old IP address.
Please follow these steps to adjust the network configuration before restoring:
- Boot into the Restore ISO and initiate the restore until the step where you are asked to run ./bmragent.
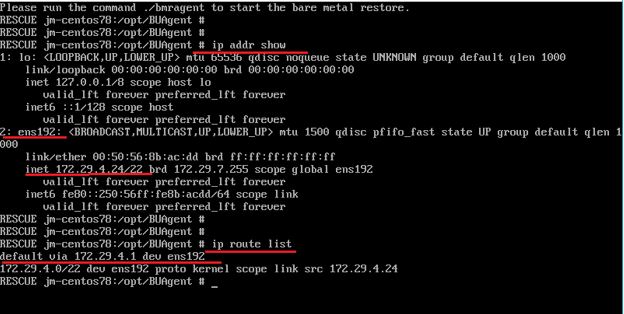
- Find the name and configuration of the network interface using ip address show
- Take the interface offline by e.g. ip link set name of network interface down
- Delete the old IP address that you determined in the first step, e.g. ip address del 172.29.4.24/22 dev name of the network interface
- Configure a new IP address using, for example, the following command ip address add 172.29.4.29/22 dev name of the network interface
- Take the network interface back online after customization
- Finally, configure the default gateway using, for example, ip route del default and then ip route add default via 172.29.4.1 dev name of the network interface
In this screenshot you can see an example of step 1 from the instructions:
Bare Metal Restore
A bare metal restore is a complete restore of a secured system, including all components required for the boot process (e.g. the bootloader).
Disaster recovery options
The following flow chart shows you possible workflows and recommendations for action for various Disaster Recovery scenarios.
Export drivers of a secured system
You can export all drivers of a system using the following instructions:
- Create a directory in which the drivers should be stored, e.g. (C:\Drivers)
- Run this command with administrative permission in CMD:
dism /online /export-driver /destination:"C:\Driver"
You can add the exported drivers when creating a new restore iso. If complications arise during a BMR test restore, we recommend exporting the drivers of the protected system as described above and adding them to the restore ISO. Please keep this ISO or drivers separately.
Create Restore ISO
To perform a bare metal restore, you need a restore iso (.iso file).
The Restore ISO is based on Windows PE and also contains the recovery software of the TERRA CLOUD backup solution, which is started automatically as soon as the system boots into the ISO.
You can create this ISO yourself and use it for BMR restore of all your systems.
Download:
Please download the Bootable Media Creator from the Backup Portal.
Installation:
Now install the Bootable Media Creator, which also requires the Windows Assessment and Deployment Kit. By default you will be guided through the installation of the ADK components via the Bootable Media Creator Setup. Alternatively, you can use the following setups for the installation:
https://backup.terracloud.de/Download/adksetup.exe
https://backup.terracloud.de/Download/adkwinpesetup.exe
Please note that both the ADK setup and the WINPE setup must be executed.
After installation, the image can be created very easily.
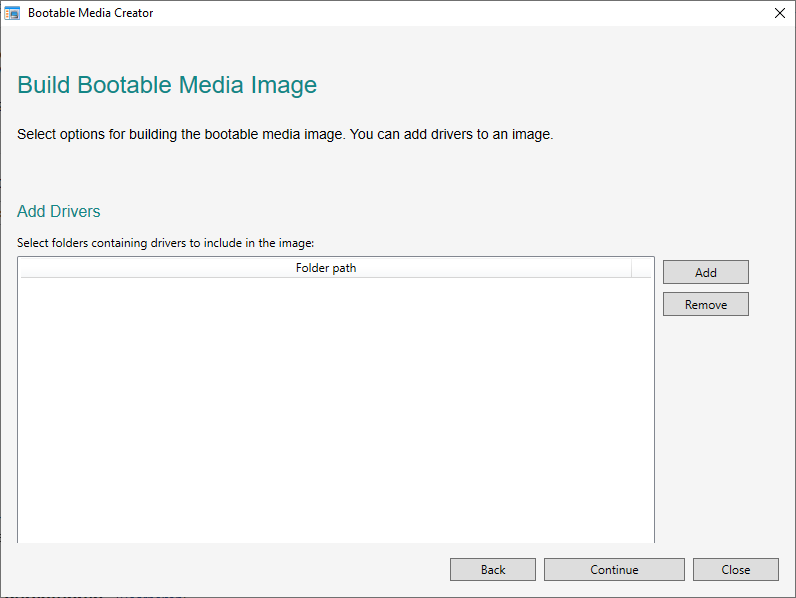
First start the Bootable Media Creator and simply select a target directory below.
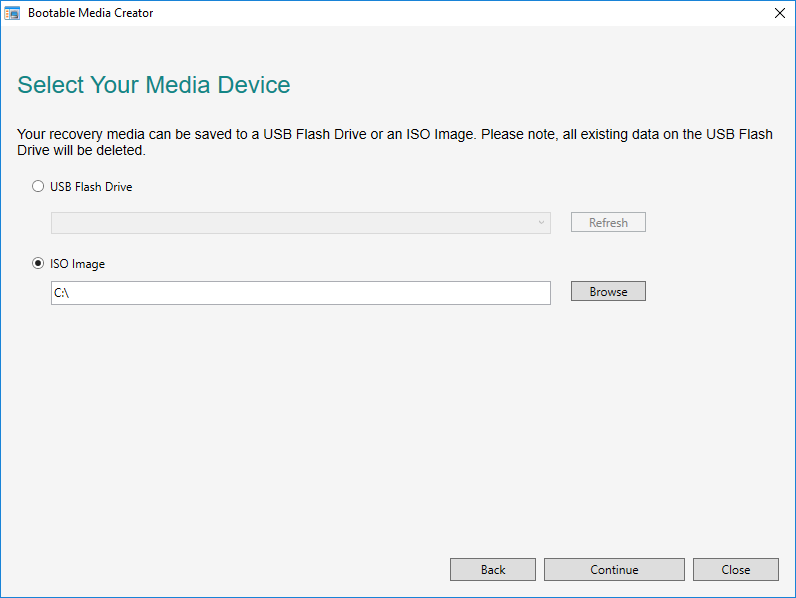
You can add exported drivers from Export Drivers in this step by selecting the driver directory using "add".
Now click on “Continue” to create the image.
The image can now be burned onto a CD or attached to a virtual machine, for example.
Perform restore
The following instructions show a typical restore operation in a virtual machine. The ISO file was attached to the virtual machine.
The legacy adapters must be used as network adapters under both VMware and Hyper-V.
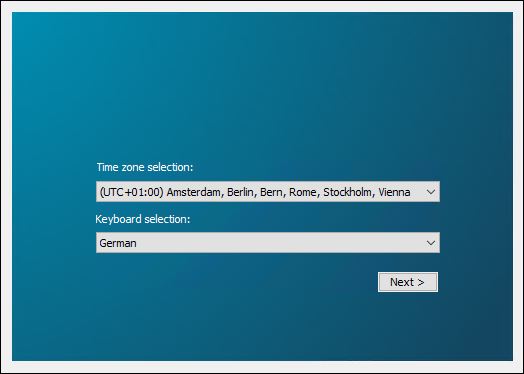
After restarting the machine, a connection to the machine must be established via the console. The following image then appears:
In the first step, configure the time zone and the desired language, then click Next.
In the following window, accept the license terms and then click on “Next”.
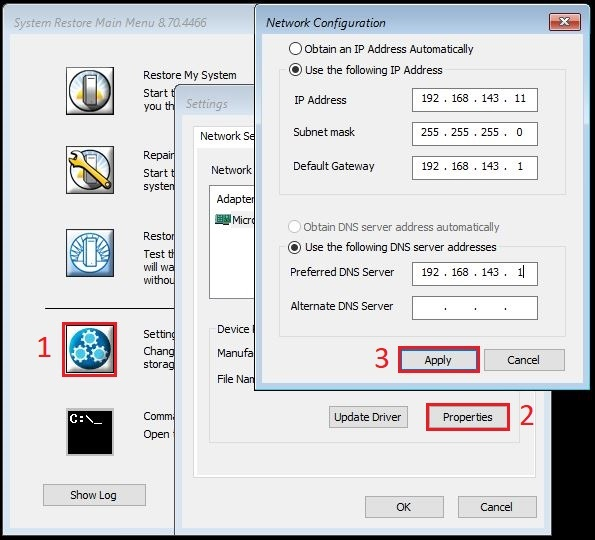
By default, the “System Restore” gets the IP address from a DHCP server. If there is no DHCP server or you want to assign the IP address manually, click on “Settings” in the main menu.
Select the network interface and then click “Properties”. Assign an IP address and confirm with “Apply”.
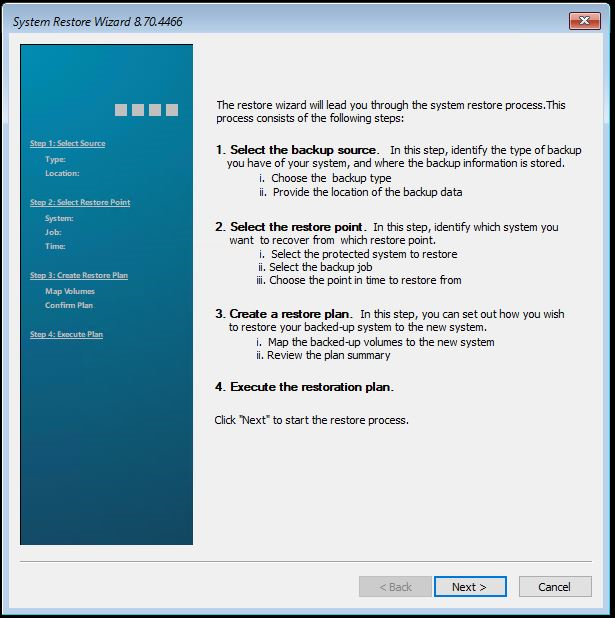
To perform a restore process, click on “Restore My System” in the main menu. Click "Next" in the wizard.
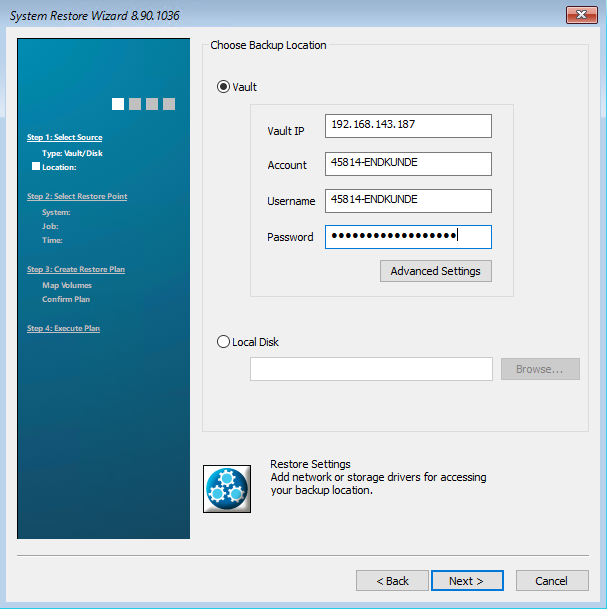
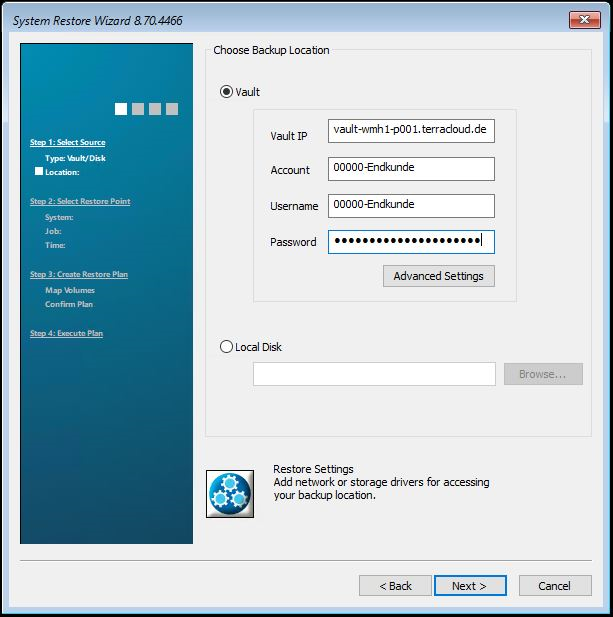
On the following page, enter your data for the vault (data storage) and confirm with Next. The system restore now tries to establish a connection to the vault.
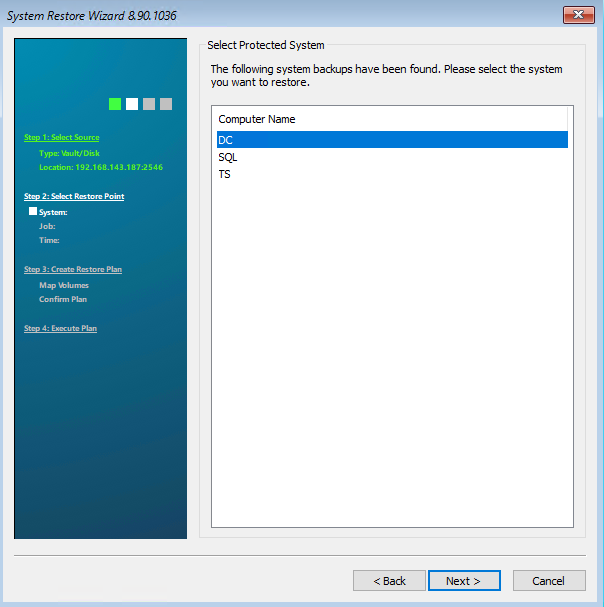
On the following page you will see all the computers that belong to your account. Select the computer you want to restore. Then click on “Next”.
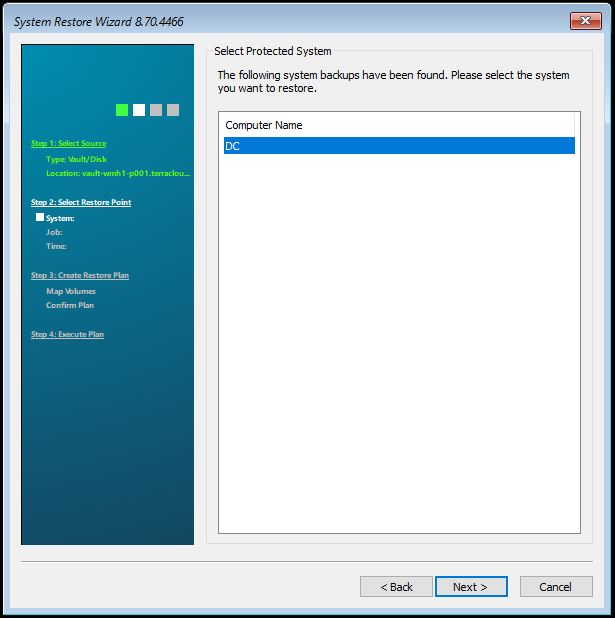
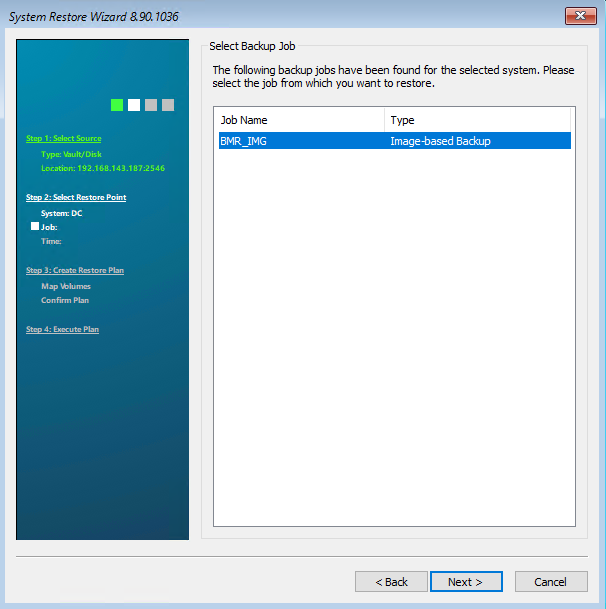
On the following page you will see all backup jobs that belong to this computer. Select the job you want to restore. Then click on “Next”.
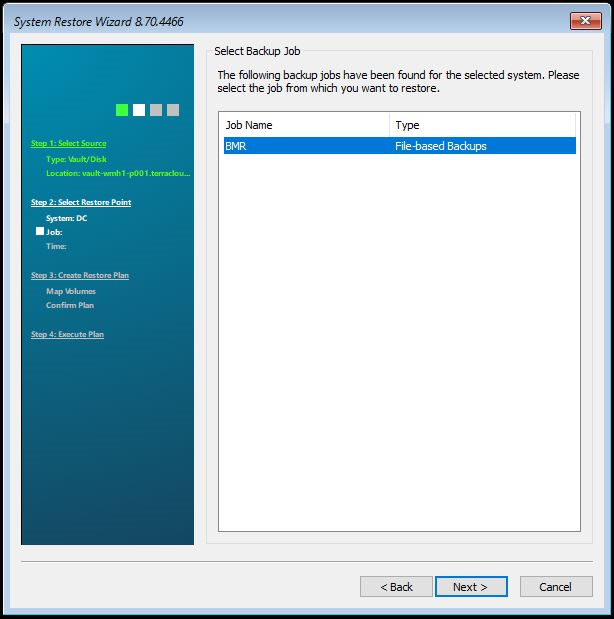
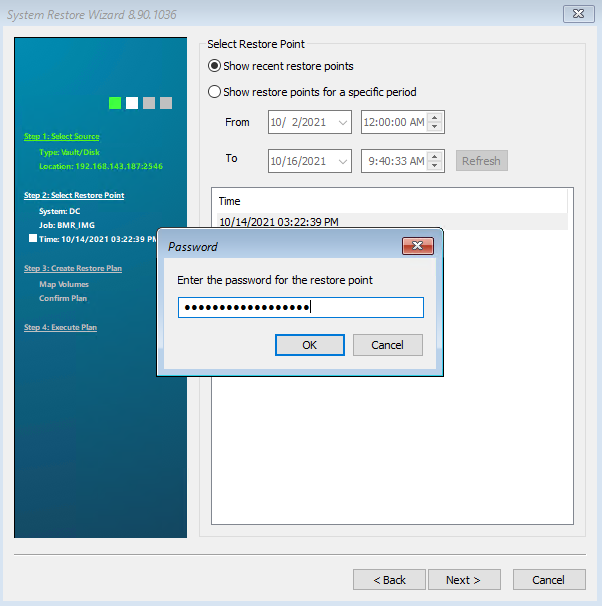
In the next step you can select which safeset should be backed up. Select the safeset you want and then click “Next”.
If you have set up a password for the backup job, a password query will appear. Enter the password and confirm with OK.
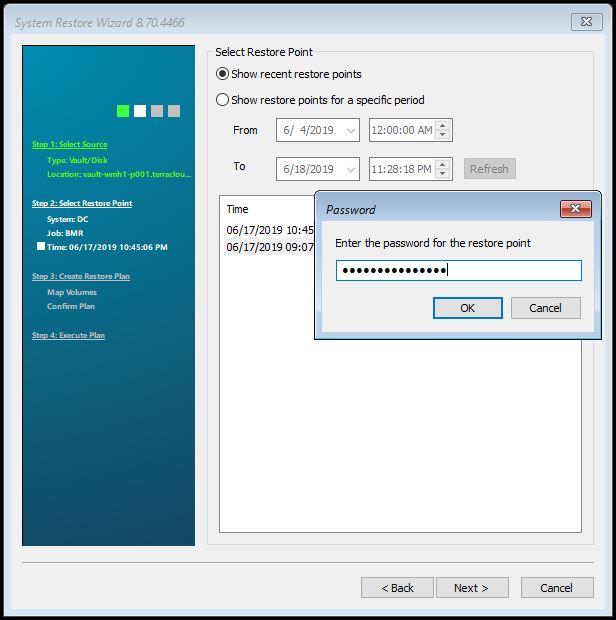
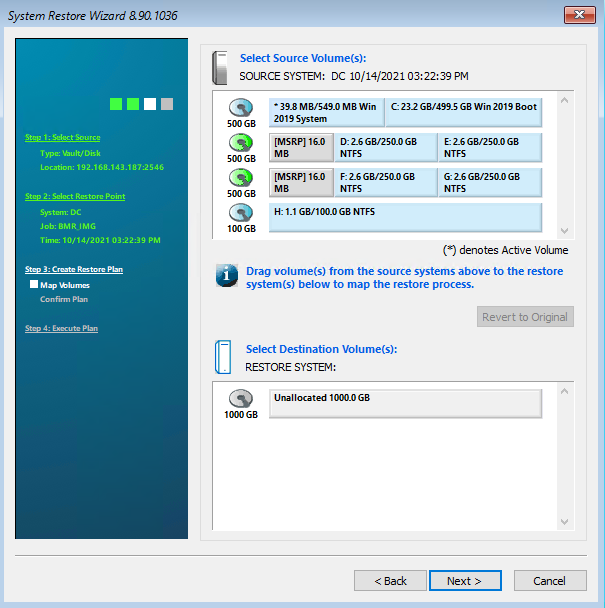
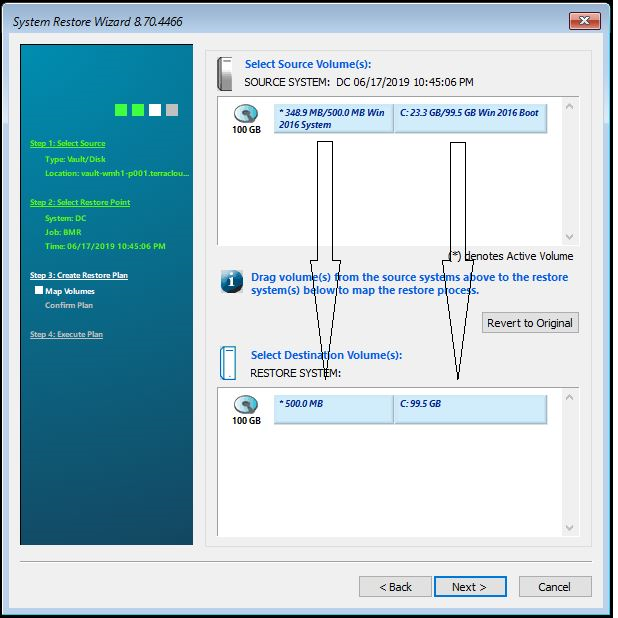
In the following step, the volumes that should be backed up can be selected. To do this, simply drag the partitions down into the “Destination” field.
Then click on “Next”.
In the last step, the settings can be checked again. Then check the box next to “Click here to confirm the restore plan”. Then click on “Next”.
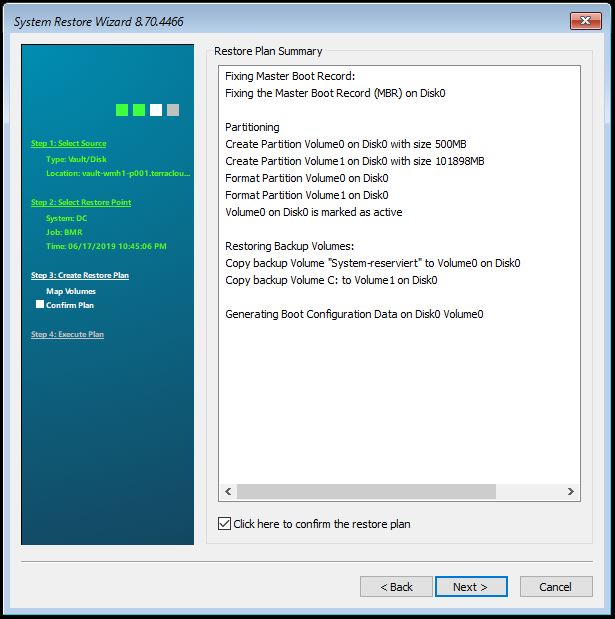
The restore process starts.
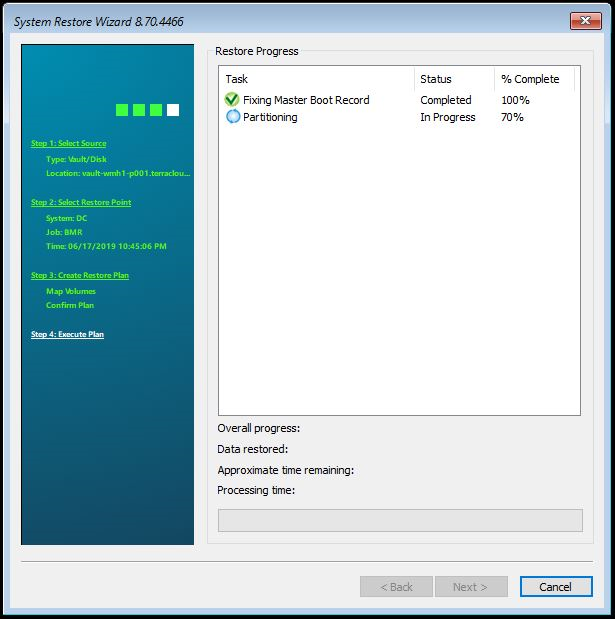
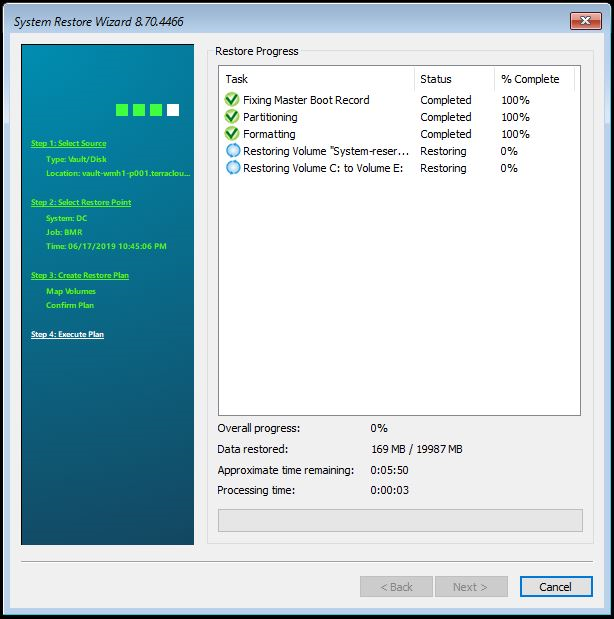
If the restore process has been completed successfully, please confirm by clicking OK to close the window. Exit the wizard and restart the server.
Backup satellites
Description and Benefits
The backup satellite is a hardware appliance or a virtual machine that is used in your end customer's network and can receive backups via the local network.
The satellite provides you with all vault functions, e.g. providing volumes from an image backup. The rental devices or virtual machines are made available to you by the TERRA Cloud and are billed monthly, depending on their size and performance, in addition to the required backup packages.
By using a satellite, you can implement a hybrid cloud backup solution, as backups are stored locally on a satellite and subsequently replicated to a data center.
This backup concept offers the following advantages:
- Fast backup and restore, thanks to a locally connected vault system (satellite)
- No acquisition costs, as the hardware is provided to you
- Time decoupling between backup and replication is possible
- Restoration is possible independently of the data center
- Initial backup can be carried out directly against the satellite
- Your customer's bandwidth can be used optimally
- Fast VM restore of the Hyper-V agent or vSphere recovery agent
Commissioning
After ordering your backup package including satellites, you will receive an email with the access data as soon as the vault account has been provided on the Basevault.
You will receive a separate notification after the satellite has been deployed and shipped to you.
After receiving the satellite, the following steps must be carried out (hardware satellites):
- Set up and launch satellite in your end customer's network
- You can reach the satellite interface via the local address of the satellite (either static IP or DHCP)
- Please note that the satellite interface can be accessed via HTTPS and may need to be enabled in the browser first
- You can use the interface to change the access data in the user administration and, if necessary, adjust the network configuration
- Please deactivate the bypass mode using the Deactivate bypass mode function 10.3.1.3
- The satellite is now prepared for productive use and must be saved as a backup target in the agents' vault settings (local IP of the satellite)
- Initial backups can optionally be carried out directly against the satellite
Commissioning a satellite VM:
- You will receive a Hyper-V VM container from TERRA Cloud Support, which you can import and virtualize under Hyper-V
- Please note that only Hyper Hosts are compatible with the Windows Server 2019 operating system or higher!
- Disk/network allocation must be done via Hyper-V Manager / VM Connect
- The remaining steps of commissioning a satellite VM are similar to commissioning a normal satellite
Satellite interface
System
Registration
You can access the following interface in your browser using the satellite's IP address. There are two different users available, the image shows the administrative user who has
unrestricted access. In addition, there is a user who only has read rights; you can set the access data at a later date.
The default login details for the admin user are:
User = admin
Password = terra
Informations
The Information item shows you the dashboard with all the important vital indicators of the hardware, e.g. CPU, RAM or hard drive utilization.
The satellite mode is also visible. A distinction is made between two modes, the active and inactive bypass mode.
With active bypass, the satellite rejects all agent requests, so communication for backups, restores, synchronizations or job creation takes place via the basevault. Accordingly, the Basevault address must be stored in the portal under the Vault Settings tab.
With the inactive bypass, the satellite is activated and accepts all agent requests, thereby enabling communication for backups, restores, synchronizations
or job creation takes place via the satellite. Accordingly, the IP address of the satellite must be stored in the portal under the Vault Settings tab.
Hard disk capacity:
Green = Between 0% and 85%
Orange = From 85% to 95%
Red = From 95% to 99.99%
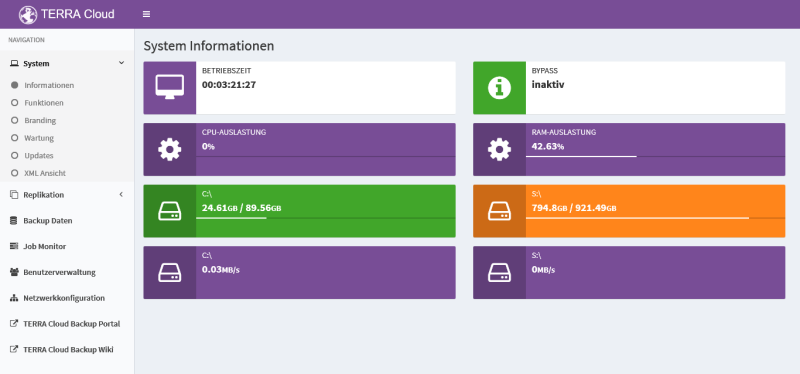
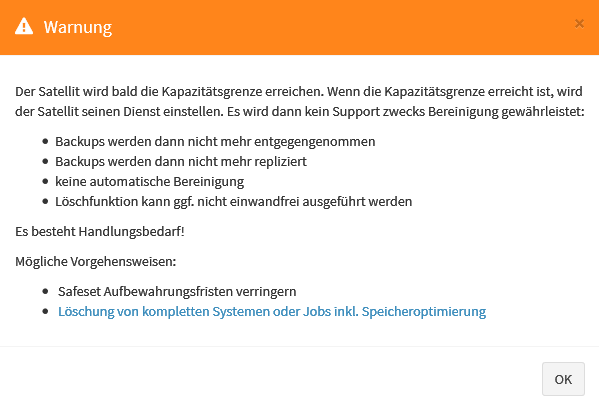
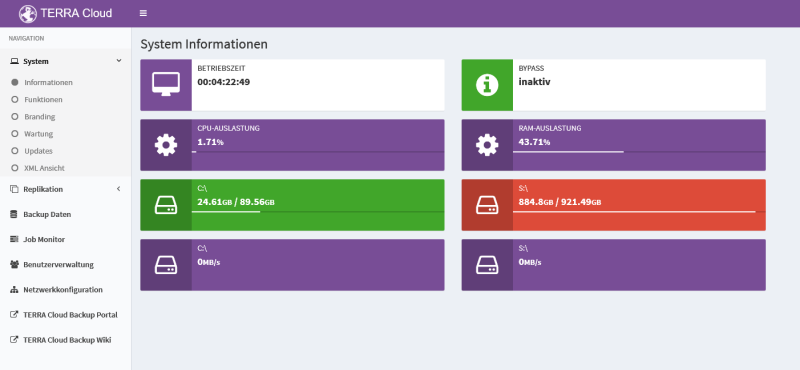
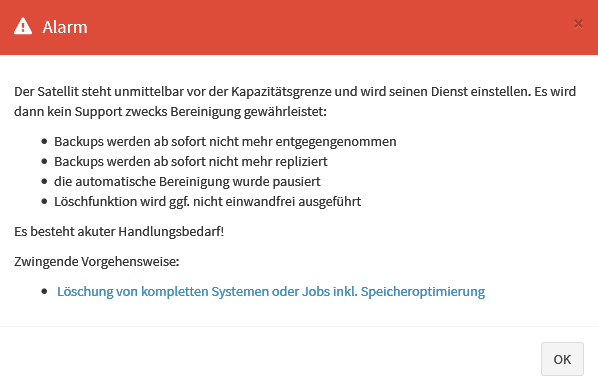
Features
System functions:
Under Functions you will find a list of the relevant services stored on the satellite. Please check whether all services are running.
If a service is stopped, you can start it using the Play symbol. Please do not restart any services while the satellite is running.
Satellite functions:
You can use this interface to shut down the satellite, restart it, or manually start a replication process.
Disable bypass:
A satellite with bypass mode activated cannot accept backups and delegates them to the base vault. Please deactivate bypass mode so that the satellite can accept backups.
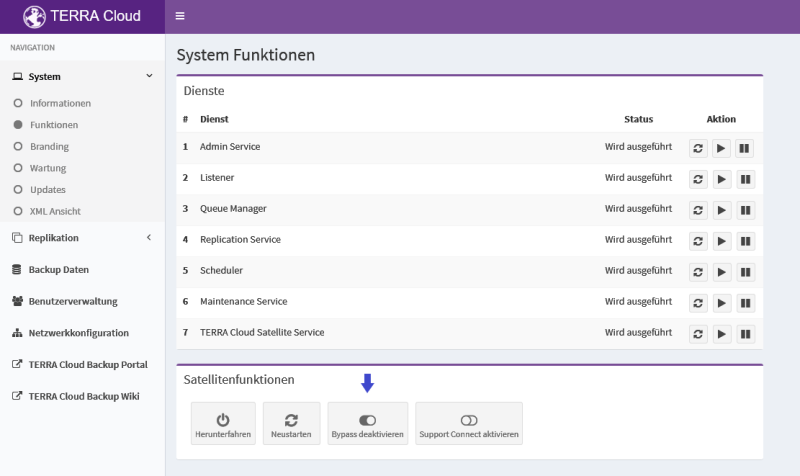
Activate Support Connect:
With this switch you allow TERRA CLOUD support to access the satellite via remote maintenance.
Branding
This function allows you to adapt the satellite interface to your company's CI. The configuration only needs to be carried out on one satellite, as you can export it and import it on other satellites.
There is also the option to add your own logo.
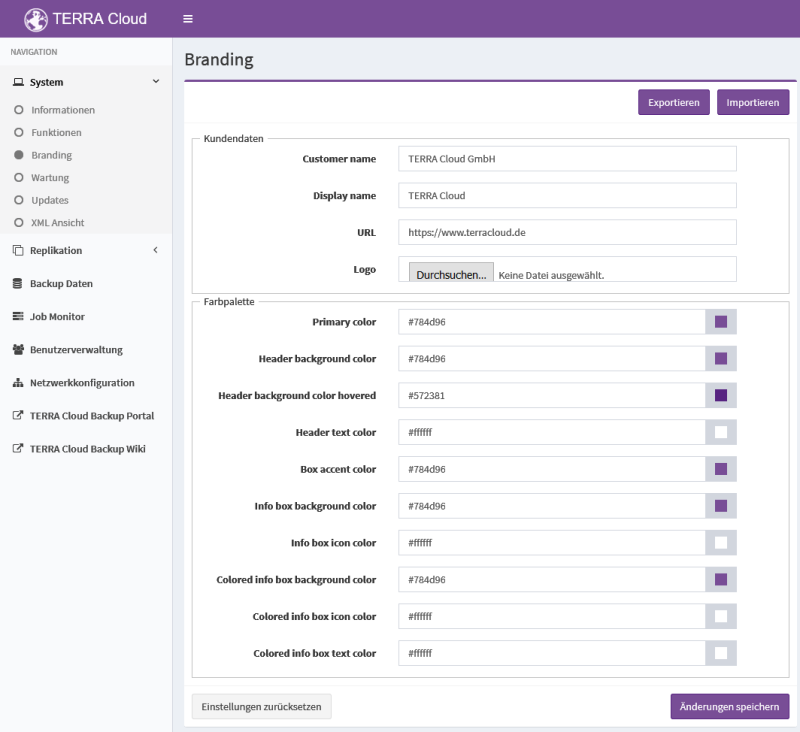
Maintenance
Vault maintenance checks the satellite's data stock every day at 9:23 a.m. for safesets that have exceeded their retention period; the number of retention days and copies must be exceeded. Expired safesets are deleted from the satellite.
You can adjust the start time of this maintenance if necessary.
Updates
You can search the satellite interface directly for current updates and import them.
XML View
This menu item will take you to the XML output of the satellite in a new tab. This output lists all relevant information of the satellite and can be monitored.
You can incorporate this link into your own monitoring solution or use ready-made sensors. You can find ready-made sensors for Server-Eye and PRTG Network Monitor, the sensors can be found under the search term “Terra Cloud Backup”.
Homepage Server-Eye
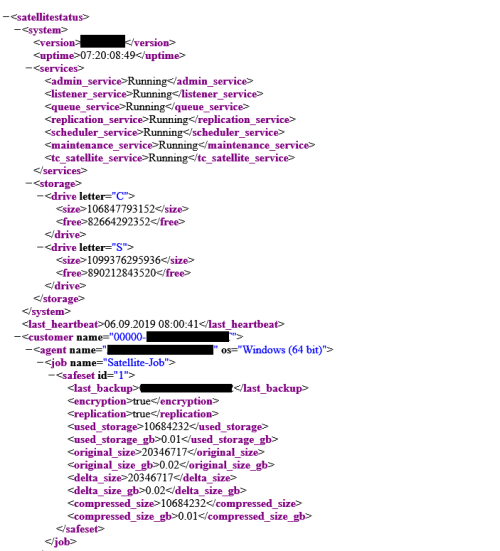
Replication
Connectivity
This overview shows you the status of the connection to the Basevault. The satellite transmits a "heartbeat" to the basevault at regular intervals.
In addition, the connection to the backup portal and the base vault is checked via ping and Telnet. This ensures that all necessary ports are activated for the satellite.< br>
During replication, for example, the outgoing network traffic rate can also be monitored.
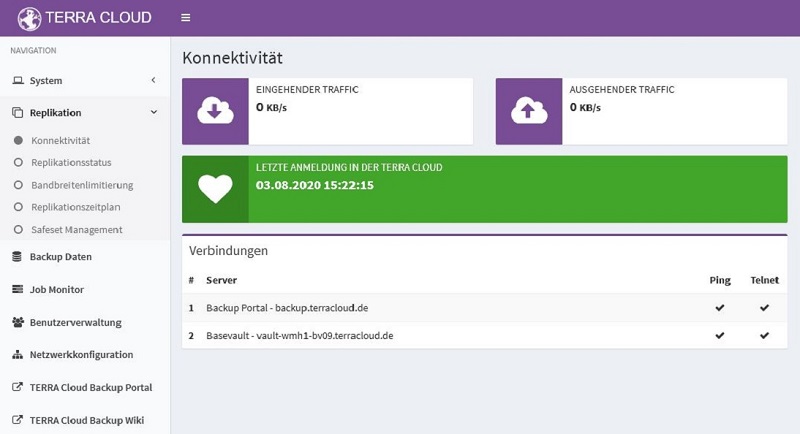
Replication Status
This overview shows you which safesets are still outstanding for replication to the data center; these are processed as if in a queue.
On the right side you can click through the satellite's current inventory and view more detailed information about individual safe sets, such as the compressed
Size or whether this safeset has already been replicated.
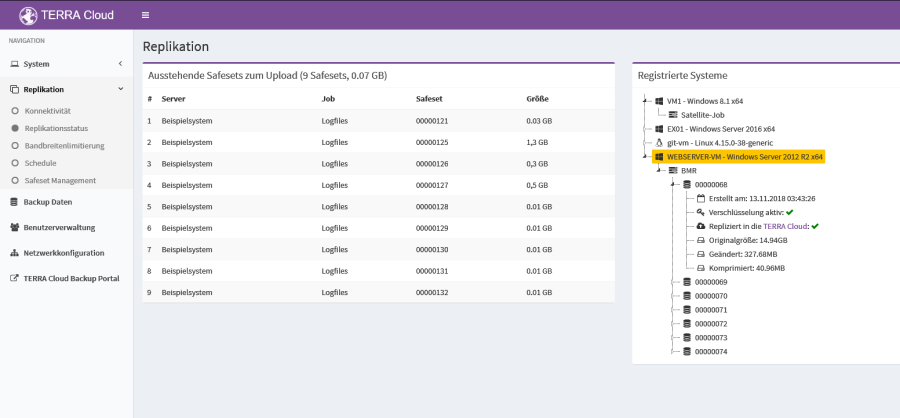
Bandwidth limitation
You can configure a bandwidth limit for satellite replication.
Please note that after an adjustment, the replication service restarts and ongoing replications are aborted.
If the connection is weaker, we recommend configuring the "Quality of Service" on the firewall for the satellite and assigning it a low priority.
This setting on the firewall ensures that, for example, on a holiday, the
. can be replicated with full bandwidth
Bandwidth allocation is therefore more flexible than a fixed bandwidth limit.
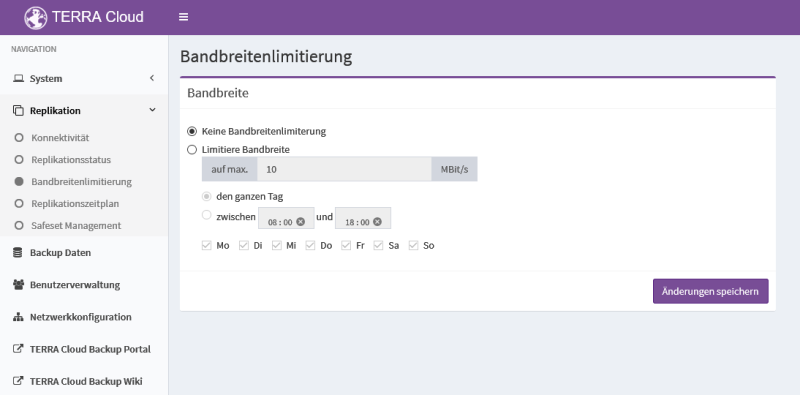
Replication Schedule
The replication schedule allows you to control whether to replicate immediately after a newly created backup and after
defined schedule or exclusively according to a configured replication schedule. This option is particularly recommended if
should be backed up during your customer's working hours, but replication should only start after working hours.
In this image you can see the configuration for a replication schedule that initiates a replication operation every day around 8 p.m.:
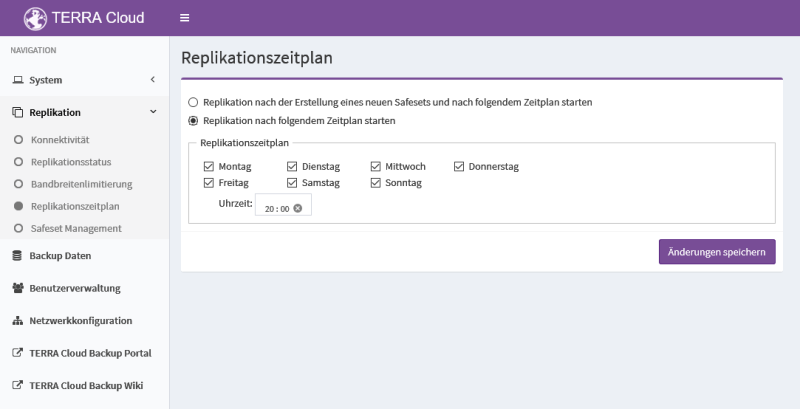
Safeset Management
Special configurations can be made on the satellite via Safeset Management; if configured incorrectly, these can affect the function of the satellite.
Changes can only be made after activation via the slider and may only be made after consultation with support.
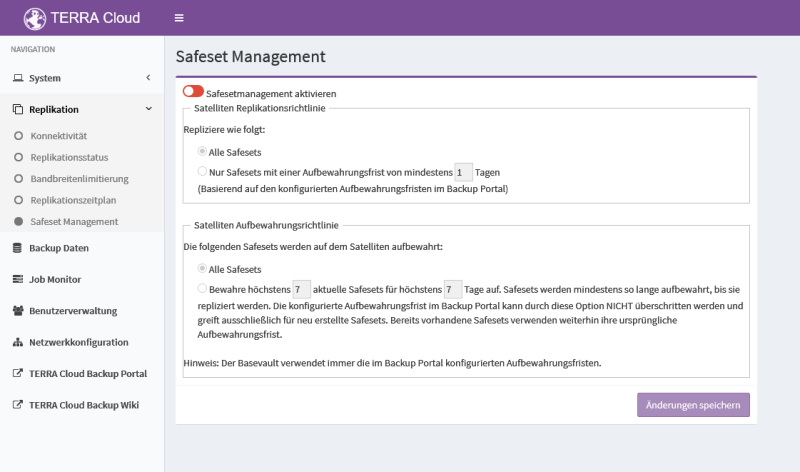
Backup data
You can use the satellite interface to delete entire systems, jobs or individual backup sets (safesets).
The deletion only applies to satellites; the data in the data center on the respective base vault remains unaffected.
Safe sets are displayed online; they are highlighted in black and can be selected by clicking in the checkbox.
Online safesets are characterized by the fact that they are stored locally on the satellite and are directly available there.
Safesets that are grayed out and cannot be selected are offline safesets.
An offline safeset represents a backup that does not exist on the Vault, but still exists on the Basevault.
Only meta information about these safesets is stored on the satellite.
Procedure for deletion:
System level deletion:
a) Check in the interface's job monitor that no process is running for the affected system. (If the Job Monitor tab is not available, update to the latest interface version)
b) Select the systems to be deleted and carry out the “Delete marked entries” action
c) Wait until the affected system is grayed out from the overview. (It may take some time)
d) Check the capacity of the satellite and start a quick storage optimization
Job level deletion:
a) Check in the interface's job monitor that no process is running for the affected job. (If the Job Monitor tab is not available, update to the latest interface version)
b) Mark the job to be deleted by selecting it and carry out the “Delete marked entries” action
c) Wait until the affected job has disappeared from the overview/grayed out. (It may take some time)
d) Check satellite capacity. If unchanged, start quick memory optimization
Safeset level deletion:
a) Check in the interface's job monitor that no process is running for the affected job. (If the Job Monitor tab is not available, update to the latest interface version)
b) Select the safe sets to be deleted and carry out the “Delete marked entries” action
c) Wait until all affected safe sets have disappeared from the overview/grayed out. (Depending on the size, the process can take a lot of time)
d) As soon as all safesets have disappeared/grayed out, start quick storage optimization
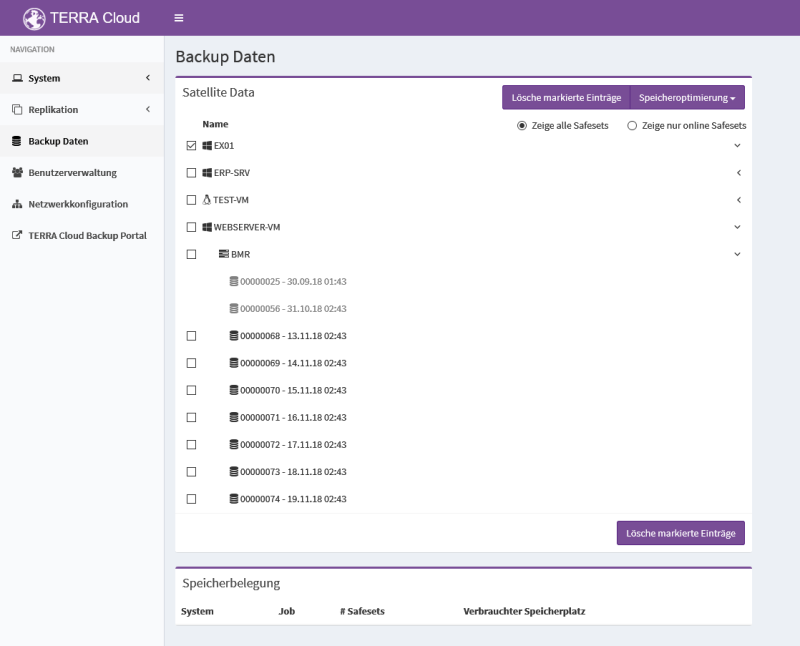
Job Monitor
You can view open or already completed processes in the Job Monitor.
Backups or restores can be monitored, as can replication processes.
The following screenshot shows a satellite that currently has no open jobs:
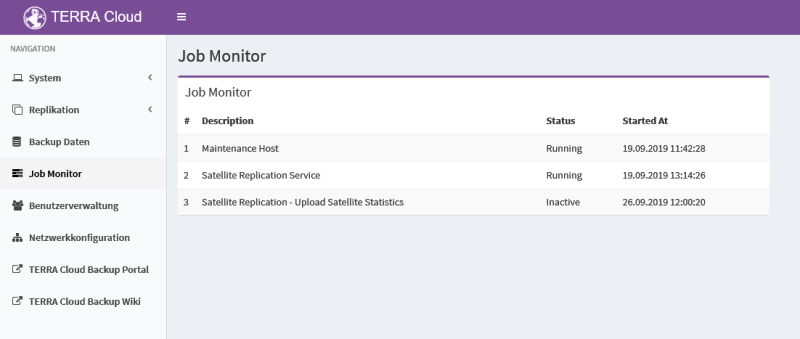
Jobs on the screenshot:
Maintenance Host = This process represents maintenance on the satellite, this process should always be displayed
Satellite Replication Service = Behind this process is the active replication service, this process should always be displayed
Satellite Replication - Upload Satellite Statistics = In the screenshot, this process is set to "Inactive" because it was completed successfully. In this job, the satellite passed information to the basevault.
User management
Within the user management you can define passwords for a total of two users. Which users are stored in total?
- Admin: This user has full access and is intended for administration of the satellite.
- User: This user only has read permission and can be issued to the end customer as required.
Network configuration
You can use the network configuration to pass on your desired settings directly to the satellite or use the “Activate DHCP” function.
As soon as DHCP has been activated, the network configuration assigned by the DHCP server will be displayed.
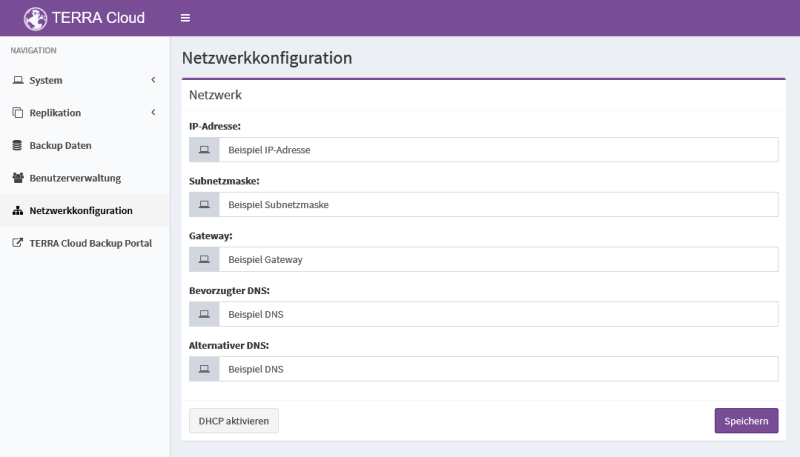
Initial backup FTP upload / send data carrier
Booking
The two processes can be added when initially booking a backup package or later in the order.
Recommended way
The Backup Assistant was equipped with the TERRA CLOUD initial backup tool.
How the initial backup tool works is explained in the following short video: TERRA Cloud Initialbackup Tool
Please select a locally connected volume that was not included in the backup set as the destination for the initial backup. Also make sure that the affected volume does not end up in the backup set using the “Entire Server” option.
Network shares are not supported as a destination path.
After the initial backup has been created, it is recommended to check the backup log file. If no warnings/errors are visible here, this can be made available either via an external data carrier or by uploading it to our FTP server.
Manual way
As an alternative to the Backup Assistant, the initial backup can also be created manually. The following points should be taken care of in advance:
- Backup Agent installed on the desired system and registered on the portal.
- Backup job and schedule configured as desired.
- Schedule disabled so that the agent does not automatically attempt to backup to the vault.
Method
1.) Start backup for metadata transfer against the vault. This involves transmitting information required by the vault that is necessary for the import process. As soon as the status “Processing in progress” is visible, the process can be stopped.
2.) Create a folder structure in the target directory. To ensure smooth identification, we ask you to create the following folder structure:
\$ACCOUNT NAME$\$COMPUTER NAME$\$JOB NAME$
Example path:
D:\00000-EXAMPLE\srv-terracloud\bmrjob
Since this always involves encrypted data, an insufficient folder structure would result in a written query and thus a delay in the process.
3.) Start backup to the previously created path. The procedure in the portal looks like this:
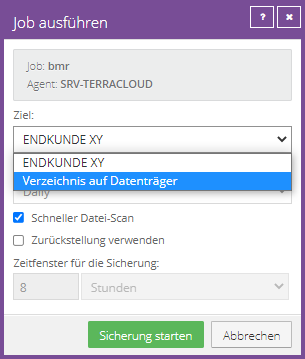
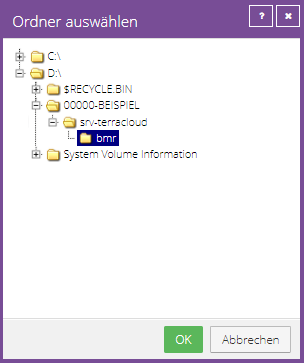
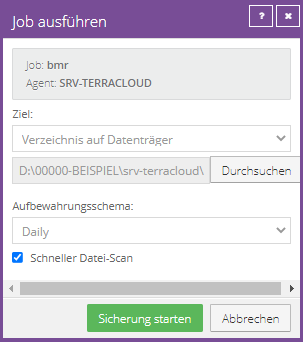
FTP Upload
Please make sure that the data is complete. Each job is divided into backup fragments, which are incremented numerically and are 1,048,576 KB in size except for the last fragment. Only the first fragment (Safesetnummer.SSI or 00000001.SSI) differs in name from the remaining files.
The initial backup created, whether manually or via the Assistant, can be uploaded to the TERRA Cloud FTP server.
For the upload you can e.g. B. the FileZilla Client can be used.
The necessary access data will be provided by us in the center after receipt of the booking.
Once the upload has been completed and checked, you can send us a short confirmation of the previously submitted information.
You will then receive a response from us as soon as there is news about the import.
Send in data carrier
Please make sure that the data is complete. Each job is divided into backup fragments, which are incremented numerically and are 1,048,576 KB in size except for the last fragment. Only the first fragment (Safesetnummer.SSI or 00000001.SSI) differs in name from the remaining files.
The data carrier can be sent together with the completed submission form to the following address:
TERRA CLOUD GmbH
Hankamp 2
32609 Hüllhorst
Notifications about the import status / shipping status of the data carrier are carried out via automated business processes.
Please do not send us unencrypted raw data from your end customer under any circumstances!
These will be sent back to the sender unprocessed.
Backup Export
To get data e.g. For example, if you want to store your data on a local medium for long-term backup, we can export your backups.
The export is encrypted and in the so-called vault format, so that the exported data must be read in with additional software before an agent can process and restore it.
Please note that this is a paid process. Further information about the process (offer, process, etc.) can be obtained from our cloud sales department: cloud@wortmann.de
As soon as you have received the desired data set, you can use the following steps. Continue steps.
You can find the required software at:
Secondary Restore Server
Secondary Restore Server
The Secondary Restore Server reads the exported data and presents it as a virtual vault in the existing network.
- Please navigate to the folder structure of the exported data in the Secondary Restore Server
- Store the data of the exported vault account, e.g. B. (45814-END CUSTOMER), as well as the vault account password
- Start sharing via the Secondary Restore Server (Start)
- Agents can then access the share as if it were a normal vault.
Restore individual files (Secondary Restore Server)
Once the data has been presented on the network, you can proceed as follows:
BMR Restore(Secondary Restore Server)
For instructions on how to initiate a BMR, see: Bare Metal Restore
Once the data has been presented on the network, you can proceed as follows:
Agent Skripting
Windows Agent
In addition to the portal, the Windows agent can also be started via command line or script.
Agent scripting is recommended, for example, to stop non-VSS-capable databases before backup (MySQL, MariaDB, etc.)
Address Windows Agent via command line
Please first change to the agent's installation directory in CMD or PowerShell, by default this is 'C:\Program Files\TERRA Cloud Backup\Agent\'
To start a backup, the following parameters must be passed to VV.exe:
- VV.exe backup JOBNAME /retention=RetentionName (CMD)
- .\VV.exe backup JOBNAME /retention=RetentionName (PowerShell)
You can use the /retention=RetentionName parameter to determine which retention type should be used.
Please replace "RetentionName" with the name of the retention period, which you can view in the Advanced Agent Settings.
Address Windows Agent via script
The desired commands can be stored in a script.
Recommended formats are .bat and .cmd
Scripts can be extended as desired, e.g. to store pre- and post-commands, i.e. commands before or after the backup.
Example script:
@echo off
cd "C:\Program Files\TERRA Cloud Backup\Agent"
echo "Start backup" >> backuplog.txt
VV.exe backup BMR /retention=Daily
echo "Backup performed" >> backuplog.txt

Run script before shutdown
You can integrate your created script into the system's pre-shutdown event with the following configuration. This is particularly recommended for client systems that are not consistently in use.
Please carry out the following steps to store a script:
- Open Local Group Policy Editor (WIN + R "gpedit.msc")
- Store your created script under "Computer Configuration -> Windows Settings -> Scripts (Startup/Shutdown)
- Click "Shutdown" and add your script via "Add".
- Please adjust the following registry key: HKEY_LOCAL_MACHINE\SYSTEM\CurrentControlSet\Services\gpsvc\PreshutdownTimeout
- This key defines the length of the pre-shutdown event, which is set to 15 minutes by default. Please increase this value so that a backup can be created during this time.
- In the Local Group Policy Editor, please navigate to "Computer Configuration -> Administrative Templates -> System -> Scripts
- Adjust the "Specify maximum wait time for Group Policy scripts" setting. You can enter a value of up to 32,000 seconds or 0 for an infinite waiting time.
- Please note that you have adjusted the rights accordingly.
- We have described further information about this in the following Wiki article: PreshutdownTimeout Value Authorization
Create new custom command
This option gives you the opportunity to add a schedule to scripts that have already been created via the backup portal.
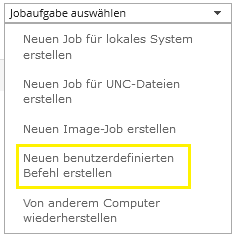
When you create a new custom command, the agent checks whether there are scripts stored in the agent directory in the "ScheduleScripts" batch files subfolder.
The standard path to this directory in which a script for this function can be stored:
C:\Program Files\TERRA Cloud Backup\Agent\ScheduleScripts
In the following screenshot you can see a selected script with a configured schedule:

Recommendation:
A custom command's schedule can only be created as a single-line schedule.
Please check our Best Practice for agent scripting to avoid this disadvantage.
Agent Skripting Best Practice
The backup agent can be tailored to individual application scenarios through the use of scripts.
We recommend that you use the following instructions as a basis for your scenario.
Preparation:
What should be prepared before using the following scripts?
- Installing the agent on the system to be protected
- Link the system to the vault in the backup portal
- Create backup job(s), without a schedule
Step 1: Create batch file
Create a batch file (.bat) with the following structure
powershell.exe -ExecutionPolicy Bypass -File "Path to PowerShell script\agentscripting_retention.ps1"
Please adapt this batch file later to the path and name of the PowerShell script you specified.
Copy the created batch script to the following folder in the agent installation directory:
C:\Program Files\TERRA Cloud Backup\Agent\ScheduleScripts (default)
In the Backup Portal for the system in question, under "Select job task" click "New_custom_command".
You can use this function to select a stored batch script and provide it with a schedule. Please configure the desired time. (e.g. 10 p.m.)
Function:
This batch file will later be started on a schedule by the backup agent itself. The batch file starts PowerShell and the second script.
Since PowerShell is much more extensive and flexible, the first script is only used to call PowerShell.
Step 2: Create PowerShell script
In this step you create the PowerShell script which is controlled by the batch script from Step 1.
This script is used to contact the backup agent to carry out a backup.
It is also possible to use different retention periods and to install pre- and postcommands.
Content:
Please create a PowerShell script (.ps1) with, for example, the following content:
Set Location "C:\Program Files\TERRA Cloud Backup\Agent"
  $date = GetDate
  $currentday = $date.Day
  $lastday = [DateTime]::DaysInMonth($date.Year, $date.Month)
  if ($lastday -eq $currentday){
    Placeholder for pre-commands
    .\VV.exe backup NamedesBackupJobs /quickscan=true /retention=Monthly
    Placeholder for post commands
  }
  else{
    Placeholder for pre-commands
    .\VV.exe backup NamedesBackupJobs /quickscan=true /retention=Daily
    Placeholder for post commands
  }
Function:
This PowerShell script goes to the agent installation directory and checks the current date.
If the date equals the total number of days of the month (the dynamic last day of the month), a backup with the Monthly retention type is performed.
On all other days, the retention type "Daily" is used.
Advantages of this implementation:
- You can use the full functionality of PowerShell and customize this basic script as desired for your customers
- The schedule can be created via the Backup Portal and does not have to be implemented via the script
- You can use pre- and post-commands to stop databases before the backup that cannot be brought into a consistent state using VSS technology
Linux Agent
In addition to the portal, the Linux agent can also be accessed via created scripts.
You can contact the agents directly via a created script. As in the following example script (CustomScript.sh):
nano CustomScript.sh
cd /opt/BUagent
./VV backup RootDir
In the example, RootDir is the backup job name.
The script (e.g.: CustomScript.sh) must then be given the appropriate rights. To do this, please execute the following command:
chmod +x CustomScript.sh
Optionally, you can schedule scripts via the Backup Portal by completing the following steps:
- Under Linux, by default, no folder called "ScheduleScripts" is created in the installation directory. Please create this with e.g. mkdir ScheduleScripts
- Place the created script (.bat or .cmd) in the agent directory in the newly created ScheduledScripts folder
- In the Backup Portal, select "Create a new custom command" via "Select job task" and select your script
- Create a schedule for the script

vSphere Recovery Agent
vSphere Recovery Agent Documentation
You can find extensive documentation and further information in vSphere Recovery Agent User Guide.
Installation
Please run the vSphere Recovery Agent setup on a Windows Server system with access to the VMware environment (vCenter or standalone ESXi host). Please note the recommendations from the section Best Practice. Please follow the instructions in the vSphere Recovery Agent InstallShield. In the last step of the installation, you register the system using the user and password entered in your end customer's created site. You can find a detailed description of the installation process in the User Guide linked above.
Agent configuration
After successful installation and registration on the TERRA CLOUD Backup Portal, you can now add the system to the vault as described in Add system to the vault.
Connection to the vSphere environment
Please enter and save the access data for the vSphere environment (vCenter or standalone ESXi host) in the “credentials” fields. You will receive immediate feedback as to whether the access data provided is correct or whether the area can be reached.

Changed Block Tracking
This agent function is already activated after installation and allows quick and efficient delta backup of the virtual machines.
For more information about this technology, see VMware's Knowledge Base.

Automated recovery tests
Enabling the Verify backup on completion option will perform a recovery test via quick VM restore after each backup completes.
After the virtual machine boots, a screenshot of the login mask is created and saved in the TERRA CLOUD Backup Portal.
To use this feature, the rapid VM recovery requirements must be met.
Please store the temporary data store on which the VM can be started for the test recovery and the desired ESXi host.
Example configuration:
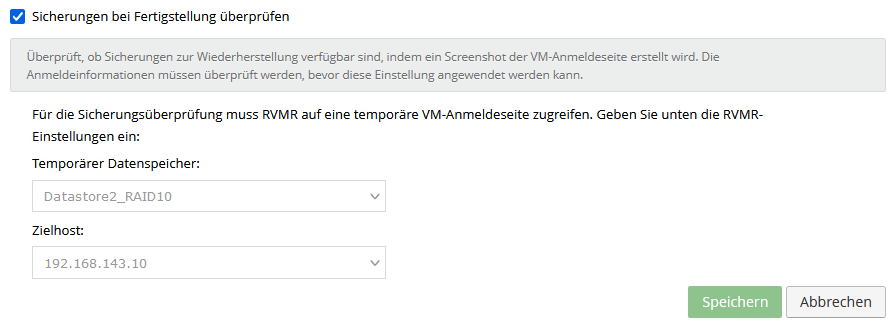
Create vSphere Backup Job
Once you have finished installing and configuring the agent, you can create a new "Job for VMware vSphere".
The following screenshot shows an example of a new job for a vSphere environment. Please enter a job name and optionally a description and the encryption password.
You can either include all virtual machines in the backup by selecting the "Virtual Machines" level, so all virtual machines are included recursively. This option offers the advantage that new virtual machines are automatically added to the backup job.
Alternatively, you can select individual VMs and add them to the backup set.
Optional:Advanced Settings:
Enable application consistent backup
As soon as you "enable application consistent backup" an application consistent snapshot can be created based on a Microsoft VSS snapshot. We recommend enabling this option for all virtual machines with a Windows guest operating system.
Truncate database transaction logs
In addition to application-consistent backup, transaction logs from Microsoft Exchange or SQL Server instances can be truncated.
Enable Threat Detection
When backing up active virtual machines with Windows guest operating systems, the vSphere Recovery Agent can scan the system for active ransomeware. We recommend enabling this option for all virtual machines with a Windows guest operating system. The Enable Threat Detection option requires guest operating system credentials.
Verify this backup job upon completion
Following the backup, a recovery test of the virtual machines is performed via fast VM recovery. Please note that this function must be set up in the [Configuration].
Global VM Credentials
The entered access data will be used for all virtual machines in the backup set.
Guest OS Credentials
If you would like to assign access data individually for each virtual machine, you can enter these in the backup set below the virtual machine by displaying the input field using the blue arrow.
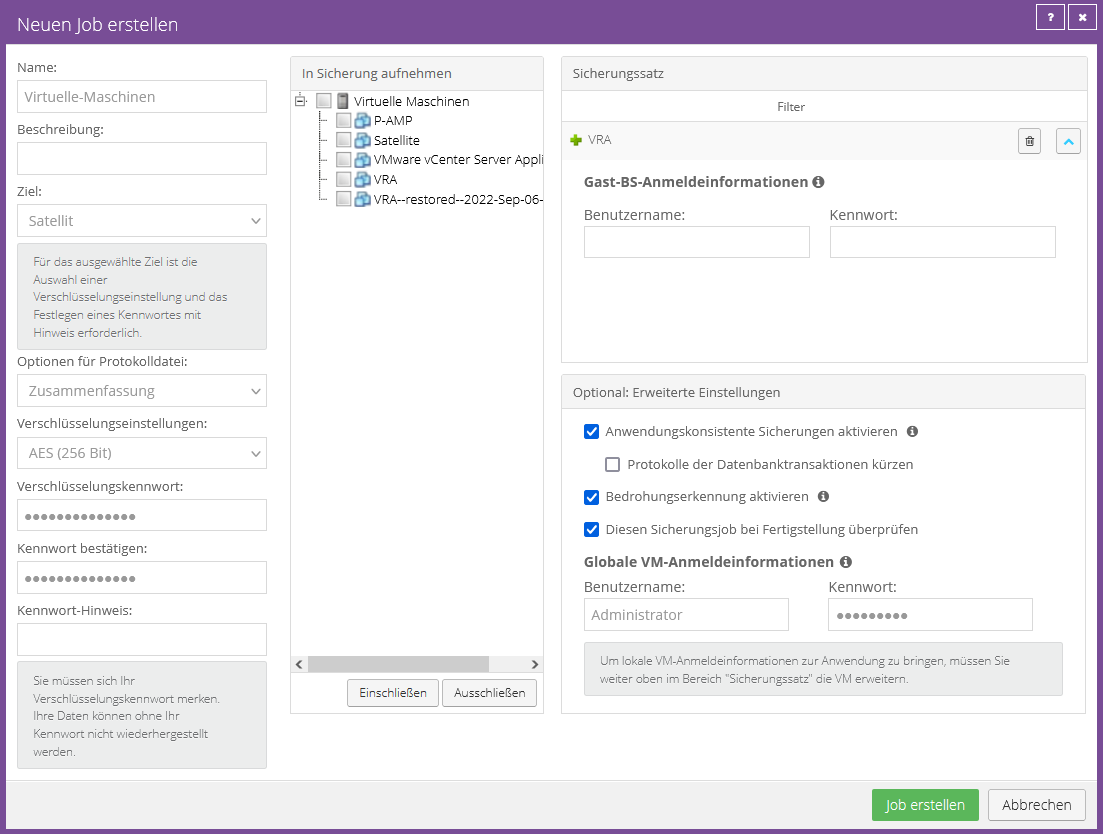
Rapid VM Recovery
The quick VM restore recovery option gives you the option to start a VM from the backup.
Downtime can be drastically reduced thanks to quick access, and the function is also suitable for carrying out a recovery test in just a few minutes.
Requirement:
- Only available in conjunction with a TERRA CLOUD Backup Satellite or TERRA CLOUD Backup Enterprise Vault
- Every ESXi host must have a software ISCSI adapter
- The datastore on which the VM is started can be either on local, ISCSI or vSAN storage
- A datastore to which a VM is to be migrated can also be located on an NFS share in addition to the storage types mentioned above
- There must be at least two datastores in total
- vSphere Recovery Agent 8.82 or later
- The Windows server on which the VRA is installed has the Windows feature "iSCSI Target Server"
Example configuration of an ESXi host for Rapid VM Recovery:
In the following screenshot, an iSCSI software adapter was added via the vCenter via "Add Software Adapter".

Additionally, a VMkernel adapter without an activated service role has been added, as shown in the following screenshot:

Method:
Once all prerequisites are met, under "Restore" you will see an additional "Virtual machine option that uses fast VM restore":
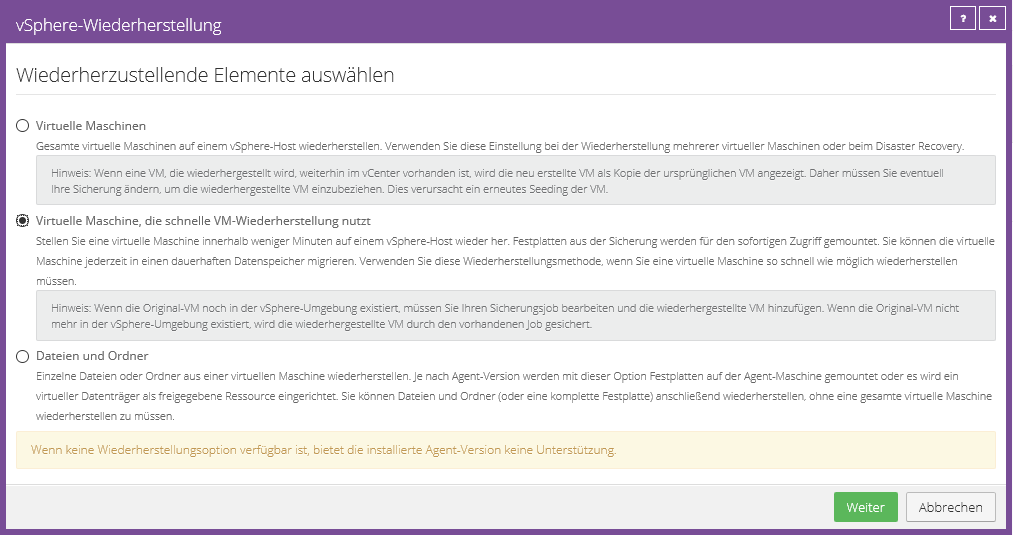
You will then be taken to the recovery configuration, where you can decide which VM should be restored and also define which datastore should be used.
In the following screenshot you can see the datastore "Rapid VM Recovery Datastore", which was specifically configured for e.g. recovery and functional testing. During the recovery you can migrate the VM to another datastore on which your productive systems are located, for example.
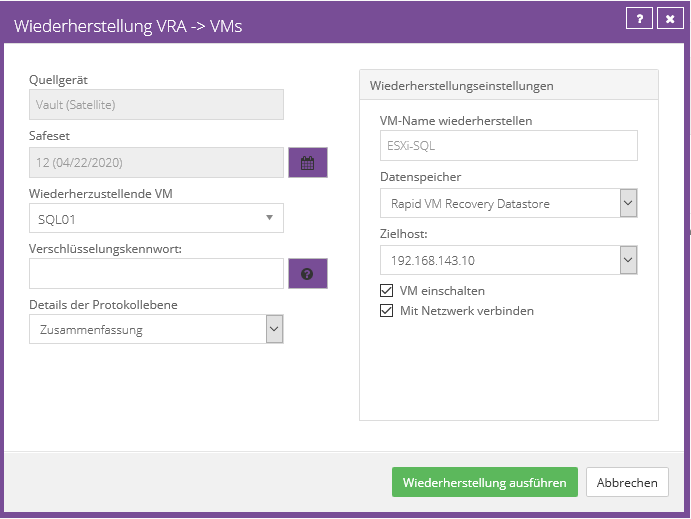
Best Practice
- Install the vSphere Recovery Agent in its own Windows Server VM; if possible, this will only be used for management or backup
- Keep the vSphere Recovery Agent VM highly available via vSphere HA
- Use a satellite for TERRA CLOUD backup to be able to use Rapid VM Recovery
- Place the vSphere Recovery Agent VM on the same subnet as the vCenter Server Appliance
- Enable the "Application Aware Backup" option in the backup job
- Use Change Block Tracking to back up virtual machines; this setting can be found under the "vCenter Settings" tab.
Hyper-V Agent
Documentation Hyper-V Agent
The following sections contain, among other things, information about setting up and configuring the TERRA CLOUD Backup Hyper-V agent.
You can find extensive documentation and further information in the Hyper-V Agent User Guide
Installation
The following compact instructions describe the essential steps for setting up the TERRA CLOUD Backup Hyper-V agent.
Setup order:
1. Install TERRA CLOUD Backup Hyper-V Agent Management
2. Setting up the management agent in the backup portal (establishing a connection to the Hyper-V environment, adding computers to the vault)
3. Install TERRA CLOUD Backup Hyper-V Agent Host
Single Host Hyper-V Systems:
In this scenario, you can install both the TERRA CLOUD Backup Hyper-V Management Agent and the Host Agent directly on the Hyper-V host ("Root"/"Parent" partition).
Please still follow the setup sequence listed above.
Hyper-V Cluster:
Because it is split into two software components (management and host), the TERRA CLOUD Backup Hyper-V Agent is ideal for use in a cluster.
We recommend installing the management agent in an administrative VM within the Hyper-V cluster, so it can be operated on different hosts and kept highly available via the failover cluster.
After completing setup steps 1 and 2, you can install the TERRA CLOUD Backup Hyper-V Agent Host on all nodes of the Hyper-V cluster in the third step.
TERRA CLOUD Backup Hyper-V Agent Management:
Step 1 of Setup
Please install the setup on the desired system and follow the instructions within the setup.
In the last step, registration on the TERRA CLOUD backup portal is configured, analogous to all other TERRA CLOUD backup agents. You can either directly select a user within the site with sufficient authorization or register the system in your parent site and then move it.
Setup Step 2
After successfully completing the installation, the system should appear in the selected site in the portal. Please follow the instructions in the Backup Portal to establish a connection to the Hyper-V environment and then add the computer to the vault.
Installation TERRA CLOUD Backup Hyper-V Agent Host:
Step 3 of Setup
After successfully configuring the Hyper-V agent in step 2, you can install the host agent on all nodes of the Hyper-V cluster or on the single host.
For a cluster installation, the FQDN of the system on which the management agent is active should be specified in order to establish a connection to it.
After the successful installation, the respective node should be displayed as online under the “Hosts” tab in the backup portal.
Rapid VM Recovery
The quick VM restore recovery option gives you the option to start a VM from the backup.
Downtime can be drastically reduced thanks to quick access, and the function is also suitable for carrying out a recovery test in just a few minutes.
Requirements
- Hybrid TERRA CLOUD backup with a TERRA CLOUD Backup satellite or TERRA CLOUD Backup Enterprise
- Hyper-V Checkpoints must be enabled for the secured VMs (for more information, see: Hyper-V Checkpoints)
Reduce number of VMs per backup run
The TERRA CLOUD Backup Hyper-V Agent backs up up to 16 virtual machines per Hyper-V host in one job at the same time.
Instructions
Preparation:
- Stop the "TERRA CLOUD Backup Hyper-V Agent Management Service" service
- Stop the "TERRA CLOUD Backup Hyper-V Agent Host Service" service on all hosts managed by the management component
- Navigate to the following directory of the management component (Default path: C:\Program Files\TERRA CLOUD Backup\Hyper-V Agent Management\Data\Configuration)
- Make a backup copy of the file "AgentCoordinator.cfg" and store it outside the agent directory
- Navigate to the following host component directory (default path: C:\Program Files\TERRA CLOUD Backup\Hyper-V Agent Host\Data\Configuration)
- Make a backup copy of the "AgentWorker.cfg" file and store it outside the agent directory
- Repeat step 6 for all host agents connected to the management agent
Editing the configuration:
- Open the management agent configuration file "AgentCoordinator.cfg" (Default path: C:\Program Files\TERRA CLOUD Backup\Hyper-V Agent Management)
- Add the Advanced section with the MaximumConcurrency parameter and the desired value e.g. For example, enter 5 in JSON format (see screenshot below) and save the file
- Open the host agent configuration file AgentWorker.cfg (default path: C:\Program Files\TERRA CLOUD Backup\Hyper-V Agent Host\Data\Configuration)
- Lower the value of the setting ""MaximumConcurrency": 16," to the value stored in step 1 in AgentCoordinator.cfg
- Repeat steps 3-4 for all host agents connected to the management agent
- Start the service "TERRA CLOUD Backup Hyper-V Agent Management Service"
- Start the "TERRA CLOUD Backup Hyper-V Agent Host Service" service on all connected hosts
Screenshot of step 2 of editing:
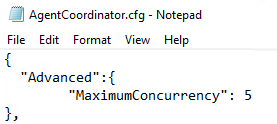
Note:
Please note that the value cannot be configured higher than the default value of 16.
If the services do not start after the adjustments, please perform a rollback using the created backup copies.
Automatic Bare Metal System Restore Test (ABSRT-Tool)
General
Regular BMR test restores are a necessity for the quality management of a backup concept.
However, manual tests are time-consuming and therefore cost-intensive; automation can help here and reduce the time spent on configuration and control.
The ABSRT tool creates virtual machines based on Microsoft Hyper-V; these have a prepared restore ISO.
All data that would have to be entered during a manual restore, such as the system name or the address of the vault system, is read from a CSV file and entered in the restore process.
The most current safeset is dynamically used for the recovery test.
After the automated configuration has been completed, a complete restore is carried out, including the system start after successful completion.
To further increase efficiency, you can also parallelize the restore by storing the data from several BMR backup jobs in the CSV file.
The current version of ABSRT is only supported on Windows Server operating systems due to compatibility issues.
Requirements
- Participation in the TERRA CLOUD Backup Certified Specialist Training
- At least one Microsoft Hyper-V host with corresponding free capacity for the test VMs
- The test VMs require access to a DHCP server
- An external vSwitch must be available
- Activated Windows Server license
- Certified Specialist ABSRT license (available upon request from Support)
Setup
When you start the ABSRT tool for the first time, the tool will ask you for a Certified Specialist ABSRT license:

After you have entered a valid license, the installation path selection appears:

The following required components are then checked/installed:
- Hyper-V installation
- Bootable Media Creator
- Windows Assessment and Deployment Kit
- If configured, VeraCrypt
If software components are missing or not up to date, they will be automatically installed by the tool.
If the Hyper-V component is installed, a restart must be carried out.

Preparation of the CSV file
Please navigate to the tool's installation directory and open the "CSV" folder (e.g. under C:\ABSRT\CSV).
This folder contains the "Backups.csv" file, which you can use as the basis for your configuration.
Important! The first line serves as a legend and may not be adjusted!
Example:
Vaultaddress,Vaultaccount,Vaultaccountpassword,Computername,Jobname,EncryptionPassword,VHDXCapacity,VMGeneration,VHDXStorage,VSwitchName,AmountOfPhysicalDisks,SendEmail
==> vault-wmh1-wp01.terracloud.de,00000-RESELLER,RtHKha451!HjioplÖ03,DC,BMR,hdakzeogsz1,300,2,D,extern,3,n
Note:
If there is a comma in the encryption password, the entire encryption password must be enclosed in double quotation marks.
Example of the encryption password with the special character comma:
"Ghgui385as,"
You can save the CSV file under any name. We recommend creating a separate CSV file for each end customer.
Explanation of parameters
Vaultaddress = FQDN of the vault system
Vaultaccount = Vault account, you can find this in your vault profile, for example
Vaultaccountpassword = You received this password in the confirmation of the provision
Computername = Computer name on the vault system, this does not necessarily have to match the name shown in the backup portal, if in doubt please check your reseller report
Jobname = Name of the backup job
EncryptionPassword = The encryption password of the selected backup job
VHDXCapacity = Please enter the size of the restored volume here, if the system has several volumes please enter the value of the largest in GB.
VMGeneration = Please note that the generation of the VM matches the source system. The generation specified in the CSV determines the algorithm for allocating volumes in the recovery process.
VHDXStorage = Please specify the drive letter for the storage location of the VHDX
VSwitchName = Name of the external vSwitch, you can find this in the virtual switch manager
AmountOfPhysicalDisks = Please specify the number of hard drives the source system has
SendEmail = An optional switch that you can use to configure an email notification (n = no, y = yes)
If you want to restore multiple systems at the same time, simply add additional lines starting from line 3. The legend line does not need to be copied.
Implementation
After you have prepared one or more CSV files, you can start the tool again. Here you just have to select the CSV file to start a restore.
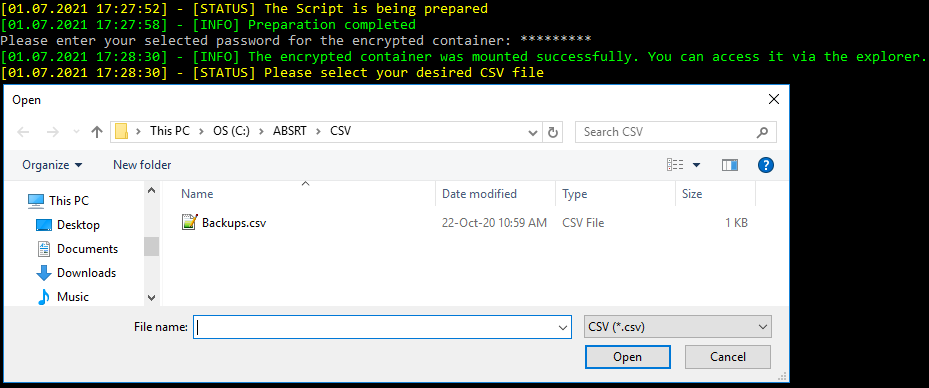
You can find a short demonstration at: Demo video
Monitoring
During recovery, another process is started which checks the status of the recovery based on the heartbeat of the virtual machine.
As soon as a heartbeat is present, a screenshot of the connection window is created and stored in the ABSRT directory under "Screenshots".
If the SendEmail option has been selected, the screenshot is also sent to the specified email address.

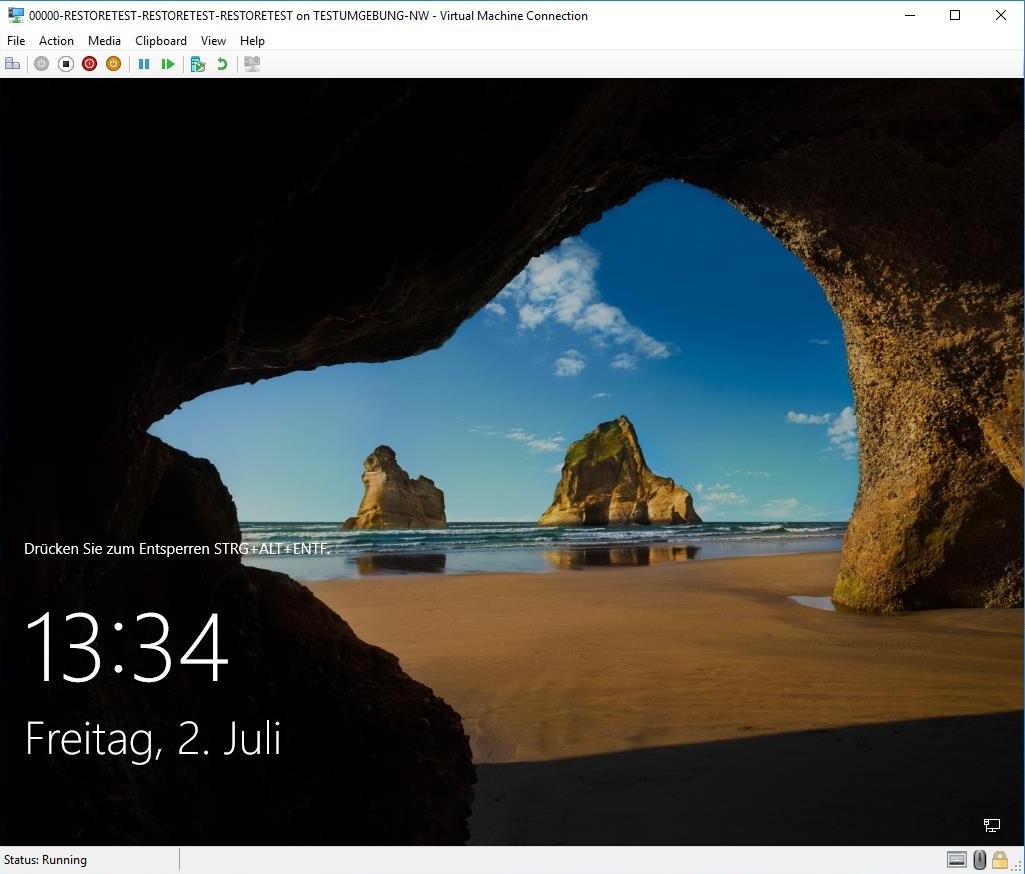
Email notification ABSRT
To use email notification, you must edit and fill out the file C:\ABSRT\smtp.xml:

The script checks in advance whether the required fields have been filled out. If an entry has not been completed, the notification will be skipped.
VeraCrypt
Activate function later:
Remove VeraCrypt REG key under HKEY_LOCAL_MACHINE\SOFTWARE\ABSRT\
Start ABSRT.exe again and activate VeraCrypt
Deactivate the function later:
If necessary, remove containers under C:\ABSRT\VeraCrypt
Remove VeraCrypt REG key under HKEY_LOCAL_MACHINE\SOFTWARE\ABSRT\
Start ABSRT.exe again and say no to VeraCrypt
Rebuild CSV Container:
Remove container under C:\ABSRT\VeraCrypt
Start ABSRT.exe again and enter the password for the new container
Script-based handling ABSRT
The following parameters can be used only via PowerShell:
-Install [Switch] - "C:\Users\Administrator\Desktop\ABSRT.exe -Install -DebitorNumber 12345 -License D133763385BAEFBFF9673C63Ab [-Vera Terra001!]"
-> Performs an automated installation of the ABSRT tool. The -Vera parameter is optional.
IMPORTANT: If the Hyper-V role has not yet been installed, an automatic restart will occur after the installation is complete!
-Password [String] - "C:\Users\Administrator\Desktop\ABSRT.exe -Password Terra001!"
-> Ensures that the VeraCrypt container is mounted automatically. If the password is incorrect, a manual query will be made.
-CSV [String] - "C:\Users\Administrator\Desktop\ABSRT.exe -Password Terra001! -CSV V:\CSV\TestCSV.csv [-NoPause]"
-> Ensures that the CSV file is automatically selected. Please always provide the complete path of the CSV + file extension. (Shift + right click -> "Copy as path" can be used for this)
-Uninstall [Switch] - "C:\Users\Administrator\Desktop\ABSRT.exe -Uninstall"
-> Performs a complete uninstallation of the ABSRT tool. However, the Hyper-V role is not uninstalled. Please ensure that you only perform the uninstallation once no VM created by ABSRT exists in the Hyper-V Manager.
-Manual [Switch] - "C:\Users\Administrator\Desktop\ABSRT.exe -Manual -Vaultaddress vault-wmh1-0002.terracloud.de -Vaultaccount 00000-RESTORE -Vaultaccountpassword wD5c9mP7-3bL1337l1th8W7xaB0T0m -Computername RESTORE -Jobname RESTORE -EncryptionPassword Terra001! -VHDXCapacity 1000 -VMGeneration 2 -VHDXStorage D -VSwitchName vSwitch -AmountOfPhysicalDisks 4 -SendEmail n"
-> Can be used as an alternative to CSV selection. All parameters are required.
ABSRT upgrade to version 9.30
1. Make sure that no VM is accessing the following ISOs:


2. Remove ISOs from the affected folders.
3. Remove the current Bootable Media Creator setup from the install directory and store the new version.
Before:
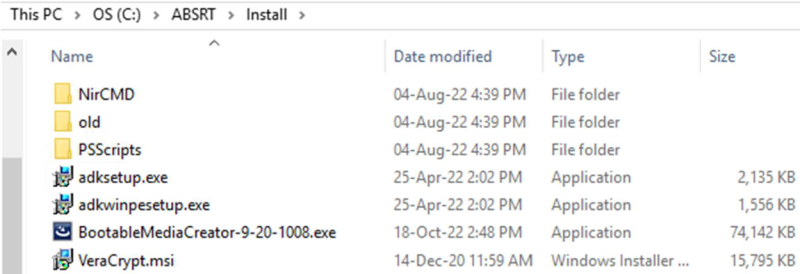
After:
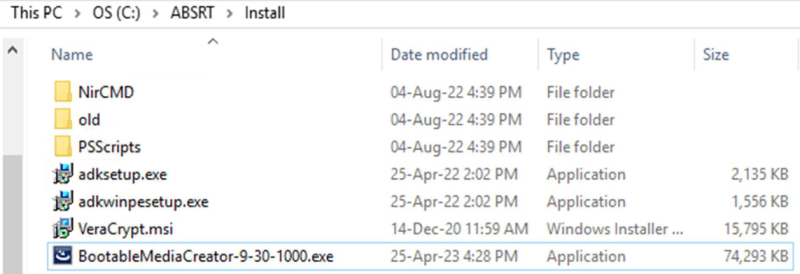
Important: There may only be one setup in the install directory.
4. You can then start the ABSRT application. The first thing to do here would be to recreate it
of the Restore ISO and the subsequent editing of the Restore ISO can be seen.
Backup Assistant
The TERRA CLOUD Backup Assistant is an in-house development of TERRA CLOUD. This tool is intended to support you in using the TERRA CLOUD backup solution.
Status
On the right side of the tool you will find information about the "Connections" and "Software" versions.
If a connection to the portal servers is not possible, please check the corresponding Ports.
You can also install or update the TERRA CLOUD Backup Windows Agent using the Backup Assistant.
Agent Installation
If the backup agent is not yet installed on the affected system, you can download and install it using the tool.
Please first enter the access data of a Backup Portal user who is located on the corresponding customer site.
If you would like an automatic job setup, you can check this directly there. All you need is an encryption password, which should be assigned.
Further information about automatic agent configuration can be found here.
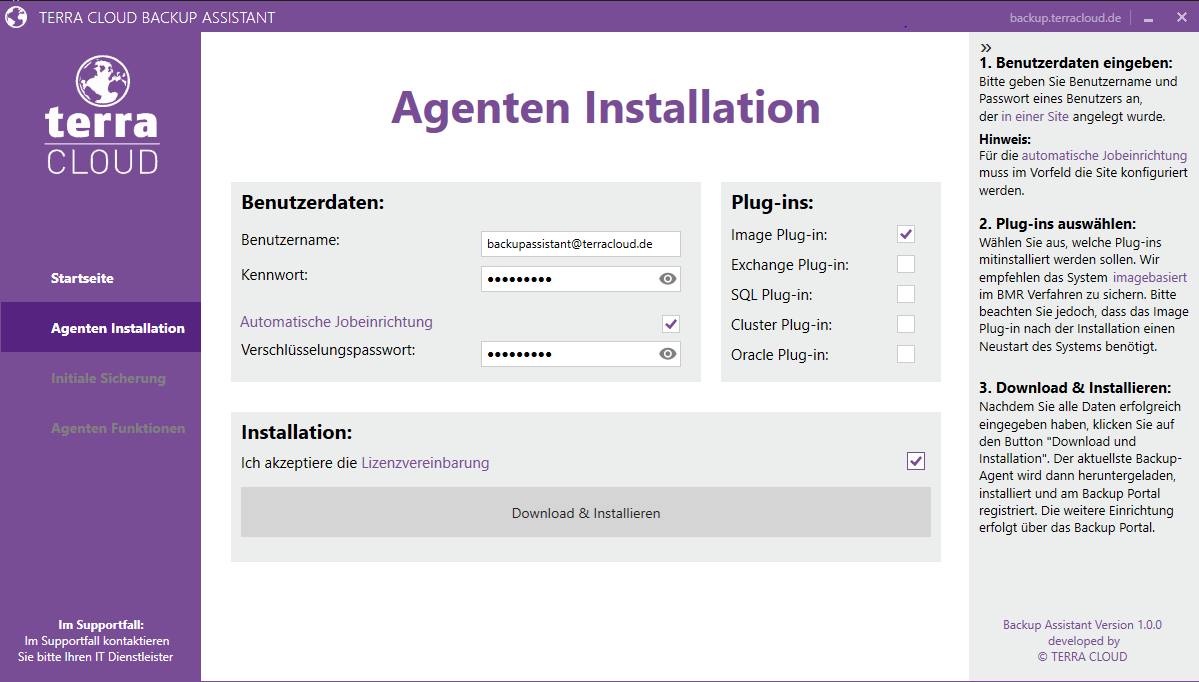
After you have selected the required plugins and accepted the license agreement, the latest backup agent will be downloaded and installed in the background.

Initial backup
This feature represents the same options that are available for the initial backup tool. This tool is presented in the following Video
Agent functions
The "Agent Functions" function offers you the opportunity to run backup jobs that have already been created by the installed Windows agent and to view information about backups that have already been created, such as the size or backup status.
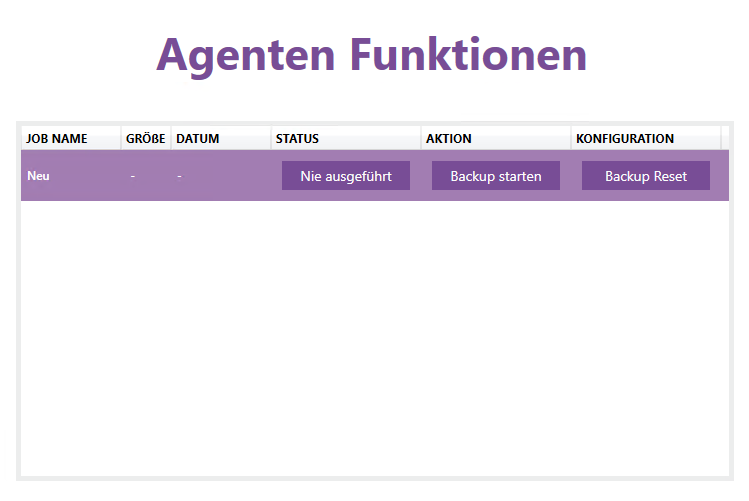
Backup Reset
This function removes metadata (e.g. the delta information) from the job directory of the selected backup job.
After deletion, the tool performs a synchronization to recreate the removed metadata.
This process may take some time.
This process may be necessary to resolve various error patterns.
Example:
delta assignment file is damaged
Support Bundle
With the support bundle, all necessary information and logs such as VSS logs, system event logs and backup job logs are brought together and packed into a .zip file.
This can help us find the cause in various support cases.
Monitoring
“Monitoring” tab in the TERRA CLOUD Backup Portal
This function of the TERRA CLOUD backup portal offers you a comprehensive overview of the status of all backup jobs.
In addition, open agent processes are displayed (ongoing backups, restores, etc.).
This overview can be accessed across customers via the parent site or within a created site and thus for a specific end customer.
In addition to the backup status, the value of the last backup completed is particularly important because you can compare this date with the date of the last backup.
From the combination of this information, you can estimate whether a failed backup is critical because, for example, the date of the last completed backup is too far in the past.
Open Processes:
You can recognize open processes by the circle consisting of two arrows and the number next to it. If you click on the symbol you will be taken directly to the overview of the process.

Export of the monitoring overview by email
You can schedule regular export in various file formats for the monitoring view using the 'Email/Schedule' drop-down menu.
For an automatic evaluation of a monitoring or ticket system, you can e.g. B. select the file format 'CSV'.
If you want an export for a single end customer, you can configure this via a site user with the "Administrator" role.
To do this, please log in to the backup portal with the site user and configure the export within this end customer.
The export from the following example includes the backup jobs of all sites/end customers.
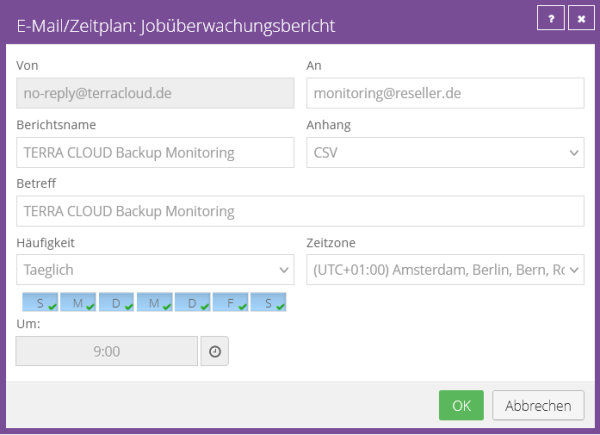
Evaluate job status in XML file
The Windows, Linux and vSphere Recovery Agent store information about the last backup status and e.g. B. the backup size in an XML file.
The following paths refer to the default installation directory.
Linux Agent:
/opt/BUAgent/<JOBNAME>/BackupStatus.xml
Windows Agent:
C:\Program Files\TERRA Cloud Backup\Agent\<JOBNAME>\BackupStatus.xml
vSphere Recovery Agent:
C:\Program Files\vSphere Recovery Agent\<JOBNAME>\BackupStatus.xml
Possible results for "<agentdata:result></agentdata:result>":
- UNKNOWN: The job status is currently unknown.
- COMPLETED: The job is completed or completed with errors/warnings.
- CANCELLED: The job was canceled manually.
- FAILED: The job failed, please check the log files.
- NO_FILES: No backup could be performed because no files are protected by this job.
Consumption Reports
The TERRA CLOUD provides you with various reports to monitor the consumption values relevant to the license model.
TERRA CLOUD Backup Reseller Report
This report shows you the consumption values of all your end customers' backup accounts.
The data refers to the 15th calendar day of a month and forms the billing basis for the respective month.
The report is sent to the Backup Master Account / Cloud Master Account (TERRA CLOUD Center) from the 16th calendar day of a month.
Example excerpt from the Reseller Report

TERRA CLOUD Backup Billing Report
In addition to the TERRA CLOUD Backup Reseller Report, you will receive the TERRA CLOUD Backup Billing Report in CSV file format.
The consumption values for billing the TERRA CLOUD backup are summarized for you in this report for each end customer.
We recommend this report as the basis for automated billing, e.g. B. also for the TERRA CLOUD Backup Enterprise license model.
Content of the report:
Active vault Vault: The name of the active vault
account Native protected data in GB: The sum of the end customer's natively protected data volume
Computer amount: The sum of the device licenses
Additional safesets: The sum of the additional paid safesets
TERRA CLOUD Backup Customer Report
Optionally, you can add an end customer report to your TERRA CLOUD backup order in the TERRA CLOUD Center.
In this report, you or your end customer will receive a weekly consumption overview and the status of the backups.
The presentation corresponds to the reseller report, but only includes the data records for the respective end customer.
FAQ
VSS
Here is a small explanation about VSS:
What exactly is VSS?
- VSS is the abbreviation is a derivation of "Volume Snapshot Sservice"
- Translated: Volume Shadow Copy Service
- implemented since Windows XP / Windows Server 2003, used to create versions (snapshots)
- A snapshot is a snapshot of a volume (read-only)
- VSS works at block level
- VSS technology is used in most backup solutions that back up Windows systems
- VSS errors are the main source of disruption in these backup solutions
Components of VSS technology
VSS Writer:
- each VSS-capable application installs its own VSS writer on the system, which is required to bring its application into a consistent state
VSS requestor:
- Any program that needs consistent data can become a requestor, in our case the backup agent
VSS Provider:
- The provider creates and manages the shadow copies of data in the system
Forgot encryption password of a backup job
The backup job's encryption password cannot be reset by TERRA CLOUD support.
Please check whether a password hint has been stored for the job.
Change encryption password of a backup job
You have the option to reset the encryption password. To do this, go to the corresponding backup job in the backup portal and then click “Edit job”.
You can now set a new password on the left. It should be noted that backups that were created with the old encryption password can only be restored with this one.
Here our recommendation would be to delete the backup job and create a new backup job with the new encryption password.
Granular Restore Tool - License
During the installation of the Granular Restore Tool you will be asked for a license.
Please send us an email including your customer number with the subject “Granular Restore License” to support@terracloud.de
We will then provide you with a corresponding license.
Register again
The “Re-register” function makes it possible to replace the agent’s locally stored configuration with a computer configuration stored on the Vault or to supplement the existing one. This is necessary, for example, after a new installation of the agent, as the agent is not configured after a new installation.
The current configuration can e.g. For example, this function can be added if you have removed a backup job in the portal and thus from the agent, but the data and configuration are still available on the vault. After re-registration, the missing backup job will be displayed again in the portal.
Procedure:
1. Please select the affected agent in the backup portal. Under the “Vault Settings” tab you will find the “Re-register” action.
2. Now load the Vault profile created for the customer site here, then the “Load computer” action can be carried out.
3. All systems located on the affected vault are now displayed on the right side.
4. After you have selected the affected system and executed the "Save" action, the configuration is restored.
5. Now edit the existing jobs and enter the encryption password for each. Each affected job must then be synchronized.
6. Once the synchronization has completed successfully, you can run the affected jobs.
Backup of a DATEV SQL database
When backing up a DATEV SQL database, there are some special features compared to a “normal” SQL database backup. As a rule, the administrator does not have full access to the database and therefore the SQL plug-in cannot be used. In addition, problems can occur with a file-based backup because the timestamp of the database file (MDF file) is partially reset.
Transaction logs do not need to be truncated because circular logging is configured for the DATEV SQL database.
Recommended backup concept:
The system should be protected using an image-based BMR backup, as the timestamp of the database file is irrelevant with this partition-based backup method.
How does the migration of backups from existing customers to a TERRA CLOUD Backup Enterprise Vault work?
Initial situation:
You have currently booked Backup Standard or Backup Basic packages for your customers and would like to have your customers' backups moved to a new TERRA CLOUD Backup Enterprise Vault.
Satellites:
Please note that TERRA CLOUD Hybrid Backup packages in conjunction with a satellite cannot be moved to a TERRA CLOUD Backup Enterprise Vault.
Preparation:
Please prepare the following steps for the migration process:
- Order the TCBE vault system in the desired location for your company (please note the delivery time of up to 10 working days)
- After deploying your new vault system, place an order for a vault account for each of your customers (you can key the vault accounts to the respective customers)
- Create a comparison in e.g. Microsoft Excel with the old Vault account (e.g. 12345-DRMEY) and the newly ordered Vault account, on your TCBE Vault e.g. (12345-DRMEYER)
- When your vault system is deployed, a support ticket for the migration process is automatically created. Please discuss the time period for the migration in this
Procedure during migration:
On the morning of migration day, the process is started by the TERRA CLOUD team. You will receive an email notification of which accounts have been started for migration.
Immediately after starting the migration, you can store the new backup destinations for the agents, as described in [for making adjustments in the backup portal].
Please note that backups cannot be performed during the migration as both accounts are locked by the migration.
Typically, migrations complete on the same business day, allowing scheduled backup agents to be backed up against the migrated dataset on the dedicated vault.
How does the migration work technically?
The migration process starts a copy process that transfers the stored computers / backup jobs / safesets from the old account from the shared vault to the account on the TCBE vault system.
How many end customers can be moved per migration day?
As a rule, around 5 end customers can be moved per day; this depends on the size of the respective accounts from around 1.5 TB (natively protected data volume)
What happens to the old accounts after the migration?
After the entire migration process has been completed, you still have to cancel the old accounts, otherwise double billing may occur.
Of course, a support team member will be available to answer any questions you may have during the migration process.
Are there password restrictions for the Backup Agent?
There is a 31 character length limit for all passwords with the TERRA Cloud Backup Agent. This includes:
- Encryption passwords
- Password hints
- SQL credentials
- VRA credentials
- Oracle credentials
- SMTP credentials
- Vault credentials password
- Etc...
Only these characters are allowed for use in the encryption password and hint fields: a-z, A-Z, Á-ÿ, 0-9, space, !@#$%^&*()_-+=[]{ }|'":;,<.>?~`´
Mandatory update: How do I add deprecated agents back to backup?
As of April 1, 2024, it is no longer possible to use outdated agent versions. See Supported agent versions
If one of your agents is no longer able to backup due to the mandatory update, you can make it functional again with the following steps:
- Perform a software update to the latest available version. If offered, the Agent Upgrade Center can be used for this.
Alternatively, the update can be carried out manually via setup.
- Once the new version is visible in the portal, you need to get the agent to contact our vault.
The actions “Execute Job” or “Synchronize” can be used for this.
Important! Without contact, our vault cannot know anything about the update that has been carried out, so the data remains locked.
- Every hour on the hour we carry out a check during which we release the data from updated agents.
As soon as the next full hour has been reached, a backup should be possible again.
If the backup is still not possible after about 2 hours, we ask you to check the following article:
SSET-E-04104 The request failed. The remote server reported the following error: RPC-E-AUTHERROR, authentication failure

