Technical Center/en: Unterschied zwischen den Versionen
Die Seite wurde neu angelegt: „== Customer management ==“ |
Keine Bearbeitungszusammenfassung |
||
| (126 dazwischenliegende Versionen von 2 Benutzern werden nicht angezeigt) | |||
| Zeile 1: | Zeile 1: | ||
<languages/> | |||
<span id="Anmeldung"></span> | <span id="Anmeldung"></span> | ||
= Registration = | = Registration = | ||
| Zeile 4: | Zeile 5: | ||
Portal link: <br> | Portal link: <br> | ||
[https://manage.terracloud.de https://manage.terracloud.de] <br> | [https://manage.terracloud.de https://manage.terracloud.de] <br> | ||
[[Datei:TC Anmeldung.png|700px|center|mini|border]]<br> | |||
[[Datei:TC Anmeldung.png|border]] | |||
<br> | |||
<span id="Aufbau_des_Portals"></span> | <span id="Aufbau_des_Portals"></span> | ||
= Structure of the portal = | = Structure of the portal = | ||
| Zeile 12: | Zeile 11: | ||
== Dashboard == | == Dashboard == | ||
[[ | [[File:TC Dashboard.png|700px|center|mini|without]] <br> | ||
<br> | |||
The portal is divided into different areas: <br> | The portal is divided into different areas: <br> | ||
On the left side you will find links to | On the left side, you will find links to customer management, virtual machines, user management, and logs, among others. <br> | ||
In the middle you can see the currently selected page; the screenshot shows the dashboard. <br> | In the middle, you can see the currently selected page; the screenshot shows the dashboard. <br> | ||
This | This provides a clear summary of your IaaS products.<br> | ||
For example, you can see that only some of the VMs are currently active and how many vCores, RAM, storage space, and images are allocated or mounted. <br> | |||
At the bottom right you can configure how often this dashboard should be updated.<br> | At the bottom right, you can configure how often this dashboard should be updated.<br> | ||
At the top right you | Clicking on the banner will take you to the Terracloud Wiki [https://wiki.terracloud.de https://wiki.terracloud.de].<br> | ||
At the very top right, you can change the website's theme and configure various settings related to your account. <br> | |||
<span id="Resellerverwaltung"></span> | <span id="Resellerverwaltung"></span> | ||
== Reseller management == | == Reseller management == | ||
In the reseller management you can set up the | In the reseller management you can set up the links as an indirect reseller.<br> | ||
For detailed information, please | This is required to obtain the respective products via the Terra Cloud.<br> | ||
<br> | |||
=== CSP=== | |||
For detailed information about CSP, please take a look at the [[Microsoft_CSP/en|CSP section]] in the TerraCloud Wiki.<br> | |||
<br> | |||
=== Securepoint=== | |||
In order for you to be able to book Securepoint services with us, a link is also required here, both at the reseller, <b>and</b> end customer level.<br> | |||
This link enables seamless integration, as well as the management of central Securepoint functions in the Securepoint reseller portal.<br> | |||
<br> | |||
<b>Note:</b> If this link does not exist, no products can be ordered that require Securepoint licenses.<br> | |||
This includes:<br> | |||
* IaaS | |||
* MIaaS | |||
* FWaaS | |||
<br> | |||
<span id="Durchführung"></span> | |||
==== Implementation ==== | |||
1. Log in to the Technical Center and navigate to the reseller administration.<br> | |||
<br> | |||
[[File:DE-Reseller-Verknüpfung-SP-1.PNG|700px|center|mini|ohne]] | |||
<br> | |||
2. In the Securepoint area you can see whether there is currently a link to Securepoint. If '''no''' green tick is present, there is currently no link.<br> | |||
<br> | |||
3. If so, please click Edit.<br> | |||
<br> | |||
4. In the next step you have the choice to link an existing Securepoint account or create and link a new one.<br> | |||
<br> | |||
[[File:DE-Reseller-Verknüpfung-SP-1-1.PNG|700px|center|mini|ohne]] | |||
<br> | |||
5. The former asks for the credentials for the existing Securepoint account, the latter asks for a password for the new Securepoint account.<br> | |||
<br> | |||
6. Finally, it must be confirmed again that Terra Cloud can order or cancel services from Securepoint on your behalf.<br> | |||
<br> | |||
7. In the last dialog box you will see both a green tick confirming the link and the option to remove an existing link.<br> | |||
<br> | |||
[[File:DE-Reseller-Verknüpfung-SP-3.PNG|700px|center|mini|ohne]] | |||
<br> | |||
8. You will then see in the reseller management overview that the link is available.<br> | |||
<br> | |||
[[File:DE-Reseller-Verknüpfung-SP-4.PNG|700px|center|mini|ohne]] | |||
<br> | |||
<span id="Kundenverwaltung"></span> | <span id="Kundenverwaltung"></span> | ||
== Customer management == | == Customer management == | ||
You can view all the customers you have created via customer management. When you select a customer you will find the packages booked.<br> | You can view all the customers you have created via customer management. When you select a customer you will find the packages booked.<br> | ||
[[Datei:TC Kundenverwaltung.png|700px|center|mini|ohne]] <br> | |||
=== CSP=== | |||
For detailed information about CSP, please take a look at the [[Microsoft_CSP/en|CSP section]] in the TerraCloud Wiki.<br> | |||
<br> | |||
=== Securepoint === | |||
A Securepoint link must also be created at the end customer level so that certain services can be booked for the end customer.<br> | |||
<br> | |||
<b>Note:</b> If you have booked an NFR service, you must link yourself again as a customer with Securepoint.<br> | |||
The appropriate account is marked with a star symbol.<br> | |||
<br> | |||
<span id="Durchführung"></span> | |||
==== Implementation ==== | |||
1. Log in to the Technical Center and navigate to customer management.<br> | |||
<br> | |||
[[Datei:TC-Kundenverwaltung-Uebersicht.PNG|700px|center|mini|ohne]] | |||
<br> | |||
2. Select the relevant end customer.<br> | |||
<br> | |||
3. Click Service Settings.<br> | |||
<br> | |||
[[Datei:TC-Kundenverwaltung-Verknuepfung-Uebersicht.PNG|700px|center|mini|ohne]] | |||
<br> | |||
4. In the Securepoint area you can see whether there is currently a link to Securepoint. If '''no''' green tick is present, there is currently no link.<br> | |||
<br> | |||
5. If so, please click Edit.<br> | |||
<br> | |||
6. Here you have the option to link an existing account or create a new account in the lower area.<br> | |||
<br> | |||
[[Datei:TC-Kundenverwaltung-SP-Uebersicht.PNG|700px|center|mini|ohne]] | |||
<br> | <br> | ||
7. If you want to link an existing account, please expand the bottom list of available accounts and select the appropriate end customer.<br> | |||
<br> | <br> | ||
[[Datei:Bestehende SP Verknuepfung.PNG|700px|center|mini|ohne]] | |||
<br> | |||
8. Finally click on Link Account.<br> | |||
<span id="Benutzerverwaltung"></span> | <span id="Benutzerverwaltung"></span> | ||
== User management == | == User management == | ||
Every user created can be viewed and edited via the user management. <br> | Every user created can be viewed and edited via the user management. <br> | ||
[[Datei:TC Benutzerverwaltung.png|700px|center|mini|ohne]]<br> | |||
[[Datei:TC Benutzerverwaltung.png| | |||
<br> | |||
A new user can be created using the “Create user” button.<br> | A new user can be created using the “Create user” button.<br> | ||
[[Datei:TC BenutzerErstellen.png|700px|center|mini|ohne]]<br> | |||
[[Datei:TC BenutzerErstellen.png| | |||
<br> | |||
<span id="Nutzerrollen"></span> | <span id="Nutzerrollen"></span> | ||
=== User roles === | === User roles === | ||
'''Reseller Admin''' | '''Reseller Admin'''<br> | ||
Administrator of the specialist dealer, full access to everything that belongs to the specialist dealer.<br> | |||
This can appoint any reseller employee as reseller admin, but then automatically loses the status of reseller admin and becomes a reseller employee.<br> | |||
There can always be <u>only one</u> reseller admin.<br> | |||
<br> | <br> | ||
If you want to promote another employee to reseller admin, proceed as follows: | |||
# Log in to the Technical Center with the current reseller admin. | |||
# Open the user management. | |||
# For the user you want to promote, open the three dots on the right-hand side. | |||
# Select <b>Promote to admin</b>. <br> | |||
<br> | <br> | ||
[[Datei:TC-Admin hochstufen-DE.png|700px|center|mini|ohne]]<br> | |||
After you have confirmed the process, you will be automatically logged out.<br> | |||
From this point on, the new employee is Reseller Admin.<br> | |||
<br> | <br> | ||
'''Reseller employee'''<br> | |||
An employee of the specialist dealer who can initially only read all environments belonging to the specialist dealer. Access to VMs can be changed globally using authorization templates.<br> | |||
This employee can create additional customer employees.<br> | |||
The number of reseller employees is not limited.<br> | |||
<br> | <br> | ||
'''Customer employee'''<br> | |||
An end customer account that is trapped in its end customer area. A user in end customer A cannot therefore gain access to data from end customer B in any way.<br> | |||
The number of customer employees is not limited.<br> | |||
<span id="Berechtigungsvorlagen_erstellen"></span> | |||
=== Create permission templates === | |||
Within the user management, you can use templates (so-called authorization templates) to create appropriate roles for access to the virtual systems and then assign these roles to individual employees. <br> | |||
[[Datei:TC Berechtigungsvorlagen.png|700px|center|mini|ohne]]<br> | |||
You can delete and edit a role at any time; a maximum of 10 roles per reseller is allowed. <br> | |||
Using the settings of the respective user, you then select the desired role that the employee should have:<br> | |||
[[Datei:TC Vollzugriff.png|700px|center|mini|ohne]]<br> | |||
When assigning the role, access to the virtual machines is set once based on the templates; authorizations that have already been assigned are lost. <br> | |||
Once assigned, all future orders are granted permissions based on the role. You can individually adjust the permissions for existing systems at any time.<br> | |||
<br> | <br> | ||
< | <span id="Offene_Aufträge"></span> | ||
== Pending tasks == | |||
== | |||
< | This section displays pending orders where we need your feedback or where action is required.<br> | ||
This could, for example, involve downtime required for a vCore adjustment or a [https://wiki.terracloud.de/index.php/Firewall_Lizenzmigration/en firewall license migration].<br> | |||
<span id="Gruppenverwaltung"></span> | |||
== Group management == | |||
In group management you have the option of dividing your customers' virtual computers into different groups.<br> | |||
You can use this to shut down or reset virtual computers together, for example.<br> | |||
<br> In the Group Members tab you can see the existing groups and their members.<br> | |||
[[Datei:9-Gruppenverwaltung.png|700px|center|mini|ohne]]<br> | |||
You can define additional groups using the Add Groups button and assign the respective resources to the groups using the All Objects tab.<br> [[Datei:9-Gruppenverwaltung-Alle Objekte.png|700px|center|mini|ohne]]<br> | |||
<span id="Virtuelle_Maschinen"></span> | |||
== Virtual Machines == | |||
Under Virtual Machines you can see all booked VMs and their status and variant. <br> | |||
[[Datei:TC Virtuelle Computer.png|700px|center|mini|ohne]] <br> | |||
Selecting the small square with an arrow on the right side takes you to direct control and detailed information about the respective virtual computer.<br> | |||
[[Datei:TC VMInformationen.png|700px|center|mini|ohne]]<br> | |||
On this page, you can also view the current IP configuration and start, restart, shut down, reset, and turn off the VM.<br> | |||
<br> | <br> | ||
The <b>physical name</b> of the VM was assigned by you during the order process and cannot be changed afterwards.<br> | |||
<br> | <br> | ||
The <b>display name</b>, however, can be changed at any time.<br> | |||
</ | |||
<br> | <br> | ||
As the password for the initial connection, please use the "Initial Password," which you can also find on this page.<br> | |||
<br> | <br> | ||
Furthermore, on this page you have the option of creating a snapshot, If the feature has been booked, create a snapshot and set the boot order.<br> | |||
<br> | <br> | ||
[[Datei:TC | <b>Note:</b><br> | ||
Please note that the snapshot function is only available for VMs with a maximum size of 2 TB (IaaS) or 5 TB (MIaaS).<br> | |||
In addition, a created snapshot is automatically deleted after 7 days.<br> | |||
Windows 11 VDIs generally do not offer the option to create snapshots.<br> | |||
<span id="Migrations-VM"></span> | |||
=== Migration-VM === | |||
If you have booked a migration VM, you will find your FTP access data in the disk information section.<br> | |||
Please upload the ISO or VHD/VHDX files there and provide us with a brief response via the ticket. | |||
[[Datei:TC-DE-Fesstplatteninformationen.jpg|700px|center|mini|ohne]] | |||
<br> | <br> | ||
[[Datei:TC-DE-FTP-Infos.jpg|700px|center|mini|ohne]] | |||
<span id="Konsolen-Verbindung"></span> | |||
=== Console connection === | |||
You have the option of establishing a direct console connection to the VM via a browser or RDP console.<br> | |||
This connection communicates directly with the VM via the Hyper-V host and works even if no active or correctly configured network card is connected to the respective VM.<br> | |||
<br> | <br> | ||
</ | <b>Note:</b><br> | ||
< | To access the login screen after accessing the RDP connection, you normally have to press CTRL+ALT+DEL.<br> | ||
== | Unfortunately, this does not work in an RDP connection. <br> | ||
Please use CTRL+ALT+END instead.<br> | |||
<span id="Verbinden_(Browser)"></span> | |||
==== Connect (Browser) ==== | |||
< | As of October 1, 2024, you will find a new console type on the virtual machines page in the Technical Center:<br> | ||
=== | * Connect (Browser)<br> | ||
This is a new way to connect to the VM via the console using the browser.<br> | |||
[[Datei:TC-VMInformationen-DE-0.png|700px|center|mini|ohne]] | |||
This offers the following advantages:<br> | |||
* RDP is not required for the console connection, so Apple devices, for example, can also establish a reliable connection.<br> | |||
* It is possible to copy text to and from the VM.<br> There are the following restrictions:<br><br> | |||
** This feature is only supported for Windows systems.<br> | |||
** This feature is disabled as soon as an ISO is inserted.<br> | |||
When you open the browser console, another browser tab opens.<br> | |||
In this, you can see your VM and manage it as described in the normal console connection.<br> | |||
At the top left, you will find an icon with additional buttons:<br> | |||
[[Datei:TC-BrowserKonsole-DE-0.png|700px|center|mini|ohne]]<br> | |||
[[Datei:TC-BrowserKonsole-DE-1.png|700px|center|mini|ohne]]<br> | |||
* HTML5 ON/OFF | |||
** Allows the use of older browsers without HTML 5 support | |||
* Scale ON/OFF | |||
** Optional scaling of the console output | |||
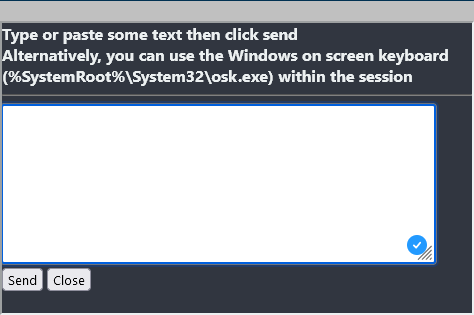
* Text | |||
** Used to copy text into the VM.<br> The text is copied directly into the previously selected text field in the VM.<br> | |||
[[Datei:TC-BrowserKonsole-DE-2.png|700px|center|mini|ohne]] | |||
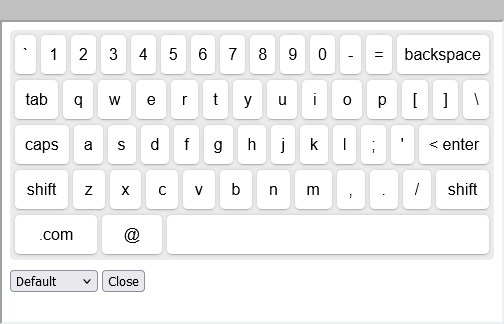
* Keyboard | |||
** Opens a virtual Keyboard | |||
[[Datei:TC-BrowserKonsole-DE-3.png|700px|center|mini|ohne]] | |||
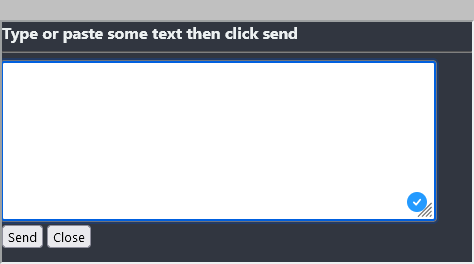
*Clipboard | |||
**Used to synchronize the clipboard between the VM and your local computer, allowing you to copy text to and from the VM.<br>Please note that this does not work on the Windows login screen. | |||
[[Datei:TC-BrowserKonsole-DE-4.png|700px|center|mini|ohne]] | |||
*Ctrl+Alt+Del | |||
**Sends the keyboard shortcut CTRL+ALT+ENT to the VM. | |||
*Disconnect | |||
**Disconnects the browser console connection from the VM. | |||
*Slider | |||
**Use the slider to adjust the quality of the connection. | |||
<span id="ISOs_einbinden"></span> | |||
=== Mounting ISOs === | |||
< | You have the option of mounting an ISO to your VM.<br> | ||
To do so, click the plus symbol and select the appropriate ISO.<br> | |||
To eject the ISO, click the triangle symbol.<br> | |||
<br> | <br> | ||
You can choose between two ISO types: | |||
* | * ISOs provided by us | ||
* | * Your own ISOs that you have previously uploaded | ||
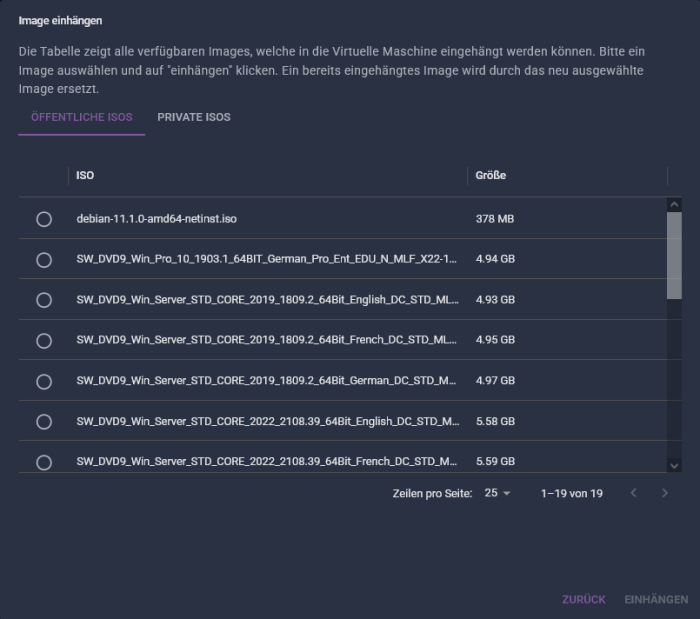
After clicking the plus symbol, a selection window will appear.<br> | |||
In the Public ISOs section, you will see the images we have provided.<br> | |||
[[Datei:1-TC-DE-ISO einhaengen.png|700px|center|mini|border]]<br> | |||
If you would like to upload and mount your own ISO, please click Private ISOs. | |||
[[Datei:2-TC-DE-eigene ISOs-leer.png|700px|center|mini|border]]<br> | |||
There, you can select an ISO from your local environment via the Upload option and start the upload. | |||
[[Datei:3-TC-DE-eigenes ISO hochladen.png|700px|center|mini|border]]<br> | |||
After the upload is complete, the ISO must be processed automatically in the background by us; for this purpose, the status changes to Processing. | |||
[[Datei:4-TC-DE-eigenes ISO hochladen-Processing.png|700px|center|mini|border]]<br> | |||
Only after this process has been successfully completed can you select and mount the ISO.<br> | |||
This process can take up to 15 minutes; you may need to refresh the view using the arrow button. | |||
[[Datei:5-TC-DE-eigenes ISO hochladen-Completed.png|700px|center|mini|border]]<br> | |||
If an error occurs during processing, please contact us:<br> | |||
Email: [mailto:support@terracloud.de support@terracloud.de]<br> | |||
Phone: +49 5744 944-850<br> | |||
<br> | <br> | ||
<b>Note:</b><br> | |||
</ | Regarding uploading your own ISOs, please note the following:<br> | ||
< | * The ISO must be a maximum of 10GB in size. | ||
=== | * You can upload up to 10 ISOs in total. | ||
* The ISO name must not contain any special characters or umlauts. | |||
* All ISOs you upload are available to every end customer. | |||
* The total size of the ISOs must not exceed 20GB. | |||
* The ISO name must be unique and should not contain special characters, as these may cause upload errors. | |||
* If an ISO image hasn't been used for 6 months and isn't mounted at that time, we'll automatically delete it. | |||
=== SecureBoot === | |||
< | You have the option to configure the SecureBoot of a VM yourself.<br> | ||
<span id="Voraussetzungen"></span> | |||
==== Requirements ==== | |||
</ | |||
=== | |||
The following requirements apply: | |||
* The VM must be a Generation 2 VM. | |||
* The VM must be disabled to configure SecureBoot. | |||
* This feature can only be used for VMs that we have preinstalled. | |||
</ | <span id="Durchführung"></span> | ||
==== Implementation ==== | |||
=== | |||
To configure SecureBoot, open the boot options in the TERRA CLOUD Technical Center.<br> | |||
Here, you'll find the option to customize SecureBoot in the top left corner. | |||
[[Datei:DE-TC-SecureBoot.jpg|700px|center|mini|border]]<br> | |||
[[Datei: | |||
== TERRA Management == | |||
TERRA Management is used to manage physical systems (servers, PCs, and notebooks) running Windows operating systems via a central dashboard.<br> | |||
Please see the separate [[TERRA_Management/en|Wiki article]] for more information.<br> | |||
{{#lstx:S3 Storage}} | |||
[[ | == Veeam Data Protection == | ||
== | |||
< | In this area you will find the initial access data for your Veeam Data Protection as well as the current consumption values. | ||
<span id="Lizenzen"></span> | |||
== Licenses == | |||
</ | |||
== | |||
In the licenses area you can view booked CSP licenses and, among other things, deactivate auto-renewal.<br> | |||
For detailed information, please see the CSP section of the TerraCloud Wiki.<br> | |||
== Backup == | |||
== | |||
< | In this section you will find all information about your backup accounts. | ||
=== Dashbord === | |||
< | The dashboard provides an overview of your global growth, as well as data on agent and account type distribution,<br> | ||
< | as well as the number of backups, protected data volume, and protected systems.<br> | ||
In the upper area, you can access the Backup Portal using the button. | |||
[[Datei:1-TC-DE-Backup-Dashboard.png|700px|center|mini|border]]<br> | |||
=== Accounts === | |||
Under Accounts, you can see all booked accounts, along with their Vault credentials and status.<br> | |||
Here, too, you'll find a button that takes you to the Backup Portal. | |||
[[Datei:2-TC-DE-Backup-Accounts.png|700px|center|mini|border]]<br> | |||
=== Vault Explorer === | |||
In the Vault Explorer, you can browse your vault, allowing you to view all existing computers, their jobs, and the safesets stored there.<br> | |||
[[Datei:4-TC-DE-Backup-Vault Explorer-ausgeklappt.png|700px|center|mini|border]]<br> | |||
If you switch to the table view, you can also export it as a .csv file.<br> | |||
[[Datei:5-TC-DE-Backup-Vault Explorer-Tabellenansicht.png|700px|center|mini|border]]<br> | |||
'''Note:'''<br> | |||
This display may be delayed by up to 8 hours depending on the overall Terra Cloud backup volume. | |||
<span id="Verbrauchswerte"></span> | |||
=== Consumption Values === | |||
In the Consumption Values section, you can see your current daily consumption on the Terra Cloud Vault.<br> | |||
In the future, you will also find a monthly report on your backups here.<br> | |||
[[Datei:6-TC-DE-Backup-Verbrauchswerte.png|700px|center|mini|border]]<br> | |||
'''Note:'''<br> | |||
Again, depending on the overall Terra Cloud backup volume, the update of this display may be delayed by up to 8 hours. | |||
<span id="Automatische_Wiederherstellung"></span> | |||
=== Automatic Restore === | |||
If you have attended our Terra Cloud Backup Certified Specialist training, you can obtain a license for the ABSRT tool from us upon request.<br> | |||
With this tool, you have the option of performing test backups on a local Hyper-V server.<br> | |||
Please see our separate [https://wiki.terracloud.de/index.php/Backup/en#Automatic_Bare_Metal_System_Restore_Test_(ABSRT-Tool) wiki article].<br> | |||
<br> | |||
To make working with this tool easier, you can automatically create the appropriate .csv file in this area.<br> | |||
To do this, proceed as follows: | |||
* Select the appropriate jobs you want to back up for testing. | |||
[[Datei:8-TC-DE-Backup-ABSRT-2.png|700px|center|mini|border]]<br> | |||
* Then set the default parameters. | |||
[[Datei:10-TC-DE-Backup-ABSRT-4.png|700px|center|mini|border]]<br> | |||
* These default parameters can be applied to all jobs in the next step.<br>Alternatively, you can also assign or change individual parameters. | |||
[[Datei:11-TC-DE-Backup-ABSRT-5.png|700px|center|mini|border]]<br> | |||
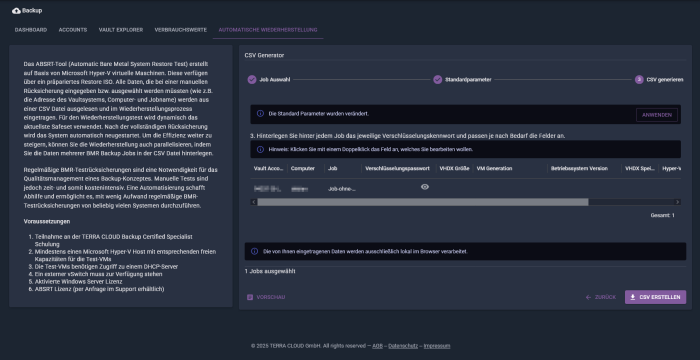
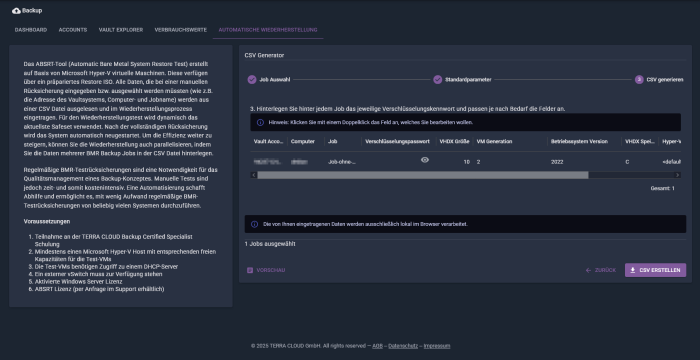
* In the final step, you can download the finished .csv file and use it for your ABSRT tool. | |||
[[Datei:12-TC-DE-Backup-ABSRT-6.png|700px|center|mini|border]]<br> | |||
'''Note:'''<br> | |||
All data entered here will be processed exclusively locally in your browser and will not be transferred to us in the Terra Cloud. | |||
== Managed IaaS == | == Managed IaaS == | ||
Under Managed IaaS you will find the administration for booked Managed IaaS environments.<br> | |||
== Tickets == | |||
== Tickets | |||
< | Under Tickets, you will find an overview of all tickets created.<br> | ||
In the future, pending tickets where we are waiting for downtime from you will also be listed here. | |||
<br> | <span id="Tickets_erstellen"></span> | ||
[[Datei:Tickets-Icon.PNG| | == Create tickets == | ||
Both at the top and in some tabs of the Technical Center you will see the icon for creating tickets.<br> | |||
[[Datei:Tickets-Icon.PNG|700px|center|mini|ohne]]<br> | |||
<br> | After the button has been clicked, a context-related email can be created, which is automatically sent with all information to Support@terracloud.de.<br> A suitable ticket is automatically opened in our support department.<br> | ||
[[Datei:Ticket_erstellen.png| | [[Datei:Ticket_erstellen.png|700px|center|mini|ohne]]<br> | ||
</ | <span id="Protokoll"></span> | ||
== Protocol == | |||
== | |||
</ | Logs (recent events) can be viewed on the logs page. The search function includes a full-text search that searches across all columns.<br> | ||
[[Datei:TC Reports.png|700px|center|mini|ohne]]<br> | |||
== Partner Ranking == | |||
This overview offers you the opportunity to track your cloud performance and ranking in comparison to other cloud partners.<br> | |||
<span id="Nachrichten_anzeigen"></span> | |||
== Show messages == | |||
At the top right, you'll find a notification icon.<br> | |||
Here, you'll see current events from virtual machines and TERRA Management performed by the logged-in user.<br> | |||
<br> | [[File:TC-Benachrichtigung-DE.png|700px|center|mini|without]]<br> | ||
[[ | <span id="Hilfe"></span> | ||
< | == Help == | ||
</ | |||
== | |||
On the help page you will find various directly linked wiki articles, as well as information on how to reach our Terracloud support. <br> | |||
You will also find an overview of the changes to the Technical Center here.<br> [[Datei:TC Hilfe.png|700px|center|mini|ohne]]<br> | |||
<span id="Einstellungen"></span> | |||
== Settings == | |||
[[Datei:TC Hilfe.png| | |||
< | |||
</ | |||
In this area you can set your preferred language, date and time format and the number of table rows per page.<br> Here are the available choices:<br> | |||
<br> | <br> | ||
* Language: English || German || French || Polish. | |||
* Date format: dd.mm.yyyy || mm.dd.yyyy || yyyy-mm-dd || dd/mm/yyyy || mm/dd/yyyy | |||
* Time format: 24h || 12h | |||
* Time zone: UTC+13 to UTC-11 | |||
* Table rows per page: 5 || 10 || 25 || 50 || 100 || 250 | |||
<br> | <br> | ||
< | These options allow you to customize the interface and display preferences to suit your individual needs.<br> | ||
[[Datei:TC_Einstellungen.png|700px|center|mini|ohne]]<br> | |||
Aktuelle Version vom 27. November 2025, 12:37 Uhr
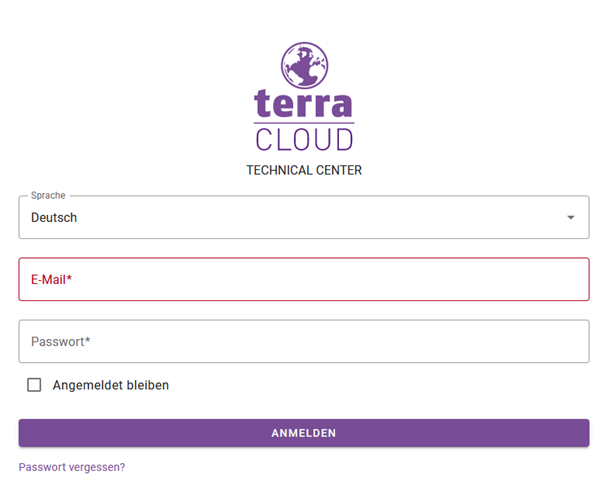
Registration
Portal link:
https://manage.terracloud.de
Structure of the portal
Dashboard
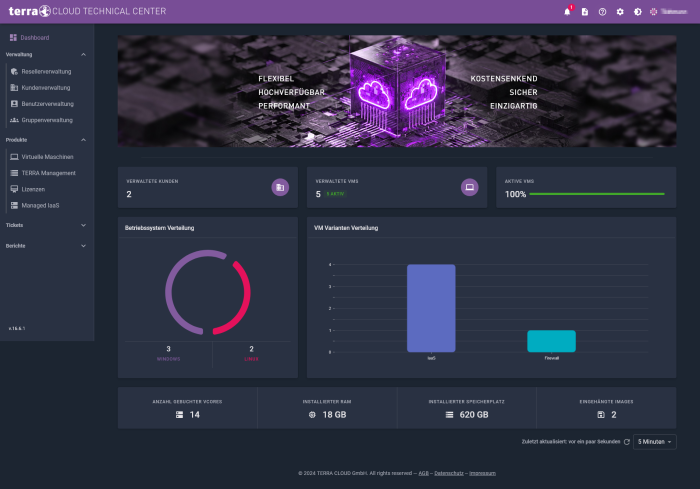
The portal is divided into different areas:
On the left side, you will find links to customer management, virtual machines, user management, and logs, among others.
In the middle, you can see the currently selected page; the screenshot shows the dashboard.
This provides a clear summary of your IaaS products.
For example, you can see that only some of the VMs are currently active and how many vCores, RAM, storage space, and images are allocated or mounted.
At the bottom right, you can configure how often this dashboard should be updated.
Clicking on the banner will take you to the Terracloud Wiki https://wiki.terracloud.de.
At the very top right, you can change the website's theme and configure various settings related to your account.
Reseller management
In the reseller management you can set up the links as an indirect reseller.
This is required to obtain the respective products via the Terra Cloud.
CSP
For detailed information about CSP, please take a look at the CSP section in the TerraCloud Wiki.
Securepoint
In order for you to be able to book Securepoint services with us, a link is also required here, both at the reseller, and end customer level.
This link enables seamless integration, as well as the management of central Securepoint functions in the Securepoint reseller portal.
Note: If this link does not exist, no products can be ordered that require Securepoint licenses.
This includes:
- IaaS
- MIaaS
- FWaaS
Implementation
1. Log in to the Technical Center and navigate to the reseller administration.

2. In the Securepoint area you can see whether there is currently a link to Securepoint. If no green tick is present, there is currently no link.
3. If so, please click Edit.
4. In the next step you have the choice to link an existing Securepoint account or create and link a new one.

5. The former asks for the credentials for the existing Securepoint account, the latter asks for a password for the new Securepoint account.
6. Finally, it must be confirmed again that Terra Cloud can order or cancel services from Securepoint on your behalf.
7. In the last dialog box you will see both a green tick confirming the link and the option to remove an existing link.

8. You will then see in the reseller management overview that the link is available.

Customer management
You can view all the customers you have created via customer management. When you select a customer you will find the packages booked.

CSP
For detailed information about CSP, please take a look at the CSP section in the TerraCloud Wiki.
Securepoint
A Securepoint link must also be created at the end customer level so that certain services can be booked for the end customer.
Note: If you have booked an NFR service, you must link yourself again as a customer with Securepoint.
The appropriate account is marked with a star symbol.
Implementation
1. Log in to the Technical Center and navigate to customer management.

2. Select the relevant end customer.
3. Click Service Settings.

4. In the Securepoint area you can see whether there is currently a link to Securepoint. If no green tick is present, there is currently no link.
5. If so, please click Edit.
6. Here you have the option to link an existing account or create a new account in the lower area.

7. If you want to link an existing account, please expand the bottom list of available accounts and select the appropriate end customer.

8. Finally click on Link Account.
User management
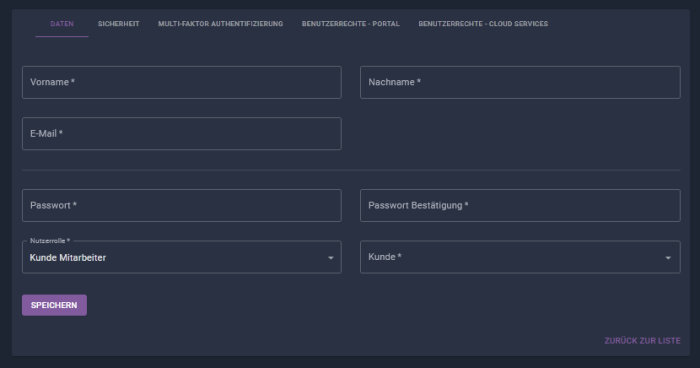
Every user created can be viewed and edited via the user management.

A new user can be created using the “Create user” button.
User roles
Reseller Admin
Administrator of the specialist dealer, full access to everything that belongs to the specialist dealer.
This can appoint any reseller employee as reseller admin, but then automatically loses the status of reseller admin and becomes a reseller employee.
There can always be only one reseller admin.
If you want to promote another employee to reseller admin, proceed as follows:
- Log in to the Technical Center with the current reseller admin.
- Open the user management.
- For the user you want to promote, open the three dots on the right-hand side.
- Select Promote to admin.

After you have confirmed the process, you will be automatically logged out.
From this point on, the new employee is Reseller Admin.
Reseller employee
An employee of the specialist dealer who can initially only read all environments belonging to the specialist dealer. Access to VMs can be changed globally using authorization templates.
This employee can create additional customer employees.
The number of reseller employees is not limited.
Customer employee
An end customer account that is trapped in its end customer area. A user in end customer A cannot therefore gain access to data from end customer B in any way.
The number of customer employees is not limited.
Create permission templates
Within the user management, you can use templates (so-called authorization templates) to create appropriate roles for access to the virtual systems and then assign these roles to individual employees.
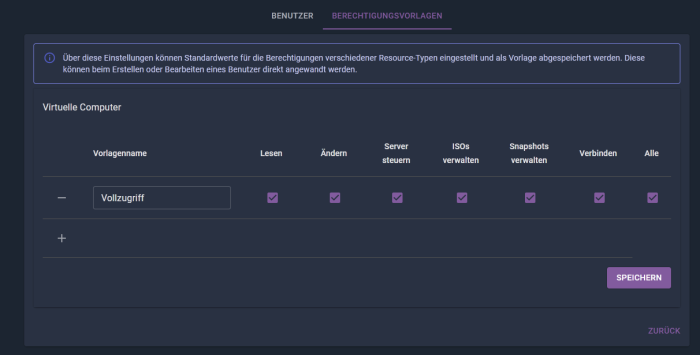
You can delete and edit a role at any time; a maximum of 10 roles per reseller is allowed.
Using the settings of the respective user, you then select the desired role that the employee should have:
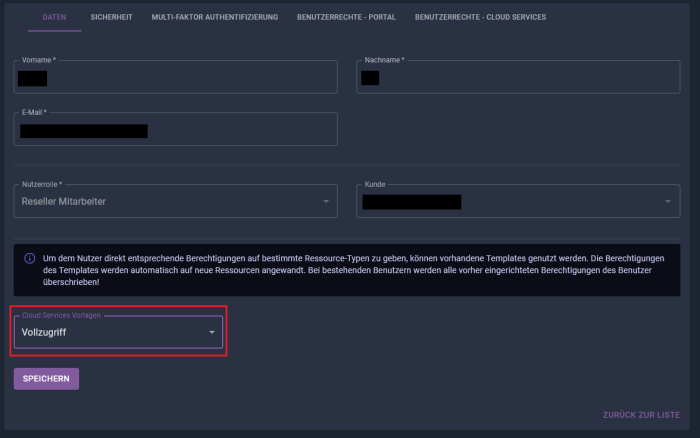
When assigning the role, access to the virtual machines is set once based on the templates; authorizations that have already been assigned are lost.
Once assigned, all future orders are granted permissions based on the role. You can individually adjust the permissions for existing systems at any time.
Pending tasks
This section displays pending orders where we need your feedback or where action is required.
This could, for example, involve downtime required for a vCore adjustment or a firewall license migration.
Group management
In group management you have the option of dividing your customers' virtual computers into different groups.
You can use this to shut down or reset virtual computers together, for example.
In the Group Members tab you can see the existing groups and their members.

You can define additional groups using the Add Groups button and assign the respective resources to the groups using the All Objects tab.

Virtual Machines
Under Virtual Machines you can see all booked VMs and their status and variant.

Selecting the small square with an arrow on the right side takes you to direct control and detailed information about the respective virtual computer.
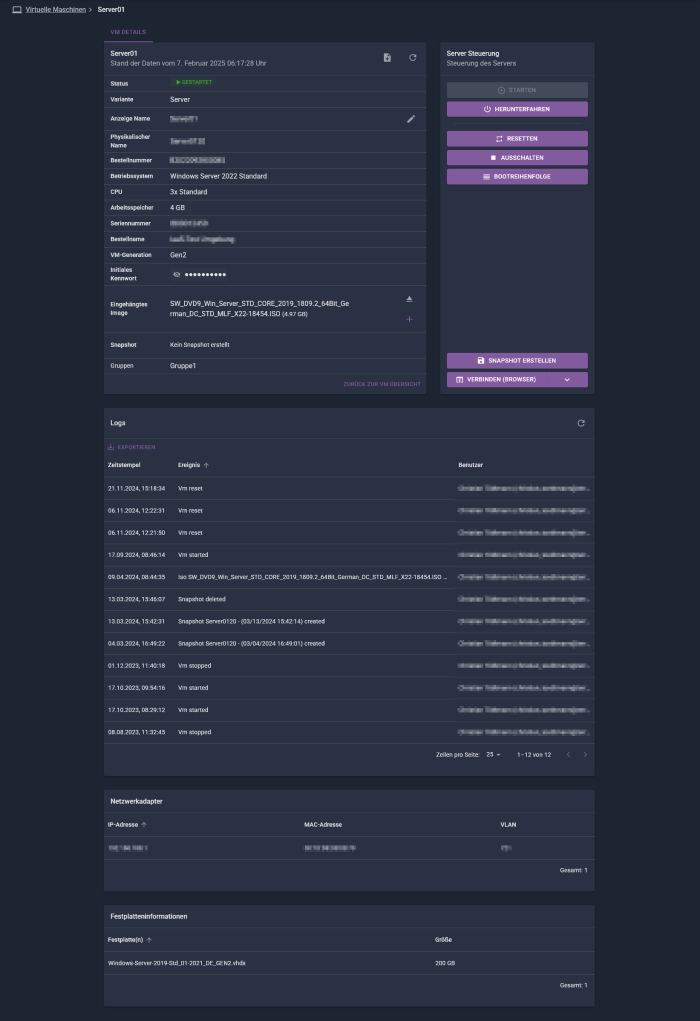
On this page, you can also view the current IP configuration and start, restart, shut down, reset, and turn off the VM.
The physical name of the VM was assigned by you during the order process and cannot be changed afterwards.
The display name, however, can be changed at any time.
As the password for the initial connection, please use the "Initial Password," which you can also find on this page.
Furthermore, on this page you have the option of creating a snapshot, If the feature has been booked, create a snapshot and set the boot order.
Note:
Please note that the snapshot function is only available for VMs with a maximum size of 2 TB (IaaS) or 5 TB (MIaaS).
In addition, a created snapshot is automatically deleted after 7 days.
Windows 11 VDIs generally do not offer the option to create snapshots.
Migration-VM
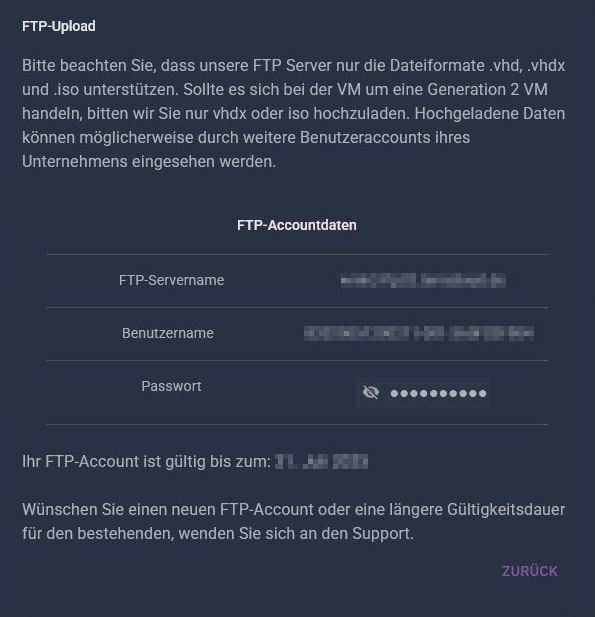
If you have booked a migration VM, you will find your FTP access data in the disk information section.
Please upload the ISO or VHD/VHDX files there and provide us with a brief response via the ticket.

Console connection
You have the option of establishing a direct console connection to the VM via a browser or RDP console.
This connection communicates directly with the VM via the Hyper-V host and works even if no active or correctly configured network card is connected to the respective VM.
Note:
To access the login screen after accessing the RDP connection, you normally have to press CTRL+ALT+DEL.
Unfortunately, this does not work in an RDP connection.
Please use CTRL+ALT+END instead.
Connect (Browser)
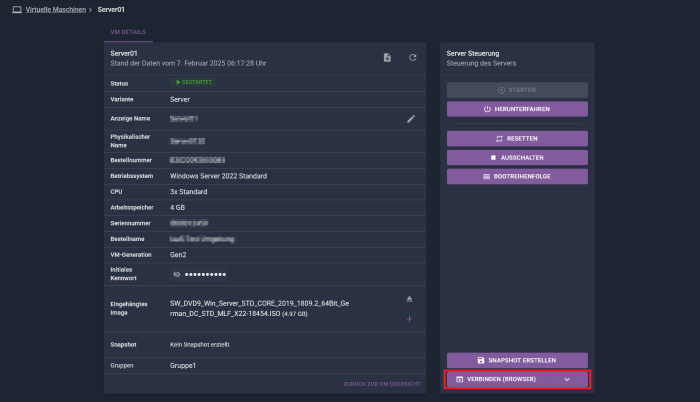
As of October 1, 2024, you will find a new console type on the virtual machines page in the Technical Center:
- Connect (Browser)
This is a new way to connect to the VM via the console using the browser.
This offers the following advantages:
- RDP is not required for the console connection, so Apple devices, for example, can also establish a reliable connection.
- It is possible to copy text to and from the VM.
There are the following restrictions:
- This feature is only supported for Windows systems.
- This feature is disabled as soon as an ISO is inserted.
- This feature is only supported for Windows systems.
When you open the browser console, another browser tab opens.
In this, you can see your VM and manage it as described in the normal console connection.
At the top left, you will find an icon with additional buttons:


- HTML5 ON/OFF
- Allows the use of older browsers without HTML 5 support
- Scale ON/OFF
- Optional scaling of the console output
- Text
- Used to copy text into the VM.
The text is copied directly into the previously selected text field in the VM.
- Used to copy text into the VM.
- Keyboard
- Opens a virtual Keyboard
- Clipboard
- Used to synchronize the clipboard between the VM and your local computer, allowing you to copy text to and from the VM.
Please note that this does not work on the Windows login screen.
- Used to synchronize the clipboard between the VM and your local computer, allowing you to copy text to and from the VM.
- Ctrl+Alt+Del
- Sends the keyboard shortcut CTRL+ALT+ENT to the VM.
- Disconnect
- Disconnects the browser console connection from the VM.
- Slider
- Use the slider to adjust the quality of the connection.
Mounting ISOs
You have the option of mounting an ISO to your VM.
To do so, click the plus symbol and select the appropriate ISO.
To eject the ISO, click the triangle symbol.
You can choose between two ISO types:
- ISOs provided by us
- Your own ISOs that you have previously uploaded
After clicking the plus symbol, a selection window will appear.
In the Public ISOs section, you will see the images we have provided.
If you would like to upload and mount your own ISO, please click Private ISOs.
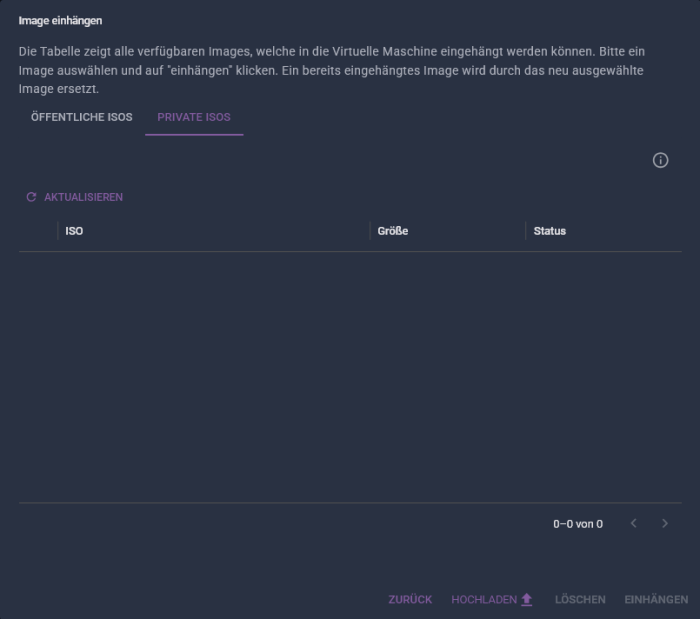
There, you can select an ISO from your local environment via the Upload option and start the upload.
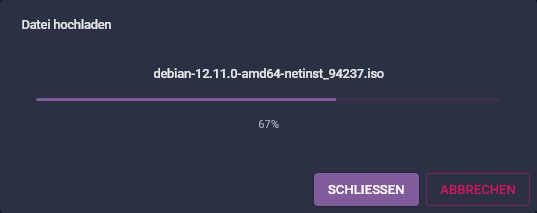
After the upload is complete, the ISO must be processed automatically in the background by us; for this purpose, the status changes to Processing.
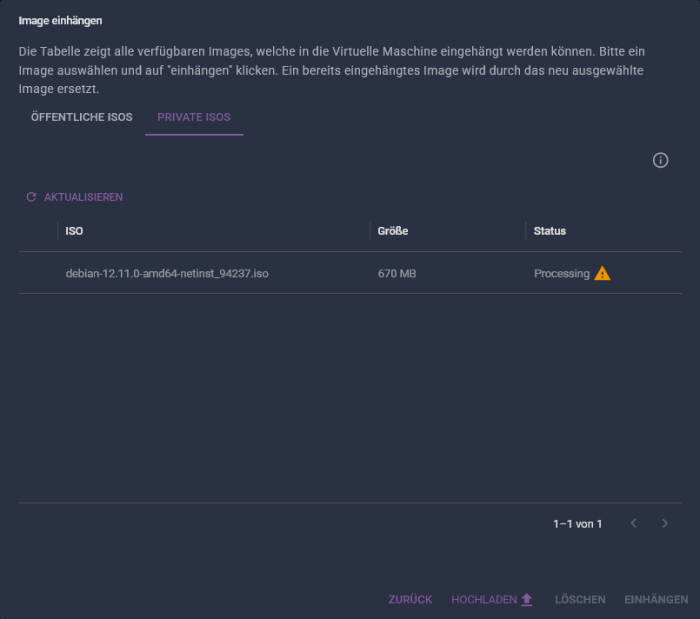
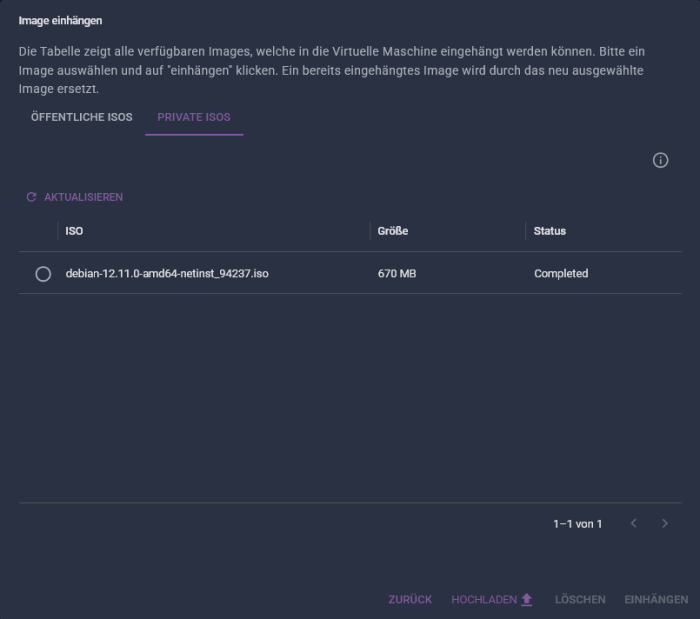
Only after this process has been successfully completed can you select and mount the ISO.
This process can take up to 15 minutes; you may need to refresh the view using the arrow button.
If an error occurs during processing, please contact us:
Email: support@terracloud.de
Phone: +49 5744 944-850
Note:
Regarding uploading your own ISOs, please note the following:
- The ISO must be a maximum of 10GB in size.
- You can upload up to 10 ISOs in total.
- The ISO name must not contain any special characters or umlauts.
- All ISOs you upload are available to every end customer.
- The total size of the ISOs must not exceed 20GB.
- The ISO name must be unique and should not contain special characters, as these may cause upload errors.
- If an ISO image hasn't been used for 6 months and isn't mounted at that time, we'll automatically delete it.
SecureBoot
You have the option to configure the SecureBoot of a VM yourself.
Requirements
The following requirements apply:
- The VM must be a Generation 2 VM.
- The VM must be disabled to configure SecureBoot.
- This feature can only be used for VMs that we have preinstalled.
Implementation
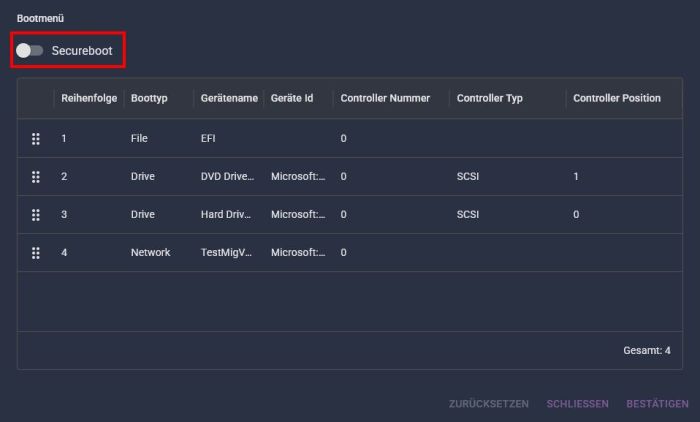
To configure SecureBoot, open the boot options in the TERRA CLOUD Technical Center.
Here, you'll find the option to customize SecureBoot in the top left corner.
TERRA Management
TERRA Management is used to manage physical systems (servers, PCs, and notebooks) running Windows operating systems via a central dashboard.
Please see the separate Wiki article for more information.
S3 Storage
After you have booked the SaaS service S3 Storage in the Terra Cloud Center, you will find the S3 section in the Technical Center.
In this section, you can manage your existing S3 buckets, delete them, and create new ones.

Note:
This menu item is already visible beforehand, but is only activated after the commercial booking.
Create S3 Bucket
If you want to create a new S3 bucket, please use the corresponding button in the top left corner of the S3 page in the Technical Center.
A dialog box will then appear where you must enter/select various information:
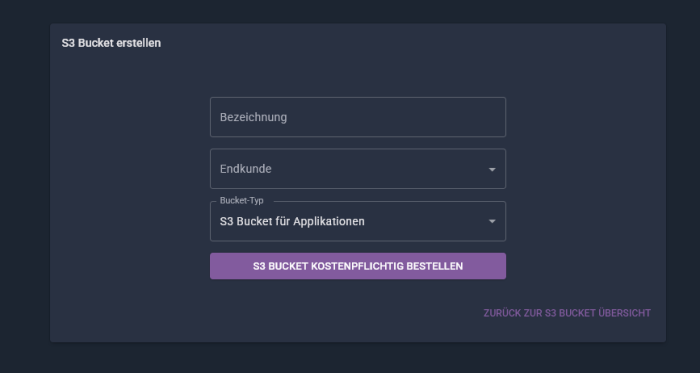
Designation
This is a freely selectable name for the S3 bucket to be created. This name can be changed at any time.
End customer
Here you must select the end customer for whom the S3 bucket should be created. This can also be changed later.
Bucket type
Under Bucket Type, you can choose between two different bucket types:
S3 Bucket for Application
This is an S3 bucket with enabled object lock and versioning.
This is optimized for Veeam, Synology, and QNAP backups.
S3 Bucket for Data Archive
Not every system or software supports S3 buckets with the above-mentioned features.
Therefore, there is a second bucket type that does not offer this feature.
Manage S3 Bucket
After you have created the S3 bucket, it will appear in your S3 overview after a short time.
You may need to refresh the browser page.
After selecting the S3 bucket, you will receive further information about your S3 bucket.
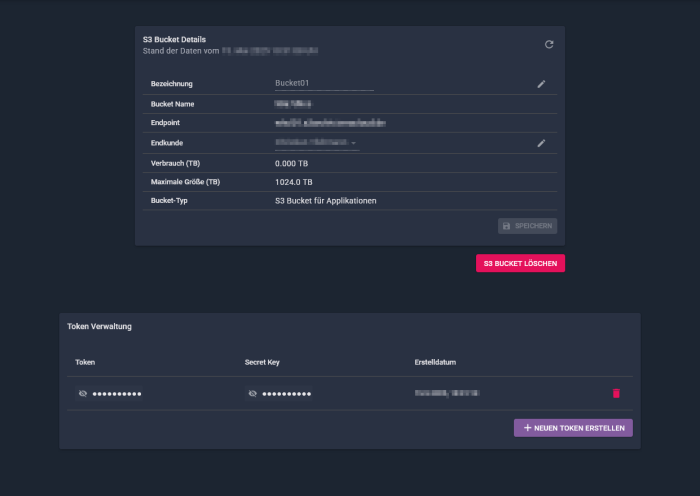
In the upper area, you can see the details of the bucket itself.
Here, you can use the respective pencil icons to change the bucket name and the assigned end customer.
You will also find information about the endpoint and current consumption.
The latter is currently not updated automatically; you must use the arrow icon in the top right for this.
In the area below, you can see the token you need to connect to the bucket.
Here, you have the option to delete the existing token or create a second one.
In the lower area You will find an overview of consumption values for the selected S3 bucket.
On the main S3 Buckets page, you will also find consumption values, which are presented here in an overview for all existing S3 buckets.

If you want to delete your S3 bucket, please use the corresponding button, which you will see in the S3 bucket details.
The displayed code must be entered manually for confirmation.
Connect S3 Bucket
To connect to the S3 bucket, you need the following information from the Terra Cloud Technical Center:
Endpoint
This is the server address through which your S3 bucket can be reached.
Token and Secret Key
These are the credentials for the connection, comparable to a username and password.
You can create up to two tokens and secret keys.
Note:
For the connection to work, the correct S3 protocol must be selected in your program.
It is usually referred to as Custom S3 or S3 Compatible Storage.
Connection examples
Proxmox Backup Server
Below, we describe how to integrate our TERRA CLOUD S3 storage into Proxmox using Proxmox Backup Server 4.1.0 as an example.
- Open the Proxmox Backup Server web interface and go to Configuration --> S3 Endpoints.
- * Fill in the fields as follows:
- S3 Endpoint ID: Bucket Name
- Endpoint: Enter endpoint
- Port: Leave blank
- Path Style: Check the box
- Region: Leave blank
- Access Key: Enter Terra Token
- Secret Key: Enter Terra Secret Key
- Fingerprint: Leave blank
- Add the S3 bucket via Datastore --> Add Datastore
- Name: (freely selectable)
- Datastore Type: S3 (tech preview)
- Local Cache: /var/cache/terra
- The terra folder must be created in the file system beforehand
- S3 Endpoint ID: Select endpoint from previous configuration
- GC Schedule: Select appropriate
- Prune Schedule: appropriate Select
- Bucket: If the previous information was correct, you can select your bucket here.
QNAP
- Open the WebGUI of your QNAP NAS and launch the HBS tool.
- On the left side, find the Storage Locations option; click Create.
- Select Amazon S3 & S3 Compatible and enter the information for your S3 bucket.
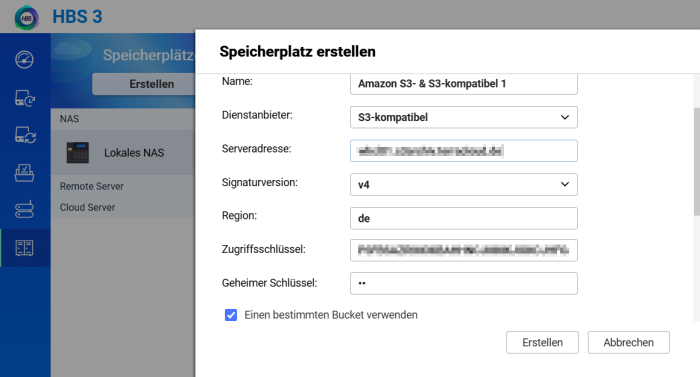
- In the next step, select the source folder.
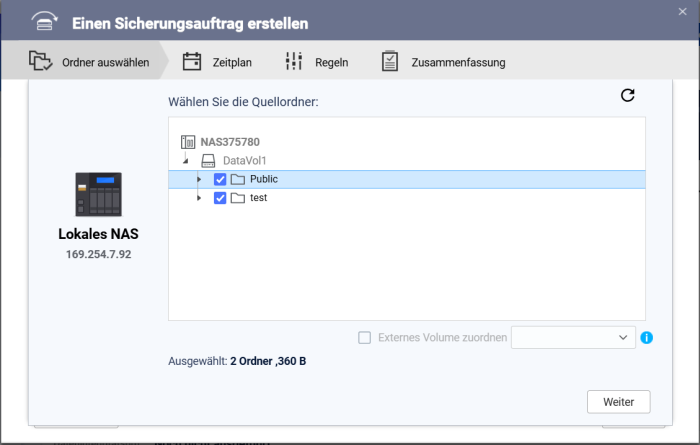
- Next, select the destination storage location. Since you previously linked an S3 bucket, you can select it here.
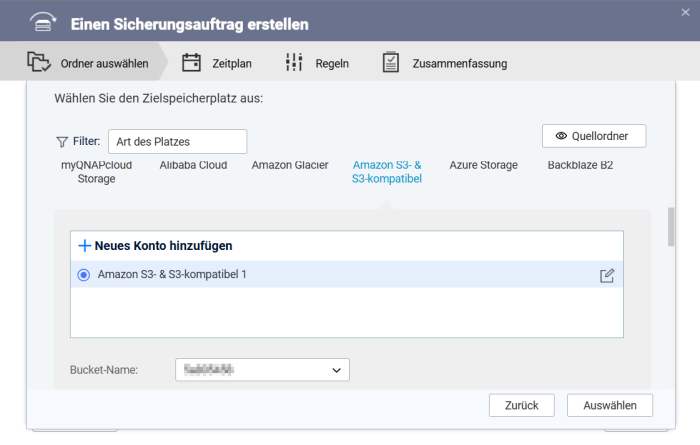
- Select the target folder for your S3 storage or S3 bucket from the tree structure. You can also create a new subfolder here.
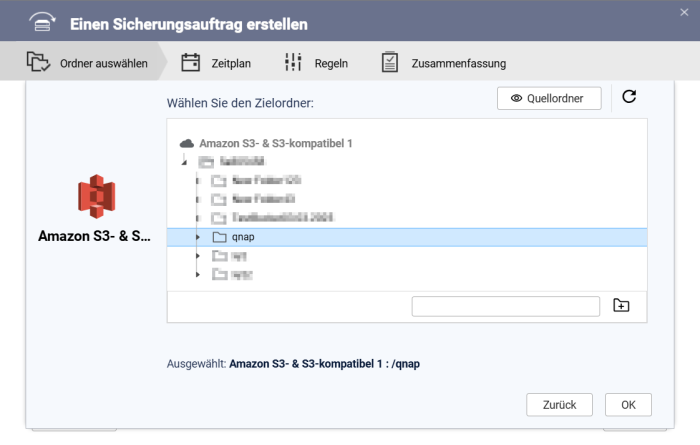
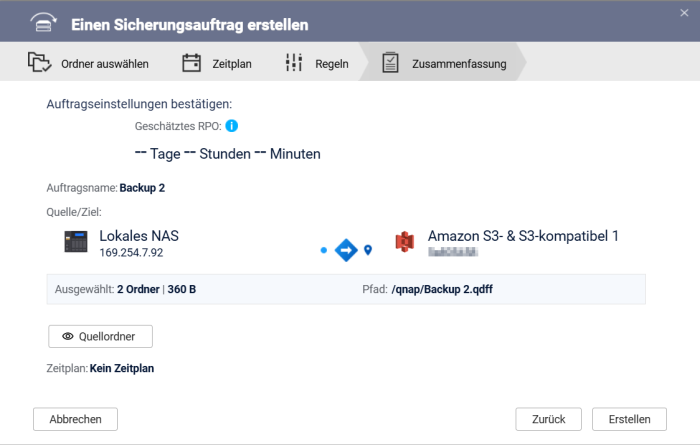
- In the next step, you can assign a name to the backup job and get an overview.
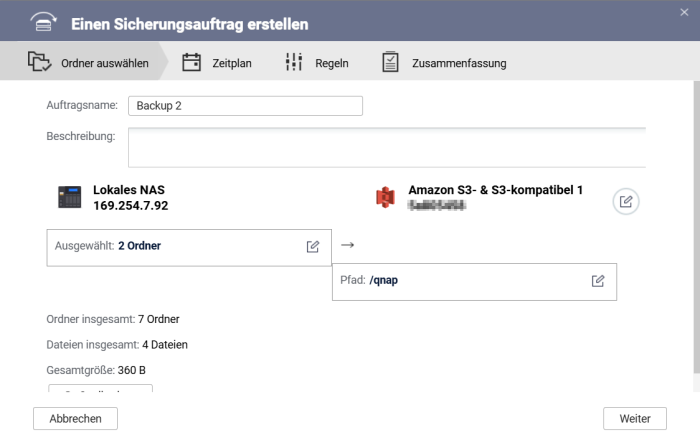
- You then have the option to configure a schedule.
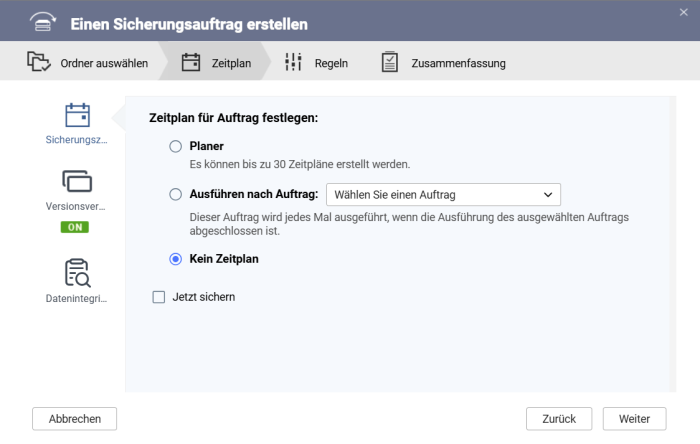
- In the final step, you will receive a summary of your created backup job.
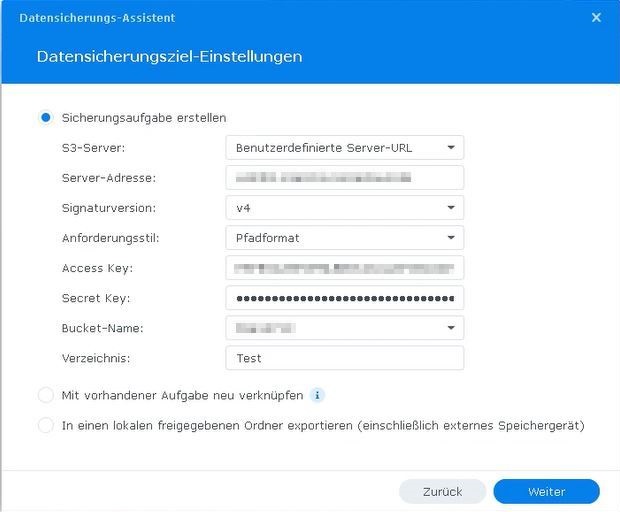
Synology
- Install the Hyper Backup extension
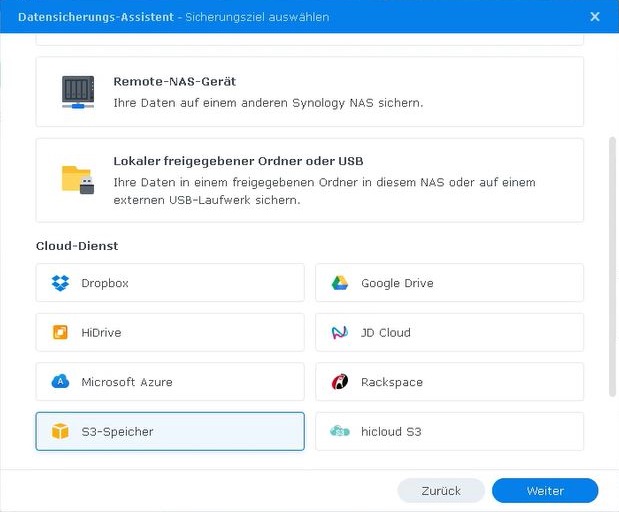
- Then, open the installed extension, which will launch the Synology Backup Wizard. Here, select S3 storage.
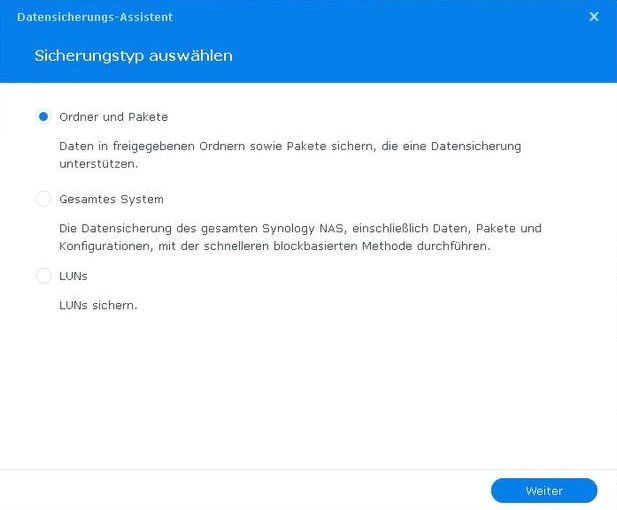
- Select Folders and Packages.
- Then select Create Backup Task and enter all necessary information for the S3 bucket.
Veeam
The following Link will take you to the manufacturer's website, where you will find detailed documentation on connecting an S3 bucket and subsequently configuring/setting up replication.
Support
If you ever need help with an S3 bucket, please contact us at Terra Cloud Support via email (support@terracloud.de)
or via our hotline (+49 (0) 5744 944-850).
So that we can help you as quickly as possible, please always provide us with a description of the error and the unique bucket name.
Veeam Data Protection
In this area you will find the initial access data for your Veeam Data Protection as well as the current consumption values.
Licenses
In the licenses area you can view booked CSP licenses and, among other things, deactivate auto-renewal.
For detailed information, please see the CSP section of the TerraCloud Wiki.
Backup
In this section you will find all information about your backup accounts.
Dashbord
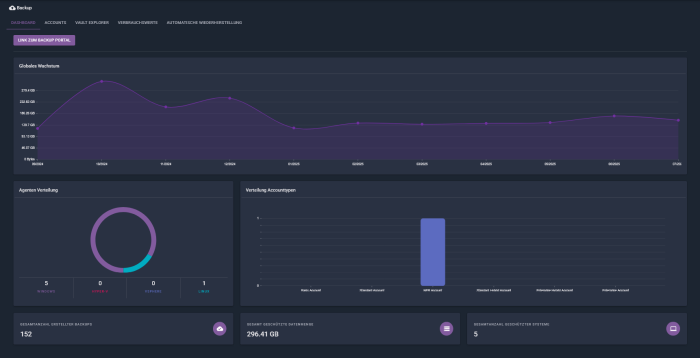
The dashboard provides an overview of your global growth, as well as data on agent and account type distribution,
as well as the number of backups, protected data volume, and protected systems.
In the upper area, you can access the Backup Portal using the button.
Accounts
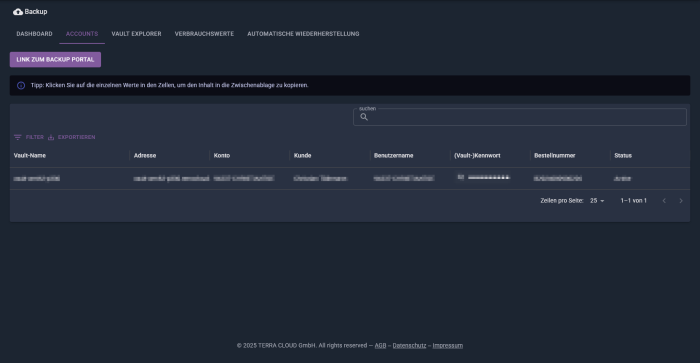
Under Accounts, you can see all booked accounts, along with their Vault credentials and status.
Here, too, you'll find a button that takes you to the Backup Portal.
Vault Explorer
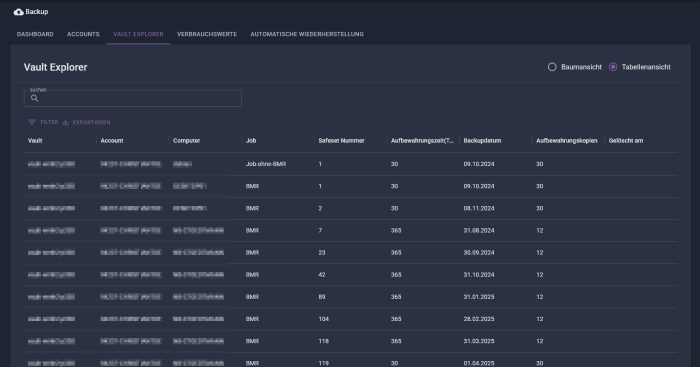
In the Vault Explorer, you can browse your vault, allowing you to view all existing computers, their jobs, and the safesets stored there.
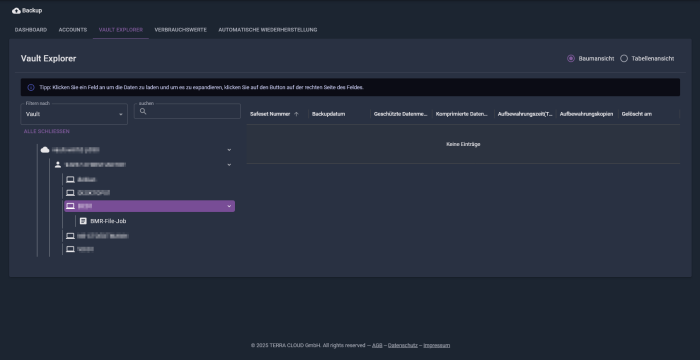
If you switch to the table view, you can also export it as a .csv file.
Note:
This display may be delayed by up to 8 hours depending on the overall Terra Cloud backup volume.
Consumption Values
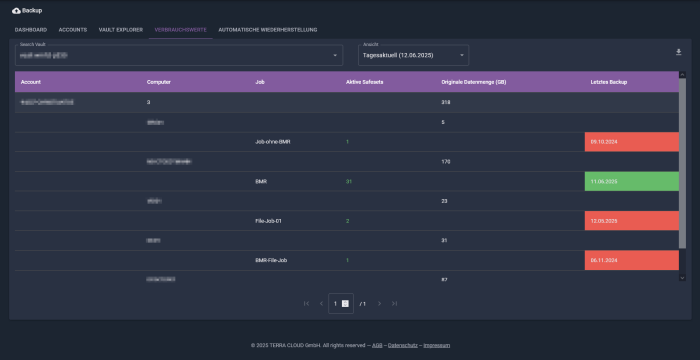
In the Consumption Values section, you can see your current daily consumption on the Terra Cloud Vault.
In the future, you will also find a monthly report on your backups here.
Note:
Again, depending on the overall Terra Cloud backup volume, the update of this display may be delayed by up to 8 hours.
Automatic Restore
If you have attended our Terra Cloud Backup Certified Specialist training, you can obtain a license for the ABSRT tool from us upon request.
With this tool, you have the option of performing test backups on a local Hyper-V server.
Please see our separate wiki article.
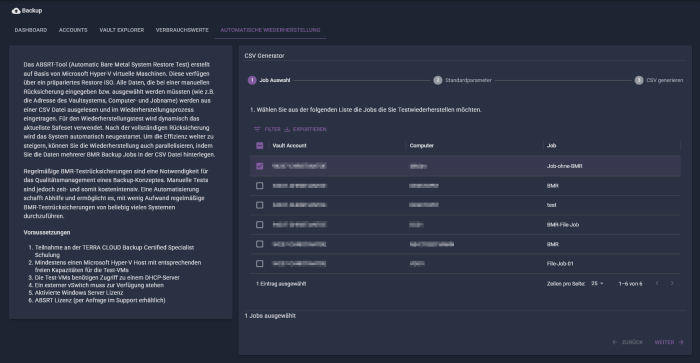
To make working with this tool easier, you can automatically create the appropriate .csv file in this area.
To do this, proceed as follows:
- Select the appropriate jobs you want to back up for testing.
- Then set the default parameters.
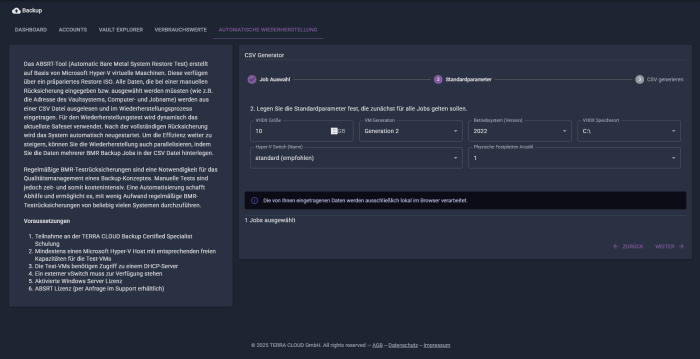
- These default parameters can be applied to all jobs in the next step.
Alternatively, you can also assign or change individual parameters.
- In the final step, you can download the finished .csv file and use it for your ABSRT tool.
Note:
All data entered here will be processed exclusively locally in your browser and will not be transferred to us in the Terra Cloud.
Managed IaaS
Under Managed IaaS you will find the administration for booked Managed IaaS environments.
Tickets
Under Tickets, you will find an overview of all tickets created.
In the future, pending tickets where we are waiting for downtime from you will also be listed here.
Create tickets
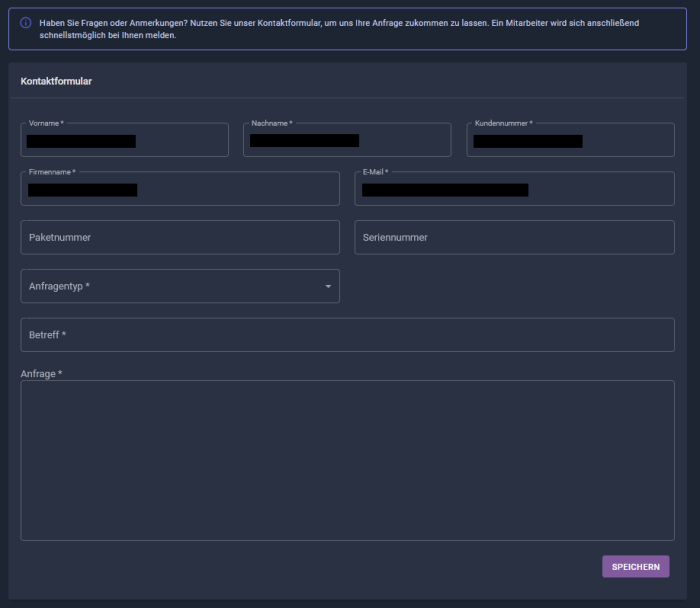
Both at the top and in some tabs of the Technical Center you will see the icon for creating tickets.

After the button has been clicked, a context-related email can be created, which is automatically sent with all information to Support@terracloud.de.
A suitable ticket is automatically opened in our support department.
Protocol
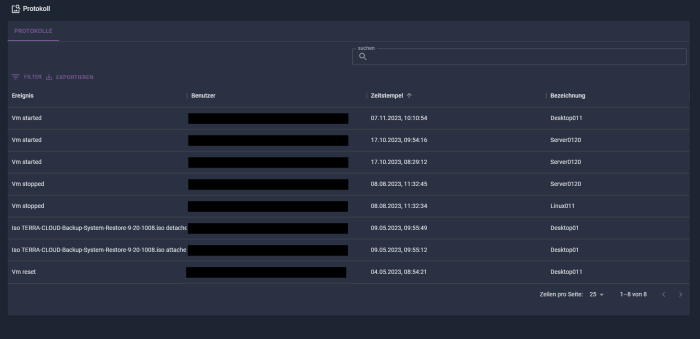
Logs (recent events) can be viewed on the logs page. The search function includes a full-text search that searches across all columns.
Partner Ranking
This overview offers you the opportunity to track your cloud performance and ranking in comparison to other cloud partners.
Show messages
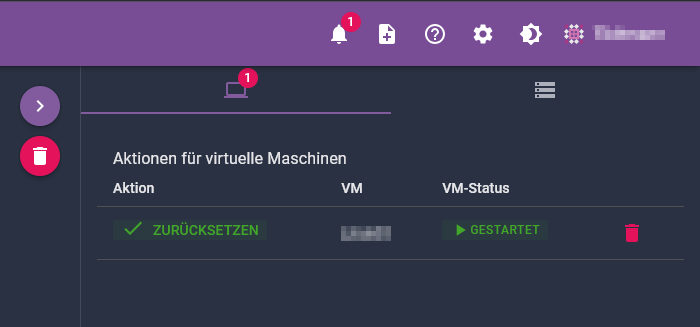
At the top right, you'll find a notification icon.
Here, you'll see current events from virtual machines and TERRA Management performed by the logged-in user.
Help
On the help page you will find various directly linked wiki articles, as well as information on how to reach our Terracloud support.
You will also find an overview of the changes to the Technical Center here.

Settings
In this area you can set your preferred language, date and time format and the number of table rows per page.
Here are the available choices:
- Language: English || German || French || Polish.
- Date format: dd.mm.yyyy || mm.dd.yyyy || yyyy-mm-dd || dd/mm/yyyy || mm/dd/yyyy
- Time format: 24h || 12h
- Time zone: UTC+13 to UTC-11
- Table rows per page: 5 || 10 || 25 || 50 || 100 || 250
These options allow you to customize the interface and display preferences to suit your individual needs.

