IaaS Erste Hilfe/en: Unterschied zwischen den Versionen
Übernehme Bearbeitung einer neuen Version der Quellseite |
Die Seite wurde neu angelegt: „# Enter the following command to start Diskpart:<br><code>diskpart</code> # List the available disks:<br><code>list disk</code> # Identify the disk containing the Windows installation based on the displayed size. # Select the appropriate disk:<br><code>select disk <disk number></code> # Then, list the available volumes:<br><code>list volume</code> # Identify the volume where Windows is installed. # Select the appropriate volume:<br><code>select volu…“ |
||
| Zeile 111: | Zeile 111: | ||
*What type of VPN do you use (SSL VPN, IPSec IKEv2, etc.)? | *What type of VPN do you use (SSL VPN, IPSec IKEv2, etc.)? | ||
*What software or hardware do you use to establish the VPN connection? (OpenVPN Client, Cloud Connector, etc.) | *What software or hardware do you use to establish the VPN connection? (OpenVPN Client, Cloud Connector, etc.) | ||
< | <span id="Das_Administrator-Kennwort_einer_Windows-VM_ist_verloren_gegangen."></span> | ||
== | == The administrator password for a Windows VM has been lost. == | ||
If the stored administrator password is no longer available, it can be reset using a workaround.<br> | |||
The following instructions describe the necessary steps, using an IaaS VM and Windows Server 2025 as an example. | |||
<span id="Windows_Server-ISO_einhängen"></span> | |||
< | === Mount Windows Server ISO === | ||
=== Windows Server | |||
# Log in to the [https://manage.terracloud.de TERRA CLOUD Technical Center]. | |||
# | # In the left-hand menu, under "Products," open the "Virtual Machines" section. | ||
# | # Select the relevant virtual machine. | ||
# | # In the VM details, click the plus icon under "Mounted Images." | ||
# | # Select a current Windows Server 2025 ISO. | ||
# | # Click "Mount" and confirm the action. | ||
# | <span id="VM_von_der_Windows_Server-ISO_starten"></span> | ||
< | === Boot the VM from the Windows Server ISO === | ||
=== VM | |||
# Start the virtual machine using the previously mounted Windows Server ISO. | |||
# | # In the subsequent windows, select the desired language and keyboard layout, clicking "Next" for each step.<br>[[Datei:DE-Password Reset-1.png|900px|center|mini|border]]<br>[[Datei:DE-Password Reset-2.png|900px|center|mini|border]] | ||
# | # In the Windows Setup screen that appears next, select the "Repair your computer" option.<br>[[Datei:DE-Password Reset-3.png|900px|center|mini|border]] | ||
# | # Click "Next" and select the appropriate keyboard layout again. | ||
# | # The "Choose an option" screen will then appear. Select "Troubleshoot".<br>[[Datei:DE-Password Reset-4.png|900px|center|mini|border]] | ||
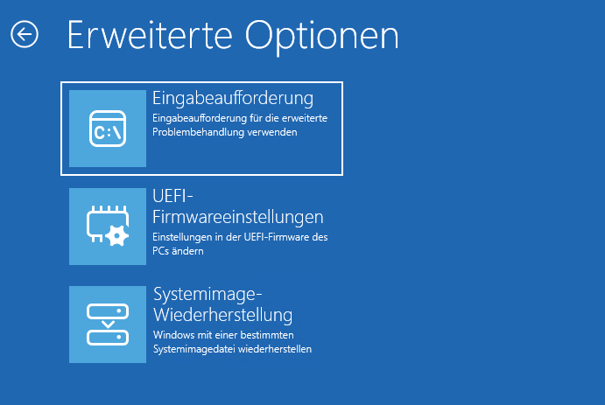
# | # Next, open the "Command Prompt".<br>[[Datei:DE-Password Reset-5.png|900px|center|mini|border]] | ||
# | <span id="Windows-Partition_mit_Diskpart_ermitteln"></span> | ||
< | === Identify Windows partition using Diskpart === | ||
=== Windows | |||
# Enter the following command to start Diskpart:<br><code>diskpart</code> | |||
# | # List the available disks:<br><code>list disk</code> | ||
# | # Identify the disk containing the Windows installation based on the displayed size. | ||
# | # Select the appropriate disk:<br><code>select disk <disk number></code> | ||
# | # Then, list the available volumes:<br><code>list volume</code> | ||
# | # Identify the volume where Windows is installed. | ||
# | # Select the appropriate volume:<br><code>select volume <volume number></code> | ||
# | # Assign an available drive letter to the volume if necessary:<br><code>assign letter=<drive letter></code> | ||
# | # Finally, exit Diskpart:<br><code>exit</code> | ||
# | <span id="Die_Datei_„utilman.exe“_vorbereiten"></span> | ||
< | === Preparing the "utilman.exe" file === | ||
=== | |||
# Switch to the partition where Windows is installed. | |||
# | # Then navigate to the Windows directory and into the "System32" subdirectory. | ||
# | # Rename the file "utilman.exe" using the following command:<br><code>ren utilman.exe utilman.old</code>. | ||
# | # To replace "utilman.exe" with a copy of "cmd.exe", run the following command:<br><code>copy cmd.exe utilman.exe</code> | ||
# | # Then close the Command Prompt. | ||
# | # The "Choose an option" window will appear again. | ||
# | # Click "Continue". | ||
# | # The VM will then restart. Allow the normal boot process to complete fully. | ||
# | |||
< | <span id="Administrator-Kennwort_neu_setzen"></span> | ||
=== | === Reset administrator password === | ||
# After restarting, open the Windows sign-in screen. | |||
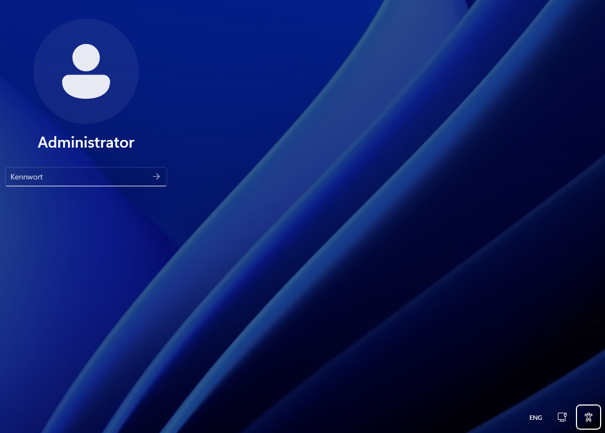
# | # Click the accessibility icon in the bottom-right corner. Instead of the utilman.exe window, cmd.exe opens.<br>[[Datei:DE-Password Reset-6.png|900px|center|mini|border]] | ||
# | # To change the password, use the following command:<br><code>net user Administrator NEW_PASSWORD</code> | ||
# | # Close the Command Prompt. | ||
# | # Log in to the server using the newly set administrator password. | ||
# | # Verify that the login is successful. | ||
# | <span id="Die_Datei_„utilman.exe“_wiederherstellen"></span> | ||
< | === Restore the "utilman.exe" file === | ||
=== | |||
After successfully changing the administrator password, the changes made during the recovery process must be reverted.<br> | |||
# Restart the VM from the Windows Server ISO, open a command prompt, and reassign a drive letter to the appropriate drive if necessary. | |||
# | # Switch back to the Windows partition and then navigate to the ''Windows\System32'' directory. | ||
# | # Restore the original ''utilman.exe'' file using the following command:<br><code>copy utilman.old utilman.exe</code>. | ||
# | # Verify that the original file has been successfully restored. | ||
# | # Close the command prompt by typing:<br><code>exit</code> | ||
# | # Open the affected VM in the TERRA CLOUD Technical Center and detach the Windows Server ISO. | ||
# | # Then, restart the VM. | ||
# | # After the restart, log in using the newly set administrator password. | ||
# | |||
Aktuelle Version vom 23. September 2026, 12:27 Uhr
On this page we would like to provide you with assistance in the area of IaaS so that you can act quickly in an emergency.
If you are missing a point, please give us feedback:
Support@terracloud.de.
IaaS order is pending
If your IaaS order is stuck, one reason may be the missing Securepoint link in the Technical Center.
This must be done at both the reseller and end customer level.
This also applies to NFR orders.
Please see the following wiki article:
VM no longer starts up
In order to get back to work as quickly as possible, two employees should work through the following steps in parallel:
Employee 1
An employee can attempt to boot the OS into recovery mode and perform a repair using the installation ISO.
Implementation:
- Log in to the Technical Center.

- Navigate to Virtual Machines.

- Select the respective package and VM.
- Insert the appropriate installation ISO and check the boot order using the respective button.


- Open the console connection and boot from the installation ISO.

- You can then try to repair the existing installation.
Note: If you do not have authorization to access the above points, please contact the colleague who was created as Reseller Admin in the Technical Center.
Employee 2
The other employee should book a DR-VM (Disaster Recovery VM) in parallel so that the restore from the Terra Cloud Backup can be carried out in parallel.
This has the advantage that a restore can be started while employee 1 is attempting to repair.
This way you don't waste any time if employee 1 is not successful.
Note:
If you use another backup solution, e.g. Acronis or Veeam Backup, a different approach such as Mig-VM (Migrations VM) may be necessary.
Implementation:
- Log in to the Terra Cloud Center.

- Navigate to your customer in the appropriate IaaS/MIaaS package.

- Add another VM there. Please pay attention to the following:

- Same configuration as the original VM
- Other name e.g. SRV-DC-New or SRV-DC-DR
- Operating system: Disaster Recovery VM Windows
- Same configuration as the original VM

- Please pay attention to the correct generation of the VM here.
This is not about the generation of the IaaS package, which refers to the underlying hardware, but about the VM generation.
If you are not sure, book two DR VMs, one with generation 1 and one with generation 2.
The wrong VM can be canceled later.
- Please pay attention to the correct generation of the VM here.

- Save the order and wait for notification from us that the DR VM is ready.
- Please make sure that you always save from right to left' and only click on the save button once.
- Please make sure that you always save from right to left' and only click on the save button once.
- Navigate to the Technical Center and Virtual Machines.
- Select the respective package and VM.
- Open the console connection and then follow the following instructions: Perform a restore
Note: If you do not have authorization to access the above points, please contact the colleague who was created as Reseller Admin in the Technical Center.
Control VM
The latest VM status is not displayed in the Technical Center.
It may happen that you do not always see the most current status of your VM in the Technical Center.
This can also mean that it is not possible to control the VM and you receive an error message:
Error changing status [..]
To solve both, you must update the VM status.
You will find an arrow symbol in the top right for this.

<br
When I access a Windows VM via console connection, the CTRL+ALT+DEL keyboard shortcut doesn't work.
Our Terra Cloud is based on Hyper-V. In a Hyper-V console connection, the key combination CTRL+ALT+END is used instead of CTRL+ALT+DEL.
My VM is having performance issues.
The cause of poor performance can be very diverse.
Therefore, we need to get precise information about the problem from you.
Please write us an email at support@terracloud.de and answer the following questions:
- Which VM is affected by the issue? (All VMs, all terminal servers, SQL etc.)
- How does the problem manifest itself? Please explain in detail (with screenshots if necessary).
- Is there a dependency on another system? (E.g. access to a database;
- How is the other system connected OnPremise <-> Cloud?)
- When exactly do the problems occur? (please state exact time/period)
- Has anything been changed in the system? (More users, different programs, etc.)
- Were updates installed and did the problem occur afterwards? If so, is it perhaps a known problem?
- What troubleshooting options have you already carried out?
- Are or were there any interruptions in the connection?
- Is access via RDP, console (Technical Center), TeamViewer etc.?
- What type of VPN do you use (SSL VPN, IPSec IKEv2, etc.)?
- What software or hardware do you use to establish the VPN connection? (OpenVPN Client, Cloud Connector, etc.)
The administrator password for a Windows VM has been lost.
If the stored administrator password is no longer available, it can be reset using a workaround.
The following instructions describe the necessary steps, using an IaaS VM and Windows Server 2025 as an example.
Mount Windows Server ISO
- Log in to the TERRA CLOUD Technical Center.
- In the left-hand menu, under "Products," open the "Virtual Machines" section.
- Select the relevant virtual machine.
- In the VM details, click the plus icon under "Mounted Images."
- Select a current Windows Server 2025 ISO.
- Click "Mount" and confirm the action.
Boot the VM from the Windows Server ISO
- Start the virtual machine using the previously mounted Windows Server ISO.
- In the subsequent windows, select the desired language and keyboard layout, clicking "Next" for each step.
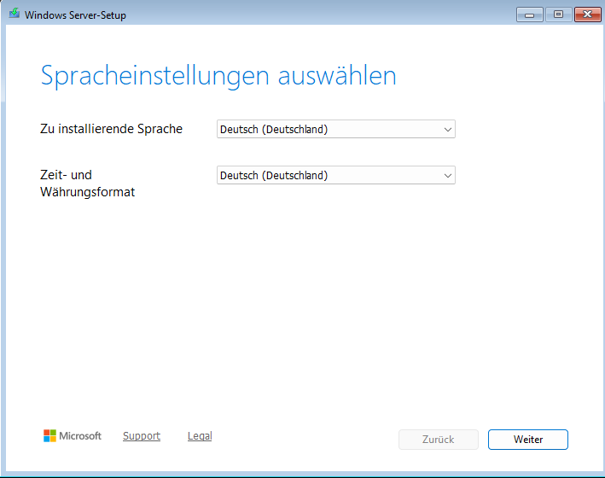
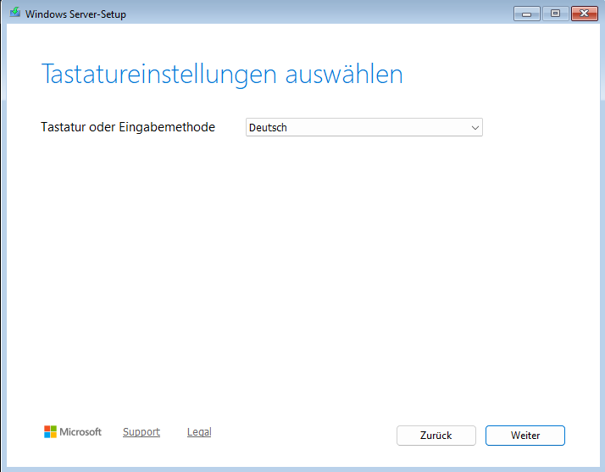
- In the Windows Setup screen that appears next, select the "Repair your computer" option.
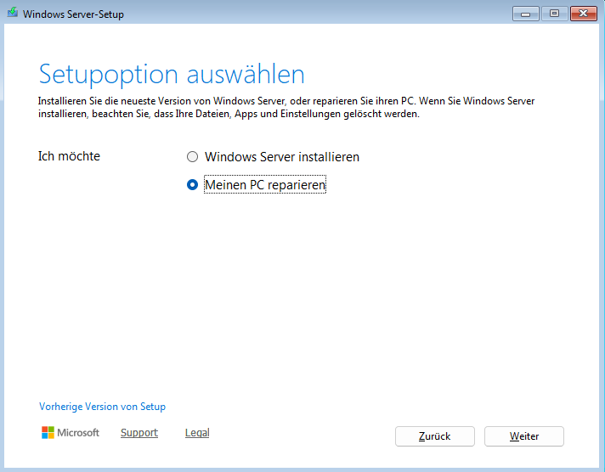
- Click "Next" and select the appropriate keyboard layout again.
- The "Choose an option" screen will then appear. Select "Troubleshoot".
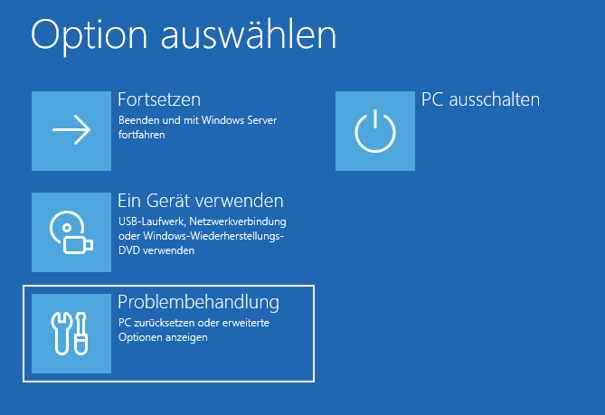
- Next, open the "Command Prompt".


Identify Windows partition using Diskpart
- Enter the following command to start Diskpart:
diskpart - List the available disks:
list disk - Identify the disk containing the Windows installation based on the displayed size.
- Select the appropriate disk:
select disk <disk number> - Then, list the available volumes:
list volume - Identify the volume where Windows is installed.
- Select the appropriate volume:
select volume <volume number> - Assign an available drive letter to the volume if necessary:
assign letter=<drive letter> - Finally, exit Diskpart:
exit
Preparing the "utilman.exe" file
- Switch to the partition where Windows is installed.
- Then navigate to the Windows directory and into the "System32" subdirectory.
- Rename the file "utilman.exe" using the following command:
ren utilman.exe utilman.old. - To replace "utilman.exe" with a copy of "cmd.exe", run the following command:
copy cmd.exe utilman.exe - Then close the Command Prompt.
- The "Choose an option" window will appear again.
- Click "Continue".
- The VM will then restart. Allow the normal boot process to complete fully.
Reset administrator password
- After restarting, open the Windows sign-in screen.
- Click the accessibility icon in the bottom-right corner. Instead of the utilman.exe window, cmd.exe opens.
- To change the password, use the following command:
net user Administrator NEW_PASSWORD - Close the Command Prompt.
- Log in to the server using the newly set administrator password.
- Verify that the login is successful.

Restore the "utilman.exe" file
After successfully changing the administrator password, the changes made during the recovery process must be reverted.
- Restart the VM from the Windows Server ISO, open a command prompt, and reassign a drive letter to the appropriate drive if necessary.
- Switch back to the Windows partition and then navigate to the Windows\System32 directory.
- Restore the original utilman.exe file using the following command:
copy utilman.old utilman.exe. - Verify that the original file has been successfully restored.
- Close the command prompt by typing:
exit - Open the affected VM in the TERRA CLOUD Technical Center and detach the Windows Server ISO.
- Then, restart the VM.
- After the restart, log in using the newly set administrator password.